Many Windows 11 users are not happy or uncomfortable with its new modified right-click context menu. It is because Microsoft has replaced the old classic context menu which was in Windows 10 as well with a new one to reduce its density, and moving many options to the “Show more options” submenu.
However, this has made many users feel crazy, well, if you are one of them then here is a simple way to restore the classic right-click context menu back using just a single command.
To get the old context menu when we click somewhere on Win 11 Desktop, we just need to run a single command in Windows Terminal (Admin that will edit some values in the registry.
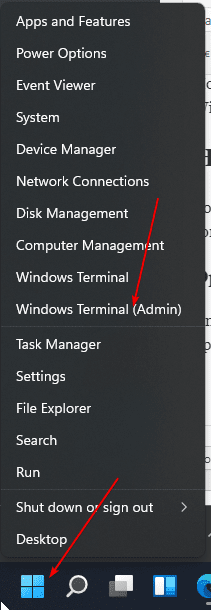
1. Open Windows Terminal (Admin)
On your Win 11 OS, right-click on the Start button and select “Windows Terminal (Admin)” from the pop-up menu.

Now, on your Windows terminal, paste the below-given command and hit the Enter key. This will edit some value in the OS registry to get back the old context menu like Windows 10.
reg.exe add “HKCU\Software\Classes\CLSID\{86ca1aa0-34aa-4e8b-a509-50c905bae2a2}\InprocServer32” /f
3. Restart File Explorer Service
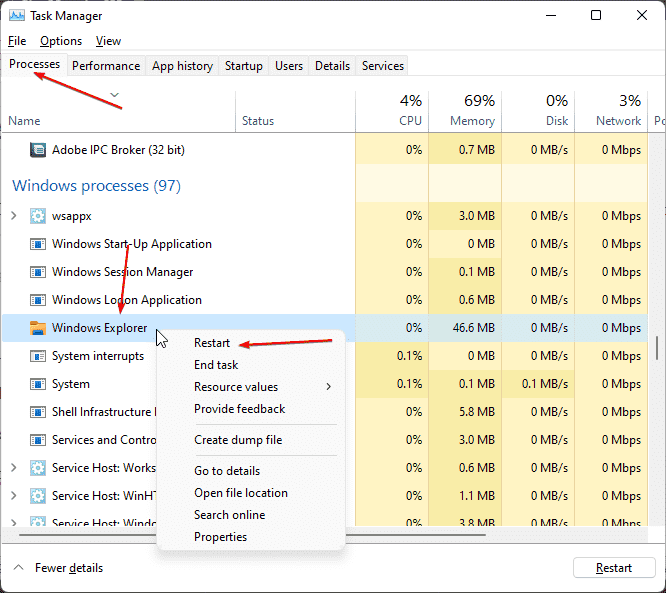
To apply the changes we have done using the above command, we need to restart the Explorer service on your Win 11. For that, we can either use Task Manager or Windows terminal (which already opened).
Using Windows Terminal (Admin)
First Run:
taskkill /f /IM explorer.exe
Then type the next command to start the Windows explorer service again. In case, you want to switch between apps before starting the explorer service, use – Alt+Tab keys.
start explorer.exe
Using Task Manager (GUI)
• Right, Click on the Start button.
• Select “Task Manager”
• Go to Processes Tab
• Find Process- Windows Explorer
• Right-click on it and select the Restart option.

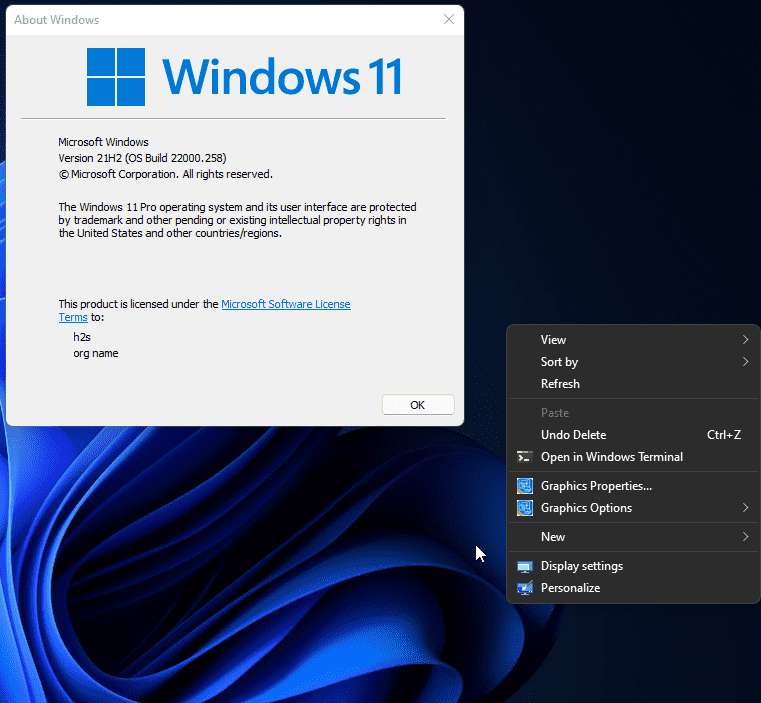
4. Check out Windows 10 like Classic Context Menu
That’s it, you already have the old Context menu on your system. To confirm right-click anywhere on your Desktop to open the menu.

5. Restore or get back Windows 11 default Menu
Well, in the future if you think that you want your Windows 11 default Context Menu back then, again right-click on the “Start menu” open Windows Terminal, and run the below-given command:
reg.exe delete “HKCU\Software\Classes\CLSID\{86ca1aa0-34aa-4e8b-a509-50c905bae2a2}” /f
After running the command, don’t forget to restart the Explorer service using Step 3 given in this article.
Related Posts
How to Install Django on Windows 11 or 10
How to open HEIC images on Windows for free
How to install Server Manager Windows 11 or 10
Install Remote Server Administration (RSAT) Tools for Windows 11 or 10
Get back the Missing Show Desktop icon in Windows 11
Get Missing Hibernate Button Back on Windows 11 using CMD