If you need to organize data in a tabular form, there is nothing better than doing that in a spreadsheet. When it comes to spreadsheet programs, Microsoft Excel is the most popular one, however, Google Sheets has also earned a lot of popularity among a number of users in the recent days for the flexibility to work on it from anywhere. But even after organizing everything in a tabular form, you sometimes need to print the same out, which can be done by the conventional method. Depending upon the number of tables, you might need several sheets of paper to print the entire spreadsheet.
However, at times, you might need to print a part of the spreadsheet, and you can do that with both Microsoft Excel and Google Docs by tweaking a small setting at the time of printing the spreadsheet. Apart from printing, the tutorial will also be applicable, if you want to save a certain part of a spreadsheet as a PDF document, using a PDF printer. The ability to print certain parts of a spreadsheet can surely come in handy in a number of real-life situations, both for your official, as well as your personal requirements.
So, without any further delay, let’s get started with, how you can print a certain area of a spreadsheet using Microsoft Excel and Google Docs.
Print selected cells in Microsoft Excel
Step 1: Open the spreadsheet on Microsoft Excel, which you are going to print, and select the cells within the spreadsheet that you want to print.

Step 2: After you have selected the cells that will be printed, click on ‘File’ and then on ‘Print’. Alternatively, you can use the universal shortcut key, i.e. ‘Ctrl + P’ to get the ‘Print’ dialogue.

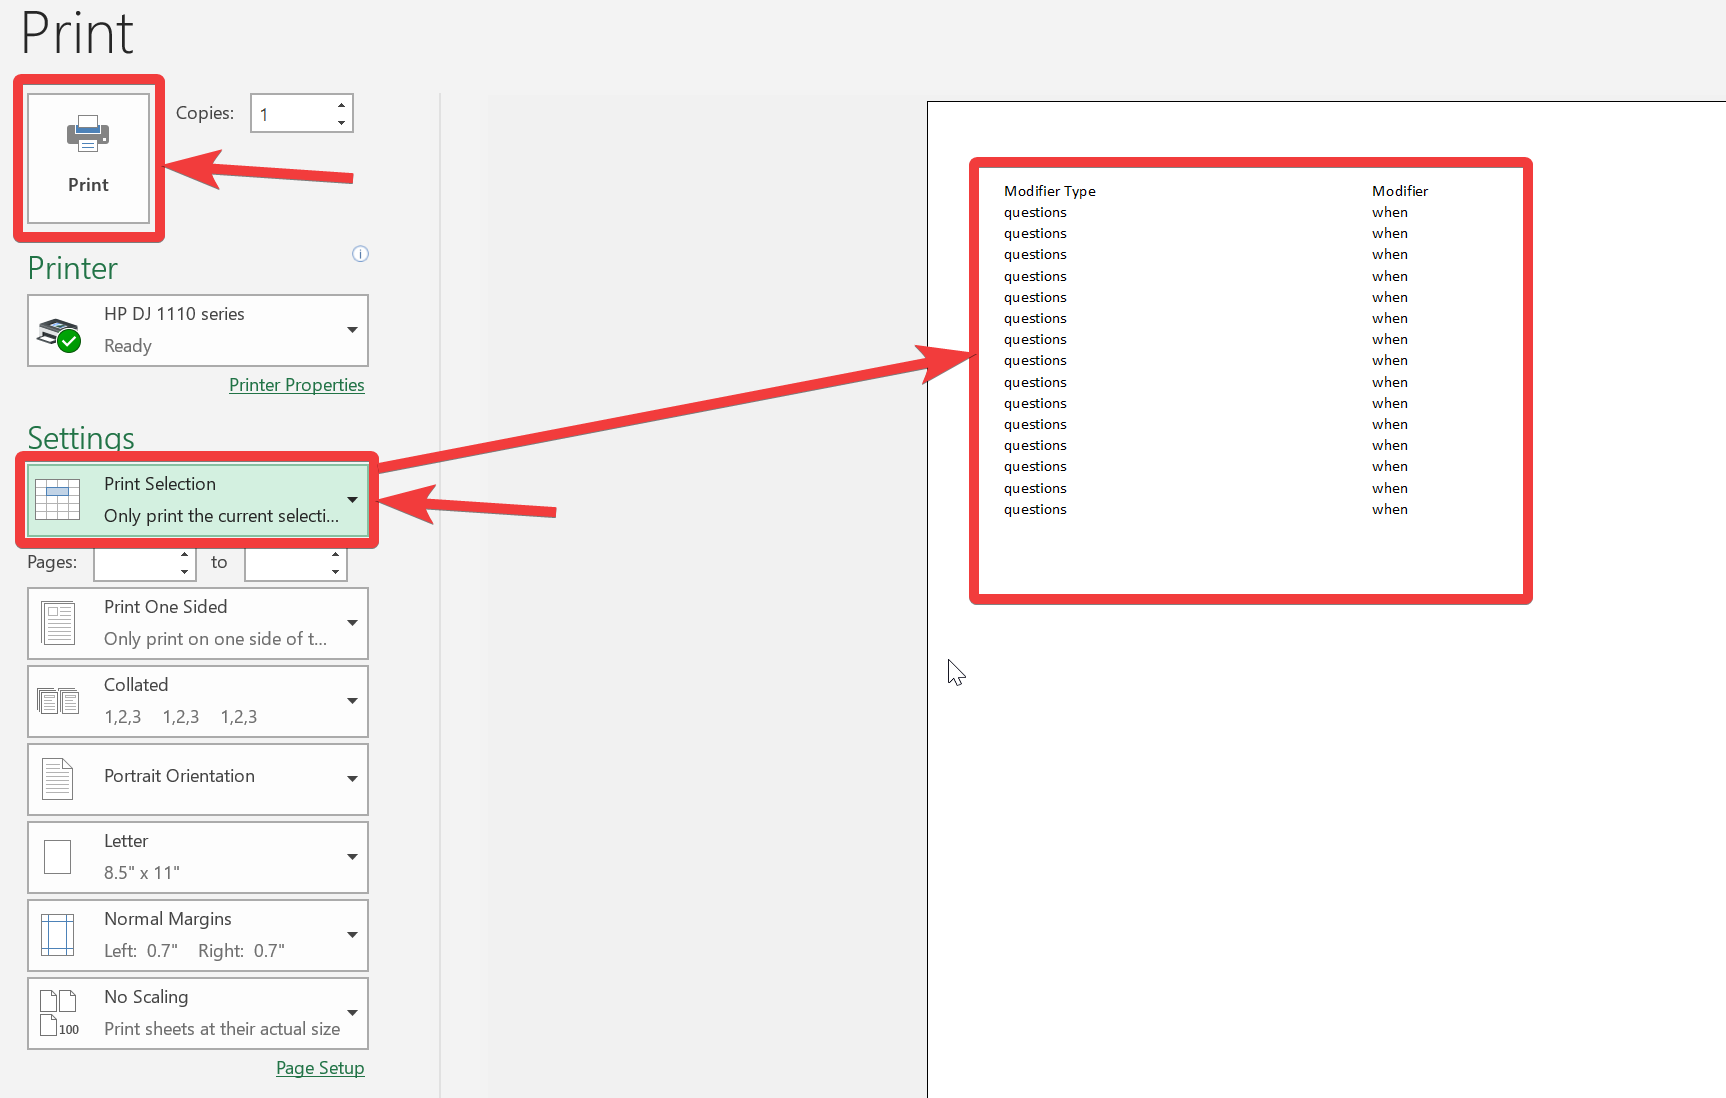
Step 3: In the ‘Print’ dialogue, click on the first drop-down menu under ‘Settings’, and select ‘Print Selection’. By default, the selected option will be ‘Print Active Sheets’. After you have made the selection, a preview will be displayed on the right side of the screen. If you are satisfied with the preview, just click on the ‘Print’ button.

You will get only the cells that you have selected, printed on a piece of paper. However, if the selected set of cells is too big for one page, it will require more pages to get the selected set of cells printed.
I have used Microsoft Excel 2019 for this tutorial. However, the process will hardly vary, on the older versions of Microsoft Excel, as well.
Print selected cells in Google Docs
The process is similar if you are using Google Docs, as well.
Step 1: Just select the set of cells that you want to print on the spreadsheet selected by you.

Step 2: Now, click on ‘File’, and then click on ‘Print’. Just like the previous case, you can use the ‘Ctrl + P’ shortcut key, as well.

Step 3: After the Print dialogue appears, just select ‘Selected cells’ from the drop-down menu under ‘Print’. The selected range of cells will also be displayed to you. A preview will be displayed to you, just like it was, in the case of Microsoft Excel. After you are satisfied with the preview, click on ‘Next’.

Finally, you will have to select the printer, and other system-specific settings to print the selected set of cells on a piece of paper.
So, it is really easy to print a selected set of cells both in Microsoft Excel and Google Docs. This will really be useful in your everyday life. Do you have any questions? Feel free to comment on the same below.


I am trying to print multiple columns, and I have them all selected, but when I click on “selected cells” in the print window, it only shows one of the several columns that I selected. Need to print all the selected columns. How do I do this?