I know it is super easy to just click on the network icon, and select the desired Wi-Fi network to go online. But there was a time when Wi-Fi was not that popular, and people used to use Broadband connections to connect to the internet. Broadband connections are even used by people nowadays, and I am one of them. But I and most other users use a Wi-Fi network to get the most out of the connection by connecting numerous devices to the same Broadband connection. Using a Wi-Fi router makes it easy to set up the complete network by logging in to the Wi-Fi router’s configuration page. Most users know how to setup PPPoE on a router.
But there are even some users, who have access to a single computer or laptop. In such cases, it is not that important to have a router to share the Broadband connection. But routers still has its advantages. Though that is not the topic of discussion for this article. Setting up a broadband connection on Windows 7 or 8 is quite easy, but it is a little twisted on Windows 10. The same goes for setting up dial-up connections, which are used by only a handful of people nowadays. Setting up a broadband connection on Windows 10 is easy, but you have to start your process at the most appropriate point.
So let’s get started with the tutorial.
Setting up PPPoE or broadband connection on Windows 10
- Just right-click on the network icon on your Windows 10 computer and click on ‘Open Network & Internet settings’.

- On the left-hand side, go to the option saying ‘Dial-up’.

- Now click on the option that says ‘Set up a new connection’. After this, most users know the process. But I will still explain the remaining part lest it is unknown to a few people.

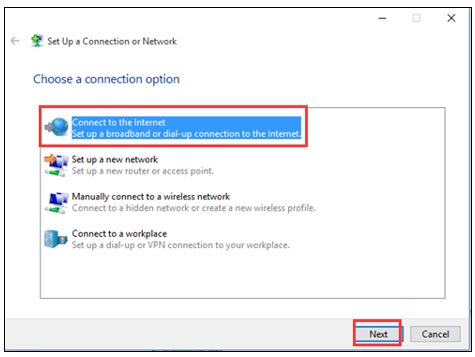
- In the new windows which appear, click on the option saying ‘Connect to the internet’.

- There will be just a single option in most new computers. Click on the option, which says ‘Broadband (PPPoE)’.
- To set up a dial-up or ISDN connection tick the option saying ‘Show connection options that this computer is not set up to use’, and click on ‘Dial-up’.
- The next steps are pretty similar to set up a broadband connection. But for setting up a dial-up connection, you also need to enter a dial-up number. That is the only extra information you need to enter.
- Now, in the new window, you should enter the username and the password. These two things will be given to you by your ISP.
- Click on ‘Remember this password’. You can give your own name to the connection, or leave it with the default name.
- After configuring everything in this page, click on ‘Connect’.
- If the username and the password were correct you should now be able to connect to the internet. You can even connect and disconnect to and from the internet connection from the taskbar of your Windows 10.


")


That was all about the way to enable PPPoE and set up broadband connection on Windows 10. I didn’t find any option on Windows 10 for PPPoE auto connect. Thus, you will have to connect to the network each time you want to connect to the internet.
Hope the information was helpful. Still having issues? Surely let me know about it in the comment section down below.
You might also like to see:
- How to activate Windows 10 Hibernate option using power options
- Put a startup password on a Google Chrome using Extension
- Hibernate missing from power options windows 10: How to get and enable it
- How to Set an Ethernet metered connection on Windows 10


How to get user name and password from ISP?
Contact your broadband or internet service provider.