We all are connected to the internet nowadays. To get the most out of the internet, it is pretty important to have accounts on different websites on the internet. But when it comes to having multiple accounts on the internet, we are more vulnerable to get hacked, in case we fail to keep all the passwords safely and responsibly. But I know most people are not that tech savvy to keep the passwords safely, and if you are the one, who keep those easy passwords to protect their accounts, two-step verification can be a boon for them. Still, a warning. Don’t keep easy passwords to protect your online accounts.
What is a two-step verification?
Those who are not aware of two-step verification, it is an extra step to sign in to an online account, where you will have to enter a one-time password, which will be sent to you typically through SMS or even through an automated voice call. As you are the only one who has access to such things, chances are very less, hackers will be able to snoop those SMS messages unless you are a targeted victim. As most two-step verifications are based on SMS or automated voice calls, you will be unable to login if you are in a remote area, where there is no mobile network. In such a circumstance, you will be unable to get the one-time passwords, and you will be unable to log in.
But technology always comes with a solution. You can use different authenticator apps, to get one-time passwords without any kind of internet or mobile network. But here we are going to discuss how to use Google Authenticator for two-step verification. It is available for both Android and iPhone (iOS) devices
So let’s get started on how to use Google Authenticator. I will also discuss some important points about using Google Authenticator.
How to setup & use the Google Authenticator app to activate free two-step verification
The steps to follow
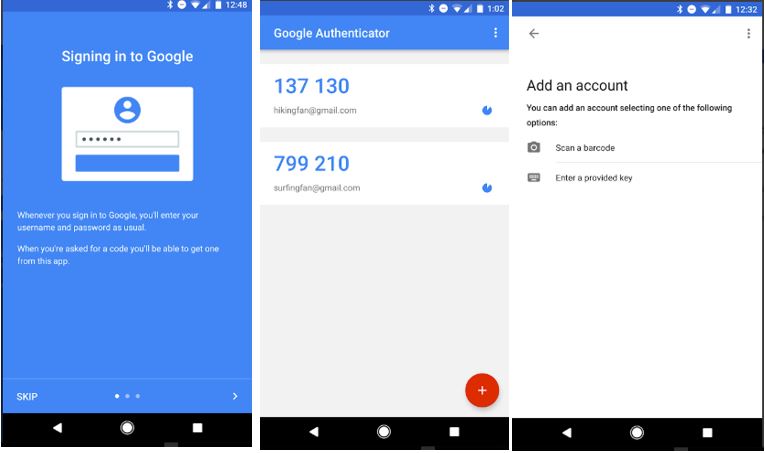
Download Google Authenticator from the Google Play Store. You can even download it here.
Now you will have to get the two-step verification key for the website where you want to activate it.
Depending upon the website, where you want to activate two-step verification, the steps might vary. Two-step verification with Google Authenticator is supported on most popular websites, which we use nowadays. It includes Google, Facebook, Dropbox, and many others. I will leave the links to directly get into the two-step verification activation and get the key for those websites, at the end of this article. So, don’t worry.
But here, I will be showing you how to activate two-step verification on Google. You just need to get the key and that’s it.
- Get the Google Authenticator Key: Just visit the following link to get into the Google’s page for two-step verification. ‘https://myaccount.google.com/signinoptions/two-stepverification’
- Get Scroll down unless you find the ‘Authenticator app’. Click on ‘Set up’.

- Get the code from the authenticator app: Choose the handset Android or iPhone (iOS) which you have. We are choosing ‘Android’, as I am having an Android device right now. Click on ‘Next’ followed by that.

- Google Authenticator barcode: Now you will find a QR code. You can either scan it or can even click on ‘Can’t scan it?’ just below the QR code to see the key.
- Setup Google Authenticator: This can be helpful if you are doing everything on your handheld device or smartphone. In such a case, you will be unable to scan the QR code, and the key can be helpful.

- Now open the Google Authenticator app on your smartphone, and tap on ‘Skip’ if you find the intro. Just tap on the small plus icon that appears on the bottom right corner of the screen.

- You will find two options in Google Authenticator. As you can get a QR code for Google two-step verification, tap on ‘Scan a barcode’. It can actually help you to scan a QR code. In case you can’t find the barcode, you will have to tap on ‘Enter a provided key’.

- You will instantly feel a vibration on your smartphone, which means the key is added to Google Authenticator. Click on ‘Next’ on the web browser.

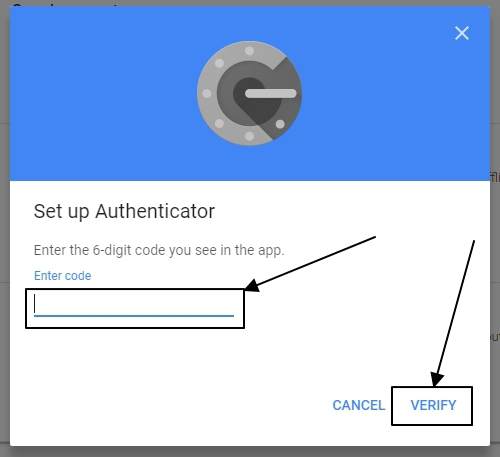
- Now you will have to enter the 6-digit-code which appears in the Google Authenticator app. Enter it fast. A new code will be generated every 30 seconds.
- Once you are done, click on the ‘Verify’ button on the web browser.
- Two-step verification is now enabled. Each time you try to log in, you will have to enter the code, which is generated by the Google Authenticator app.


This is indeed a cool way to enable two-step verification, and sign in to your accounts, even when you are out of network coverage. Moreover, sometimes careers might charge you for SMS, and there can also be a limit on the number of SMS messages you can receive per day. But Google Authenticator is at the top of everything. You can always use it bypassing all kinds of restrictions, which are imposed by network operators.
Some points to remember
You should keep some points in mind while using Google Authenticator.
- You cannot use the Google Authenticator app from multiple devices to sign in to the same account. For example, you cannot install Google Authenticator on two devices, and use the code from either of them for two-step verification to sign into the same account. The two devices will generate different codes, and the device, where you installed the Authenticator app for the last time can be used for two-step verification.
- You can even add new devices with support for two-step-authentication when your smartphone is offline or is not having any network.
- There are other apps like Google Authenticator. Just like the first point, you cannot use any other similar kind of app for two-step verification at the same time, when you are using Google Authenticator.
- Google Authenticator will not work on all the websites or apps, under the sun. But most popular websites nowadays support Google authenticator for two-step verification. Hope it will be adopted by more websites in the coming days.
The links to activate two-step-authentication
Now let’s have a look at the direct links for some popular websites, where you can visit to activate two-step verification and get the keys for Google Authenticator.
https://www.facebook.com/security/2fac/settings/
Just click on ‘Get Started’ and click on ‘Authentication App’. Click on ‘Next’ to get the key for Google Authenticator.
Dropbox
https://www.dropbox.com/account/security
Turn on Two-step verification, and click on ‘Get started’. Enter the Dropbox account password, and choose ‘Use a mobile app’ to get the QR code or the key.
Evernote
https://www.evernote.com/secure/SecuritySettings.action
So those were the links, where you can visit directly to activate two-step verification on your accounts. You can get support for authenticator apps for your favorite websites in the coming days. Though it is a matter of time.
Using authenticator apps like Google Authenticator is by far the easiest and most hassle-free way to activate two-step verification for the best results. I will recommend you to activate it for the websites supporting it.
Hope the small information on how to activate Google Authenticator for two-step verification was helpful for you. Faced issues? Feel free to comment it down below.
You might also like to see:
- Instructions to use the inbuilt password manager in Google Chrome?
- How to use just Google Chrome instead of keeping multiple browsers
- How do I change Google Chrome Autofill settings on Windows and Android
- Way to set google as default search engine on chrome
- How do I change Gmail password on Android and web
Related Posts
How to set Gemini by Google as the default Android assistant
Google’s new AI Content Moderation Policy for Play Store Apps
Google Meet now offers Full HD streaming for group video meetings
Googlе and Applе Facе Finеs of Ovеr $50.5 Million for App Storе Violations
Google’s new update allows Android users to delete up to 50 emails at once in Gmail with the “Select All” option
Google to display only interest-based ads using a privacy sandbox