Remmina is software available for Linux to get access to remote computer systems over a network. Here we learn the steps and commands to install Remmina on the latest Linux Mint 20.1| 20.2 or earlier version system using the terminal.
Unlike Windows, Linux Mint doesn’t have any software to facilitate the service of remote desktops. Therefore, the user either has to go for some third-party solution such as Teamviewer. Well, what if you don’t want to use the internet for connecting a local system in an organization. There are some solutions like RDP and VNC protocols. Today in this article we are going to talk about Remmina, a remote desktop client for Linux that has several protocols for remote control of computers.
It is a remote maintenance software that supports the VNC, NX, RDP, XDMCP, and SFTP protocols. Furthermore, it is possible to route a connection through an SSH tunnel, which makes it useful if you normally want to use unencrypted protocols such as VNC over the Internet.
RDP (Remote Desktop Protocol): We can remotely connect to other computers and customize the color depth, shared folder, quality, sound, and many other parameters.
VNC: We can configure the color, quality, monitoring port, authenticate with username and password, disable or enable data encryption, and many other properties.
SSH and SFTP: We can control a remote server or computer through SSH. An SFTP client is also included, with which data can be encrypted and authenticated.
Remmina is one of the main alternatives for remote desktop software for our Linux operating system. Like any other software in this category, it also allows controlling a remote computer using a keyboard and mouse.
How to install Remmina on Linux mint 20
#1st Method using Repository:
1. Add Remmina Repository on Linux Mint
Remmina is not available on Linux Mint using the base repository, hence, we need to add the one provided by its developers i.e PPA. Yes, Remmina is available via the PPA which can be added using the commands given below.
Add PPA repo:
The packages to install it are not available through the base repo, add the given dedicated PPA available for this software
sudo apt-add-repository ppa:remmina-ppa-team/remmina-next
Run system update to integrate the repo properly:
sudo apt update
3. Command to Install Remmina on Linux Mint
Once you have successfully added the repository, next run the given command to install all the required packages we need to properly access the remote computer.
sudo apt install remmina remmina-plugin-rdp remmina-plugin-secret
4. How to Run and use Remmina on Mint
After getting this remote desktop on your Linux mint, we can start using it. For that go to Application launcher and search for this app.
Click on the + icon
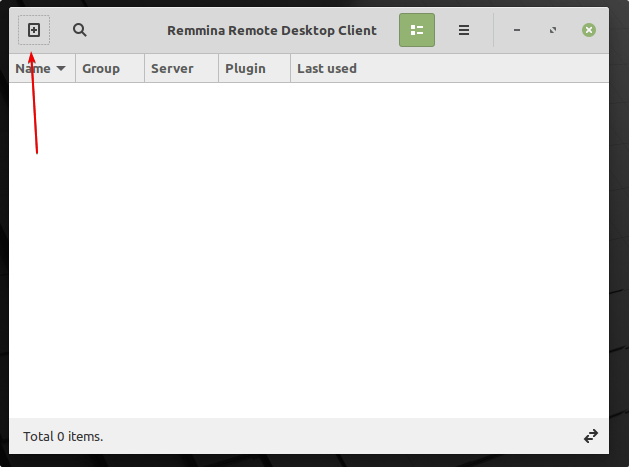
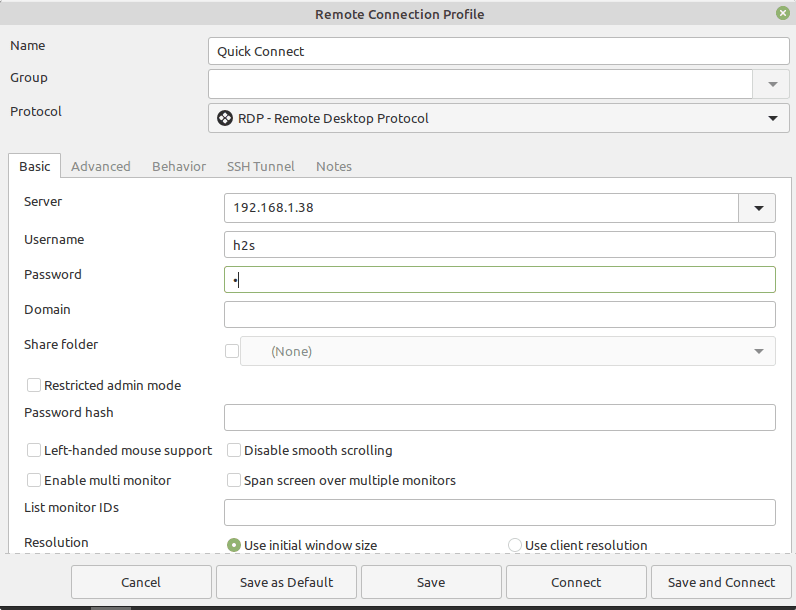
Select the protocol you want to use, for example, RDP to access Windows.
Enter the Ip-address of the remote computer such as Windows and then the username & password of that system. after that hit the Connect button. Accept the certificate and you will have the remote desktop screen to control.
5. How To Remove or Uninstall
If you didn’t like it then remove both PPA and Remmina.
sudo killall remmina
sudo apt-add-repository --remove ppa:remmina-ppa-team/remmina-next
sudo apt remove remmina remmina-plugin-rdp remmina-plugin-secret
#2nd Method Using Flatpak:
6. Enable FlatPak
Those who don’t want to add PPA can go for the FlatPak. However, FlatPak is also not available on Linux Mint by default, hence you first need to install it as well.
Add Flatpak repo for your current user:
flatpak remote-add --user --if-not-exists flathub https://flathub.org/repo/flathub.flatpakrepo
Install Flatpak as well as H.264 codecs
flatpak install org.freedesktop.Platform
flatpak install org.freedesktop.Platform.openh264
7. Install Remmina via Flatpak on Linux Mint
Finally, get the package of Remmina and install it for your current use:
flatpak install --user flathub org.remmina.Remmina
flatpak run --user org.remmina.Remmina
#3rd Method Use Snap:
8. Install Snapd
Linux mint has disabled the Snap to get installed by default using the APT package manager. Therefore, first, we need to remove the file that stops us from installing the SNAP on Mint.
sudo rm /etc/apt/preferences.d/nosnap.pref
sudo apt update
After that use the APT package manager to install Snapd
sudo apt install snapd
Make sure its service is running;
sudo systemctl enable --now snapd
Check status:
sudo systemctl status snapd
9. Setup Remmina using Snap
Once all the steps given above are done, we can easily install this open-source remote desktop too using the below given single command:
sudo snap install remmina
10. Uninstall
To remove, the user just needs to replace the ‘install‘ with ‘remove‘ in the above-given command:
sudo snap remove remmina
Conclusion:
So far, in this tutorial, we have learned the multiple steps or commands to install and use the Remmina Remote desktop tool on Linux Mint. The process to set up this tool is pretty simple and it also offers a pretty simple user interface that any newbie can easily understand to access remote Windows or Linux desktop.
Other Articles:
• Use RDP on Linux mint to access Windows 11, 10, or 7 remotely
• Top 3 Command Line Ubuntu Package Manager tools
• How to create users on Linux Mint
