If you have ever traveled somewhere and need to change the Timezone in Ubuntu 20.04 Desktop or Server OS, then here are the steps to follow.
There are two types of clock used by our system, one is software clock and another one is hardware. Software clock is the time within the Linux kernel. It is important for all users and the operating system itself and defines the system time that is valid for all programs during operation. It is also sometimes referred to as the operating system clock or the system clock. Whereas Hardware clock also called real-time clock, battery-backed clock, real-time clock (RTC), BIOS clock, or CMOS clock) is a clock that runs independently of all other components, even if the computer has been shut down. When switched off, it continues to run and is used to synchronize the software clock when the system is started.
However, the Time zone defines the area and the particular time in that vicinity, as we know due to earth rotation, all the places on earth don’t have the same time for sunrise and sunset. Thus, scientists have divided the earth’s Time into zones that represent and know as Time zones. So, if few are moving from one country to another then we have to change our Time zone either manually or the system must do that automatically.
How to change the time zone on Ubuntu 20.04 Server Linux
The below-given steps will also work for Ubuntu 18.04 or other versions including Linux Mint, Elementary OS, and other similar Linux distros.
#First Method
Open Command terminal
If you are using the Command line server, then you are already there whereas the GUI users can press Ctrl+Alt+T to open the terminal.
Command to reconfigure Ubuntu 20.04 Time Zone
Just run the below-given command that will start the text-based wizard to easily configure the Ubuntu server time zone.
sudo dpkg-reconfigure tzdata
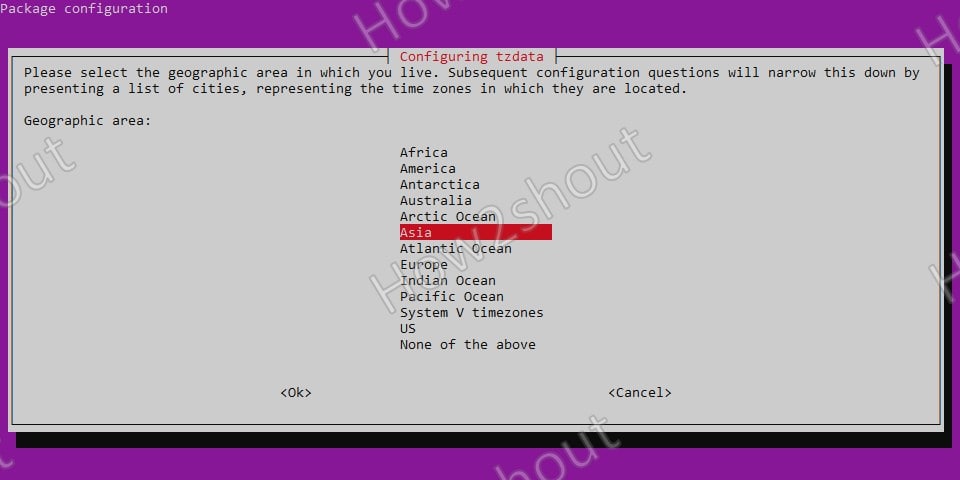
Select Geographic area to set server timezone
Now, you will see a list of Geographic areas, select the one in which your country or place falls.
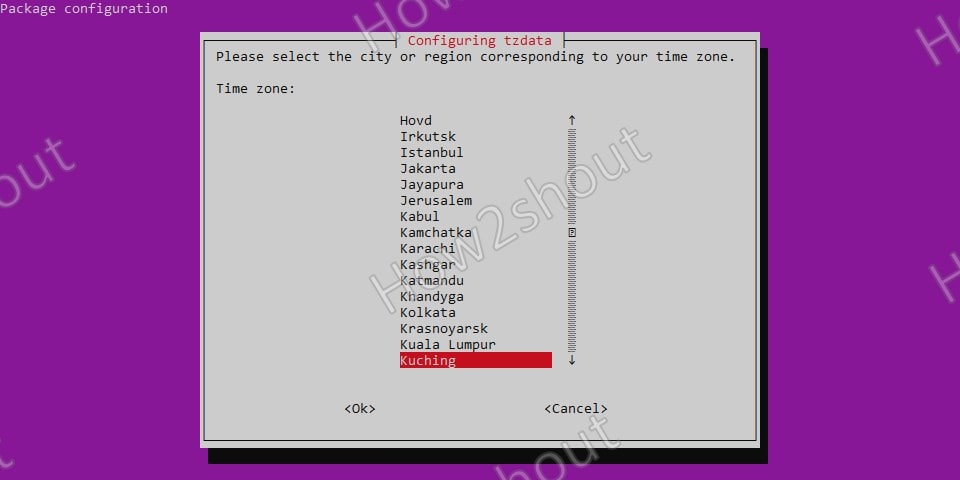
Configuring Tzdata- Select city or region
Now, as your Time zone selection, select the corresponding city or region in which currently your Ubuntu 20.04 server exists.
That’s it, this is how you can select and change the Time zone in Ubuntu servers.
If you don’t want to meddle with the time zone, then simply use the NTP server to make sure your system’s time is up to date as per your location.
Update Time using Chrony NTP
If you don’t want to go through the above-given steps then install and use Chrony. It is the implementation of NTP- NetworkTime Protocol that will automatically sync & update time accurately for your server with NTP servers.
sudo apt-get install chrony
systemctl enable --now chronyd
systemctl status chronyd
Now, the Chrony is active and syncing your system’s time, to check how many servers and peers are connected, from Chrony is getting accurate time update, run-
chronyc activity
or
chronyc sources -v
To see system date and time, the command is-
timedatectl
