If you want to learn how to run and access a website from a remote location, we need a Web server and what it be more practical than starting with Apache if you are new to the hosting world. Here in this tutorial, we will learn the command to install and start Apache web server on Ubuntu 22.04 LTS Jammy JellyFish or Ubuntu 20.04 LTS focal fossa.
Apache is the most widely used web server on the Internet. And can be easily configured because of its flexible nature and ability to expand features with the help of a large number of modules. It has been developed and maintained under the Apache foundation.
Usually, the Apache web server is installed with PHP and MySQL/MariaDB. Although, Apache itself delivers only static HTML pages. However, when combined with PHP (PHP Hypertext Preprocessor) like scripting language it can serve the Dynamic HTML pages generated from database contents.
Most of the popular content management systems (CMS) such as WordPress or Joomla therefore also need PHP and the MySQL database. And when it comes to the installation of Apache, all popular Linux distributions such as RedHat, CentOS, Ubuntu Debian, and others have Apache packages in their respective base repository, so that the user can install it with just one command. We can use Apache on Windows but being an open-source project and native to Linux systems and their dominance in the server world, hosting services offers it on Linux only to get the full potential of this web server software.
Whereas, those developers are on Windows and working on some web project that requires Apache, usually go for XAMPP or WampServer like the projects to get the whole LAMP stack easily up and running.
Steps to install Apache web server on Ubuntu 22.04| 20.04 LTS
What do you need to follow steps in this tutorial?
• Ubuntu 22.04|20.4|18.04 Server
• A non-root user with sudo rights
• Internet Connection
1. Apt Update
If you have just installed a fresh Ubuntu server on your local machine, Cloud, or some VPS then first run the system update command. This will refresh the repository cache as well as install if there are any updates available for your system.
sudo apt update
2. Command to install Apache on Ubuntu 22.04 | 20.04 LTS
Next, as mentioned at the beginning of the tutorial that we don’t require to add any third-party repository because the package to install Apache webserver is already in the base repository of ubuntu Linux.
sudo apt install apache2
3. Start and Enable Apache service
Once the installation is completed, first check whether the service of Apache is already running in the background or not using the given command:
systemctl status apache2
If it is not running, then start and enable the same with this command:
sudo systemctl enable --now apache2
4. Allow port 80/443 on Ubuntu 22.04 | 20.04
Depending upon where you have installed your Ubuntu 20.04/22.04 Server, we have to open the firewall for two ports 80 for HTTP and 443 for HTTPS. If you are on Cloud then use your service provider’s network firewall to open these ports. Whereas, in case the system also has the firewall enabled then run:
Check whether the system firewall is active or not.
sudo ufw status
If the output comes as ‘active‘ then run
sudo ufw allow 80/tcp
sudo ufw allow 443/tcp
5. Access Demo Web page
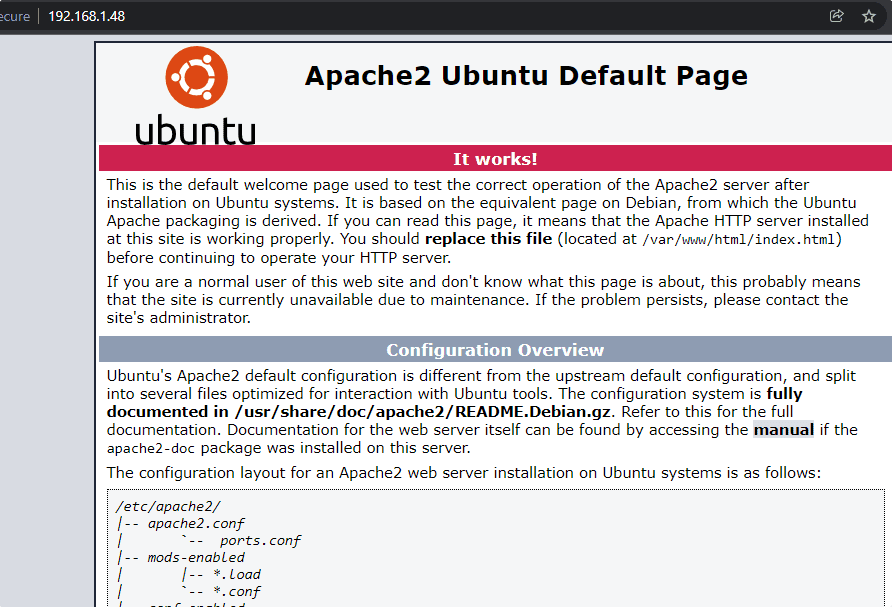
Now, the Apache webserver is up and running, it’s time to access its demo web page to confirm everything is working as perfectly as we want.
Open your browser on a system that can access the IP address or domain where you have installed the Apache. And point it to URL as the given syntax:
http://server-ip-address
Replace the server-IP-address with the real Ip-address of your Ubuntu 22.04 or 20.04 Server. If you don’t know the address then in your server’s command terminal run:
ip a

Reload Restart or Stop Apache commands
There are many scenarios where after installing some web application we either need to restart or stop the Apache webserver service. And if you are in any of such scenarios, then here are the commands to follow:
• To reload: It means, let the webserver remain running but just refresh or reload the configuration file.
sudo systemctl reload apche2
• To gracefully restart: In this, the Apache will exit process threads when they are finished and idle, and then reload the configuration.
sudo /etc/init.d/apache2 graceful
• To restart: This will kill all the threads, stop the webserver and start it again.
sudo systemctl restart apache2
• To stop: Shut down webserver service completely.
sudo systemctl stop apache2
• To start:
sudo systemctl start apache2
• To disable the Apache from starting automatically with system boot, use:
sudo systemctl disable apache2
Whereas to enable it again:
sudo systemctl enable apache2
Completely Uninstall Apache from Ubuntu 22.04 or 20.04
To completely remove the webserver, if you don’t require it, run:
sudo apt remove apache2*
For more info check the official Apache Documentation whereas to learn further, see- how to install WordPress on Apache Server running on CentOS/AlmaLinux/Rocky/RHEL/Oracle


