To try out Rocky Linux 8 on our physical system we either need a bootable USB drive or DVD/CD. However, DVD is not common now, thus USB is the preferred option. And here in this tutorial, we let you know the steps for creating a bootable USB drive for Rocky Linux 8 using Rufus or BalenaEtcher.
Create Rocky Linux 8 bootable USB drive using BalenaEtcher
BalenaEtcher is a cross-platform bootable USB drive maker, thus we can use it on Windows, macOS, Ubuntu, CentOS, and other Linux systems. The installation of it is very simple.
- Download BalenaEtcher software for Windows, macOS, or Linux.
- Here is the official website link
- Double click on the downloaded setup and this will start the software.
- Now, Get the Rocky Linux ISO file, here is the website link. If you already have its ISO file then skip this step.
- Plug-in USB drive that you want to make bootable to your PC or laptop.
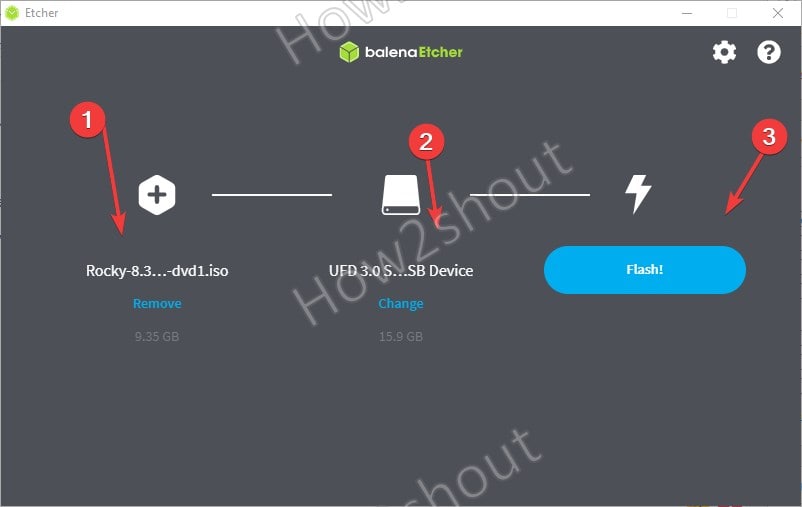
- Next, on BalenaEtcher, click on the “Flash From File” option and select the downloaded Rocky Linux 8 ISO file.
- Click on the “Select Target” button and choose the connected USB drive.
- Finally, hit the Flash button and wait for some time until the process gets complete. After that, you will have the Rocky Linux bootable USB drive.
Rocky Linux bootable USB using Rufus, Windows only
In case you are on Windows 10, 8, or 7 and don’t want to use Etcher then Rufus is the best option to create Linux bootable USB drives.
- Download Rufus setup from its website.
- Get the Rocky Linux ISO, if you don’t have it already then use this link.
- Now, Plug-in the USB drive into your Laptop or PC.
- Run the Rufus.exe file to open it.
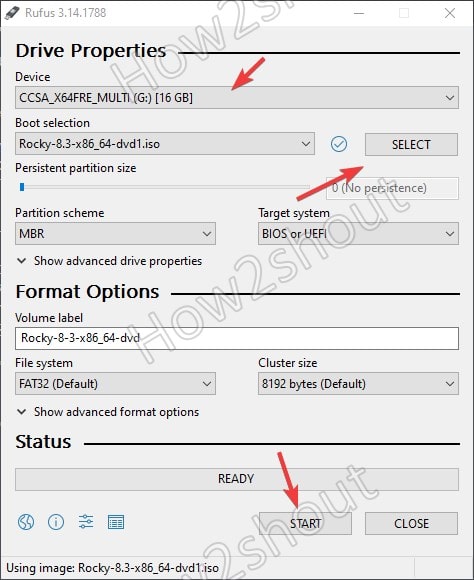
- Select the USB drive from the Device drop-down.
- Next, click on the SELECT button and choose the Rocky Linux ISO file that you want to use for the bootable Pen drive.
- Leave the rest of the settings default and click on the Start button.
- Let the default option “Write in ISO Image mode” be selected.
- Click on the YES button to download Idlinux.sys and Idlinux.bss files.
- Wait until the writing process of ISO is completed and after that reboot or plugin the drive where you want to install Rocky Linux.
