Follow the commands given in this tutorial to install Adminer Database manager on Ubuntu 22.04 LTS using Terminal.
Like PHPMyAdmin, Adminer is also an open-source web-based tool to manage databases. Earlier it was known as phpMinAdmin, however, later its developers changed its name to Adminer. Maybe to remove the confusion that appears with its name’s similarity with PHPMyAdmin.
Adminer is better than phpMyAdmin in terms of performance and is also a lightweight alternative. Further, it natively supports a wide range of database systems. Such as MariaDB/MySQL, PostgreSQL, MongoDB, SQLite, Elasticsearch, and more…
Steps to install Adminer on Ubuntu 22.04 Linux
This installation guide for one of the best web-based management tools for databases- Adminer is not just limited to Ubuntu 22.04 but even can be used for Ubuntu 20.04, Debian, and Linux Mint.
1. Update Ubuntu 22.04
Firstly, on your command terminal run the system update command. This will fetch and install the latest version available package updates on your system.
sudo apt update2. Apache Installation
We need an Apache web server to serve the Adminer and access its interface on a web browser. Hence, execute the given command in your terminal to install Apache and its dependencies.
sudo apt install apache2Once the installation is completed, start and enable the service of the Apache webserver.
sudo systemctl enable --now apache2Also, check whether it is working without producing any error in the background.
sudo systemctl status apache2 --no-pager -l3. Install PHP and MariaDB Database
Next, Adminer is written in PHP hence we need to install the PHP and its required extensions to run this web-based database management tool.
sudo apt install php php-curl libapache2-mod-php php-cli php-mysql php-gdAfter that, also install MySQL or MariaDB, here we are using MariaDB because it is used commonly in most PHP-based applications. You can use other supported databases such as PostgreSQL, SimpleDB, MongoDB, and more…
sudo apt install mariadb-serverAlso, start, enable and check the status of the installed MariaDB.
sudo systemctl enable --now mariadbsudo systemctl status mariadbSecure MariaDB Database server
sudo mysql_secure_installationOutput:
Enter current password for root (enter for none):
Switch to unix_socket authentication [Y/n] Y
Change the root password? [Y/n] Y //Enter the password you want to set for MariaDB root user
Remove anonymous users? [Y/n] Y
Disallow root login remotely? [Y/n] Y
Remove test database and access to it? [Y/n] Y
4. Set root Database password for Adminer
To manage the complete database system using the Adminer we need to log in with the root database user. Therefore set a password for that. This will help us to manage all available databases using Adminer.
Login to MariaDB or MySQL:
sudo mysqlNow, set the password for the root user:
SET PASSWORD FOR 'root'@'localhost' = PASSWORD("my-password");Note: Replace my-password with the password you want to set for your root database user.
Exit the MariaDB shell:
FLUSH PRIVILEGES;exit;5. Install Adminer for Ubuntu 22.04
Adminer is a single PHP file web-based database management system, we can download and install it using Ubuntu’s default system repository. Hence, just use the APT package manager and the package name of Adminer.
Run the following command
sudo apt install adminerEnable php-fpm
sudo a2enconf php*-fpmEnable the Apache configuration file for Adminer.
sudo a2enconf adminerRestart the web server:
sudo systemctl restart apache26. Access the Adminer Web Interface
Now, everything we need to set up Adminer on Ubuntu 22.04 is configured so far, let’s access its web interface to log in and manage our Database.
Open a browser on your local system that can access the IP address of the Ubuntu server or Desktop where you have installed the Adminer.
For the same system:
http://127.0.0.1/adminerFor remote system:
http://server-ip-address/adminerNote: Those who are using SSL certificate enable domain, then they should use the domain name and HTTPS to access the Adminer interface.
7. Log in
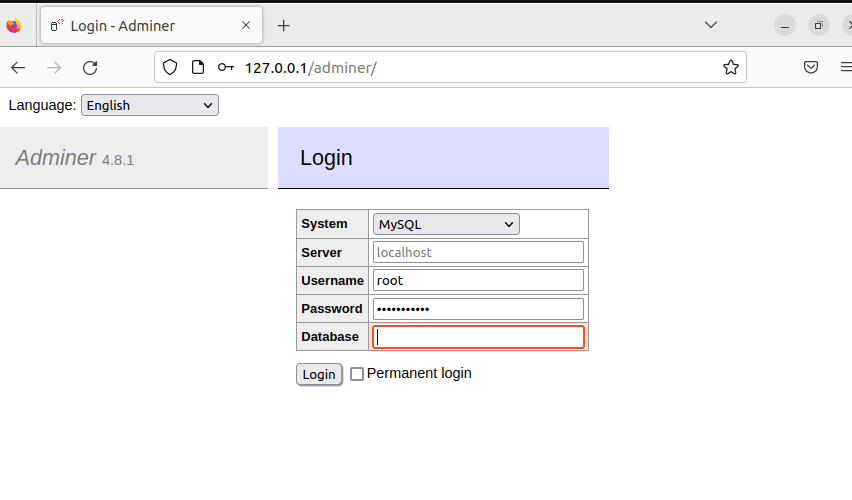
Enter the root as a username and the password that you have configured in Step 4 of this tutorial to log in to the Adminer. Leave the Database box empty because the root user has the access to all the available databases.

8. Dashboard
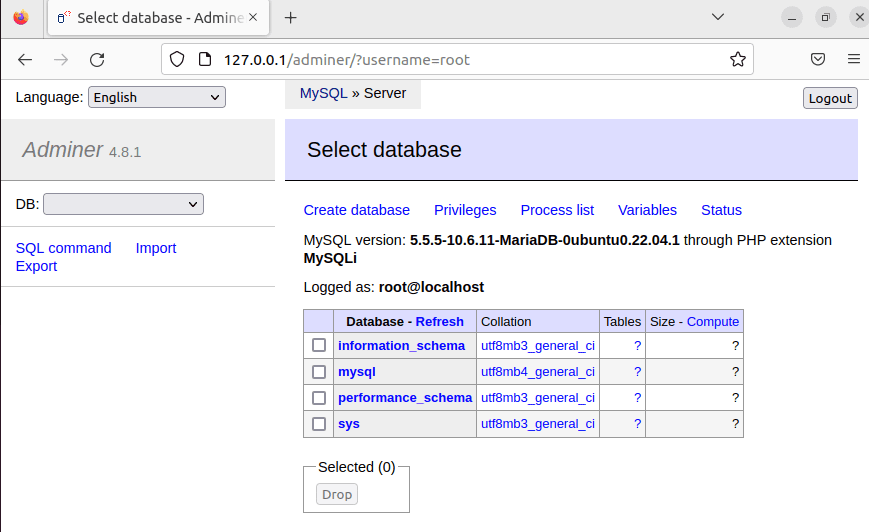
After login, you will have the Dashboard to access all the available databases. You can delete or create a database as well. However, the interface of Amdiner is not rich as that of PhpMyAdmin, yet simple, easy to navigate, understandable, and not confusing.

9. Uninstall Adminer from Ubuntu 22.04
Well, if you don’t want the Adminer Database system manager anymore on your Ubuntu system; then we can remove it completely. Here are the commands to follow:
sudo apt autoremove --purge adminerThose who also want to uninstall Apache, MariaDB, and PHP, can follow:
sudo systemctl stop apache2 mariadbsudo apt autoremove --purge mariadb-server php* apache2In this way, we can install or uninstall the Adminer from Ubuntu 22.04 or 20.04 Linux. Its lightweight and ability to manage a wide range of database systems allow users to easily create, delete or edit the databases using a web browser.
FAQs
What is Adminer used for?
Just like phpMyAdmin, Adminer is used for managing different Database management systems using the web interface and the browser without any command. It supports MySQL, MariaDB, PostgreSQL, SQLite, MS SQL, Oracle, Elasticsearch and MongoDB.
How do I get into Adminer?
We can install the Adminer on Ubuntu or Debian Linux using the default package manager. Whereas other systems with PHP installed can download Adminer’s single PHP file from the GitHub Page
Is Adminer better than phpMyAdmin?
Adminer is better than phpMyAdmin in terms of features. Yet, it is always a user preference what software they get used to. If you are just a MySQL or MariaDB then you don’t need to switch to Adminer; also because most of the hosting services offer phpMyAdmin by default then it is recommended to stick with it.
Whereas cloud users who want to host their own applications can prefer Adminer because its features are better than phpMyAdmin.
Few features that make Adminer better than phpMyAdmin
- Adminer supports multiple database systems whereas phpMyAdmin only MariaDB or MySQL
- Users can log in to Adminer permanently login including the user list, phpMyAdmin only partially supports through configuration.
- While creating Database Table, Adminer adds fields automatically; In phpMyAdmin, you have to specify the number of fields before creating a table.
- Adminer can reorganize columns and add them in different places – at once, phpMyAdmin cannot.
- Simple Interface
Know more about the difference from the official website.
How to connect to Adminer in MySQL?
After the installation when we log in to the Adminer web interface, select MySQL from the drop-down then enter the Database username and the password to log in. Note: MySQL or MariaDB must be installed on your server or system where you have installed he the Adminer.

Other Articles:


