Install Buildah on Ubuntu 22.04 Jammy JellyFish or Ubuntu 20.04 Focal Fossa Linux using the command terminal for building container images from their source codes.
In today’s fast world, developers need a mechanism to deploy their applications as fast as they could and keep them up to date as well. That is the reason why containerized apps are becoming increasingly important and to create containers automatically, images are necessary. These can be created with Buildah.
Let’s know what is Buildah technically?
Buildah is an open-source tool originally developed by Red Hat. It helps the developers to create container images for containers created for Docker/Kubernetes environments using their source code. The images created by Buildah even can be used for other container services such as Podman. One advantage of Buildah is that creating images does not incur overhead.
Buildah facilitates building Open Container Initiative (OCI) container images that continue to advance the possibilities of containers. Hence, it is therefore important to comply with the standards set by the OCI. This allows the tools to be shared, even if they have been programmed by different developers. This is interesting for a combination of Podman with Buildah.
Using Buildah after installing with Podam or Docker, the following things can be done without the need for any additional tool.
⇒ Build Images in traditional Docker image or in OCR Image format.
⇒ Create new containers from different sources.
⇒ Using a working container or from a Docker file, images can be created for containers.
⇒ Use the updated contents of a container’s root file system as the file system layer to create a new image.
⇒ Rename a local container.
⇒ Delete images from the system.
You can find on GitHub how to use the Buildah with examples. An example of creating an image with Buildah can also be found on Github.
Steps to install and use Buildah on Ubuntu 22.04 or 20.04
1. Update Ubuntu
Buildah packages are available through the standard repository, hence first run the system update command. This will rebuild the APT package manager’s index cache and also install the latest update, if available.
sudo apt update && sudo apt upgrade
2. Install Buildah on Ubuntu 20.04 or 22.04
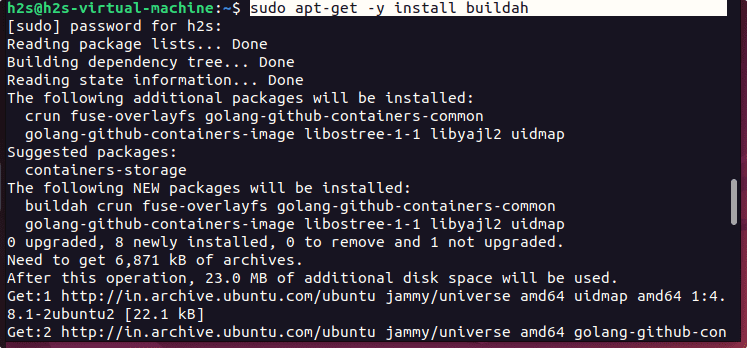
To install Buildah open source tool, we don’t need to add any third-party repository. As I told you earlier, we can use the APT package manager and standard repository to install this Container Image creator tool, so let’s do that.
sudo apt install buildah

To check the version, use:
buildah -v
3. Use Buildah to create a container
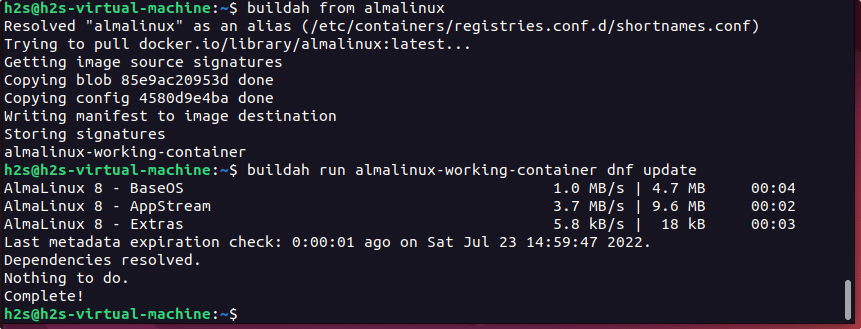
Once the installation is done, we can use the Buildah to pull and create a container image. For example, let’s fetch Almalinux Image to build it as per our need.
buildah from almalinux
Now, we have the Almalinux Image on our system. Let’s install the apps we want on our image pre-installed before running it in a container. For example, we want an image of AlmaLinux with a pre-installed Httpd server. So, for that, we can follow the given steps.
The default image name of the pulled one set by Buildah – almalinux-working-container will be flashed on your terminal after pulling the image.
Run system update for Image:
buildah run almalinux-working-container dnf update

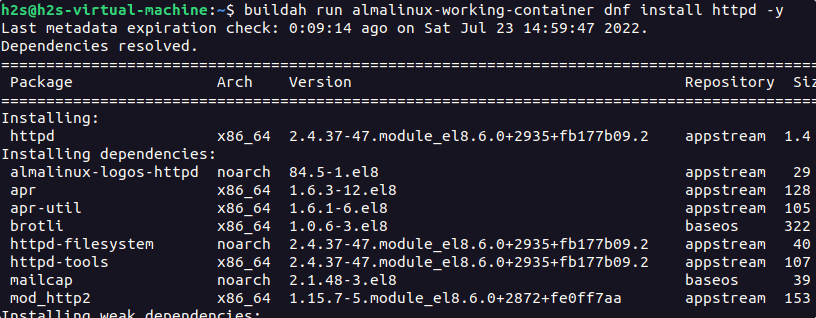
Let’s install the Apache webserver in the created container
buildah run almalinux-working-container dnf install httpd -y

After that, set the HTTPd as the Entry point, so that it could start automatically in the background as we run the container.
buildah config --entrypoint "/usr/sbin/httpd -DFOREGROUND" almalinux-working-container
4. Create an Image
Once you have added whatever things you want in your things, like we added Apache webserver, it is time to build a new Image with the changes from it.
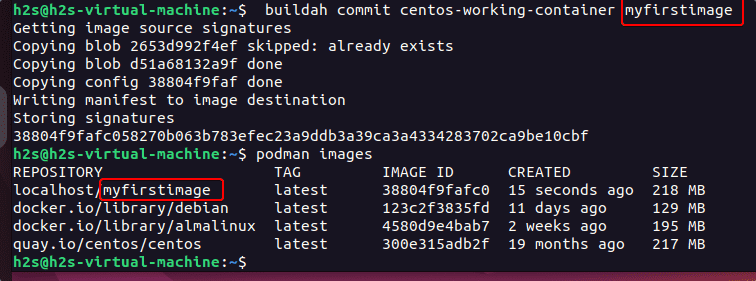
buildah commit almalinux-working-container myfirstimage
In the above command almalinux-working-container is the name given to the container created using a pulled image by Buildah and myfirstimage is the name in which we want to save the image created using the container for our usage.
5. Run Buildah created Image with Podamn or Docker
Once we have our own customized image created using Buildah, we can create a container using that image.
Let’s first check whether the Image is available or not. Here we are using Podman.
podman images

6. Create and Run a container using your image
After creating an image, we can use it to create our container either using Podman or Docker. Here is the command for that.
podman create --name demo myfirstimage
myfirstimage is the name of the image we have created, you can use yours.
demo is the name we have given to our container, you can use whatever you want.
Note: if you want to expose the port for the container to access its running service from outside it then mention it in the command while creating the container.
Start the container:
podman start demo
Switch to the command line of your started container:
podman exec -it demo /bin/bash
Now, we can run the commands we would like.
Note: If you get an error while running the update command in your container, here is the solution.
Error: Failed to download metadata for repo ‘appstream’: Cannot prepare internal mirrorlist: No URLs in mirrorlist
sed -i 's/mirrorlist/#mirrorlist/g' /etc/yum.repos.d/CentOS-*
sed -i 's|#baseurl=http://mirror.centos.org|baseurl=http://vault.centos.org|g' /etc/yum.repos.d/CentOS-*
sudo dnf update -y
To know more about how to use Podman and Buildah, see the Redhat’s Guide.
Other Articles:
How to install Podman on Rocky Linux 8 / AlmaLinux
Install Miniconda on Ubuntu 22.04 LTS
How to install Emacs 28 on Ubuntu 20.04…
Install DaVinci Resolve on Ubuntu 22.04…


buildah is not available from Ubuntu 20.04 apt repository.