fail2ban is a package of client, server, and configuration files that uses to protect the system from various malicious attacks. It secures Linux server services against Denial of Service (DoS) as well. Whereas, other basic functions are monitor log files, searches for predefined patterns, and temporarily block IP addresses. It is published under the GNU General Public License Version 2 and is based on Python.
It can run in the background (as a demon) as well as in the foreground. The program is useful, for example, in ssh server you want to limit the number of login attempts. The fail2ban program examines the system’s log files for failed login attempts and then blocks the attacker’s Internet address (IP) for a certain period of time.
Here we learn the steps to install Fail2ban on Debian 11 Bulleyes and its configuration process.
Fail2ban installation on Debian 11
The packages to install and configure the Fail2ban are available in the official Debian 11 repo, thus we just need to use the apt command for its installation.
First, run update command to rebuild repo cache-
sudo apt update
And then the main command to get this security tool-
sudo apt install fail2ban
With the running of the above command following programs will available after installation:
- fail2ban-server – the server
- fail2ban-client – Client program for configuration and evaluation of the server
- fail2ban-regex- Program for testing regular expressions
Enable and check the status of its services-
sudo systemctl enable fail2ban
sudo systemctl status fail2ban
Configuration on Debian 10/11
fail2ban reads configuration file types with the extensions .conf and .local. Files with the extension .conf are created during installation and will be overwritten during a package upgrade, so all changes must be made in the corresponding .local files. Thus, only add or change the values in this file that are different from the default or global settings.
Fail2ban has three configuration file types:
/etc/fail2ban/action.d/*.conf/*
/etc/fail2ban/filter.d/*.conf/*
/etc/fail2ban/jail.conf
/etc/fail2ban/jail.d/*.conf
Actions.d
The files in the directory /etc/fail2ban/action.d/ contain the commands for (unblocking) IP addresses. Action files contain two sections: [Definition]and [Init]. The entries in the [Init]section is used to overwrite the rules defined in the jail. The examples in the following table are taken from the iptables-multiport-conf action. All commands are executed with the fail2ban user rights.
| Overview of the options | ||
| entry | description | example |
[Definition] |
||
actionstart |
Commands that are executed when fail2ban is started. | actionstart = iptables -N fail2ban-<name>iptables -A fail2ban-<name> -j RETURNiptables -I <chain> -p <protocol> -m multiport --dports <port> -j fail2ban-<name> |
actionstop |
Commands that are executed when exiting fail2ban. | actionstop = iptables -D <chain> -p <protocol> -m multiport --dports <port> -j fail2ban-<name>iptables -F fail2ban-<name>[[BR]]iptables -X fail2ban-<name> |
actioncheck |
Commands that are executed before each actionban. These are used to check the current environment for functionality. | actioncheck = iptables -n -L <chain> | grep -q 'fail2ban-<name>[ \t]' |
actionban |
Commands that are executed when an IP is banned. The condition is always maxretry must be exceeded and findtime fallen short of. | actionban = iptables -I fail2ban-<name> 1 -s <ip> -j <blocktype> |
actionunban |
Commands to be used for unbanning. | actionunban = iptables -D fail2ban-<name> -s <ip> -j <blocktype> |
[Init] |
||
name |
The default name of the chain | name = default |
port |
port | port = ssh |
protocol |
Is used internally by the config reader. Possible values: tcp, udp, icmp, all. |
protocol = tcp |
chain |
The iptables chain to which the fail2ban rules should be added. Standard is INPUT. |
chain = INPUT |
| Action tags | Action tags are placeholders that can be used in actionban, actionunbanand actioncheck. |
|
ip |
The IPv4 address to be banned. | |
failures |
The number of failed attempts counted. | |
time |
The Unix timestamp (seconds) of the ban. | |
matches |
The chained entries from the lines of the log file that lead to the ban. Many shell characters are escaped. | |
Filter.d
The files in the directory /etc/fail2ban/filter.d/ contains the regular expressions for analyzing the log files and for extracting the IP address or if usedns are used, the hostname. There are only two sections in these files: [Definition]and [Includes]. The latter can be used to read in other configuration files.
The examples in the following table are taken from the iptables-multiport-conf action. All commands are executed with the fail2ban user rights.
| Overview of the options | ||
| entry | description | example |
[Definition] |
||
failregex |
With the help of this regular expression, the log files are searched for hits. The tag is HOSTavailable here,which is used as part of the regex and contains the hostname or the IP address. The distinction between IP address and hostname is determined automatically by fail2ban. |
failregex = ^%(__prefix_line)sFAIL: \S+ address from=<HOST>$ ^%(__prefix_line)sFAIL: \S+ libwrap from=<HOST>$ |
ignoreregex |
Exceptions can be defined here, even if they were valid for the above failregex. ignoreregex supports string interpolation so that you can use your own variables with %(variablenname)s. |
ignoreregex = |
[INCLUDES] |
||
before |
Use to make a file is read before the set one. An example is common.conf |
before = common.conf |
after |
The file is read after the set one | after = example_after.local |
| example | After integrating the common.conf is _daemonavailable.See /etc/fail2ban/filter.d/common.conf for more details. |
_daemon = xinetd |
Jail.conf
Whereas the jail.conf file combines Actions and made Filter into a jail. The user needs to save this file with the extension.local to start adding his own rules or customizing it.
The jail.conf and the following table provides an overview of the default possible values.
| Overview of the options | ||
| entry | description | example |
[DEFAULT] |
||
ignoreip |
Space-separated list of IPs or networks to be ignored. | ignoreip = 127.0.0.1/8 192.168.1.33 |
bantime |
Ban time in seconds. A negative value is a permanent ban. | bantime = 86400 |
findtime |
The number of seconds after which the counter for maxretry is reset. | findtime = 660 |
maxretry |
The maximum number of unsuccessful attempts before fail2ban bans the IP. | maxretry = 2 |
backend |
The backend, such as systemd, can be set here. The default is auto(recommended). |
backend = systemd |
usedns |
Setting for the reverse lookup behavior of fail2ban. Possible values are yes, noand warn.The latter means that entries with hostnames give a warning in the log file, which can lead to a large number of entries. |
usedns = warn |
[myJail] |
The name of the jail can be assigned here. | [ssh] |
enabled |
(De-) activates the jail | enabled = true |
port |
Port definition, can be numeric. Multiple values are separated by commas. | port = ssh |
filter = sshd |
Name of the filter file | /etc/fail2ban/filter.d/sshd.conf |
logpath |
The log file to be monitored, which is checked for the filter. | logpath = /var/log/auth.log |
maxretry, bantime,... |
Different values for the default options can also be defined. | maxretry = 3 |
Create your own Jail configuration file
Thus, let’s now copy the jail.conf file to create a jail.local file to add any custom settings that will remain there even after upgrading the fail2ban.
sudo cp /etc/fail2ban/jail.{conf,local}
To configure various settings, edit the created local jail files
sudo nano /etc/fail2ban/jail.local
Few examples-
Whitelist some IP addresses, IP ranges, or hosts
Now, as the file opens, let’s say you wish to whitelist some IP addresses, IP ranges, or hosts from getting blocked by the File2ban service. For that will, we define the same in the newly created Jail.local file.
See: How to check IP-address on Linux Command terminal
In the file find the #igonreip line and remove the # from it. After that add the IP address or range that you want to whitelist.

Bantime, findtime, and maxretry
Similarly, we can also increase or decrease the time of banned IP-address by changing the values of bantime option given in the file.
[Default]

bantime = 10m
To reduce or increase the time period, simply change the default 10 minutes to whatever you want. Whereas to block the Ip-address permanently use some negative value.
maxretry
How many maxima tries an IP-address must have made to get blocked? Be default it is five and declared using the maxretry option in jail.local file. If you want to reduce it let’s say only after two malicious attempts the IP should get blocker then change the number from 5 to 2. In the same way, you can increase the number of maximum tries as well.
maxretry = 5
findtime
It is the time between the maximum retry that should happen for any malicious or login on the system before the Fail2Ban blocked the particular IP address. For example, someone is trying to log in, if he made 5 attempts in stipulated 10 minutes, then his IP gets blocked. However, you can change the findtime value to increase or decrease this time period.
findtime = 10m

Fail2ban can send email alerts
Yes, if some IP gets banned then you can receive the mail notification for the same. However, you have to enable and define what email address you want to use to receive the notification.
Install Sendmail- An open-source mail transfer agent (MTA)
sudo apt install sendmail
Now, there are two key settings we have to perform in the jail.local file to get emails notification.
- destemail – mail address that will use to get a notification.
- sender – email address from which fail2ban will send the emails.
So, in the file find the above two settings and add your email address-

Next, find the below line
action = %(action_)s
And change it with either of the following one-
action = %(action_)s – This one will send an email notification when some Ip-address gets banned.
or
action = %(action_mwl)s – In case you want the email notification for banned host IP including logs information then, use this action option.
Furthermore, you can look at our best email client apps list for Ubuntu or Debian Linux.
Enable Services in Fail2ban Jail file
As I mentioned earlier that creates jail.local comprise both Actions and Filters that can be used to disable/enable default allowed services or create your own.
For example– By Default, SSH is enabled in Jail.local of Fail2ban.
Actually, in the Fail2ban Jail file, you will see there are lots of services that come along with it. However, you have to enable them to use. OR else you can create your own.
Under /etc/fail2ban/filters.d folder you can see all the configuration filter files for each Fai2ban Jail service available there.

Before showing how to turn them ON, let’s check what are the enabled jails services-
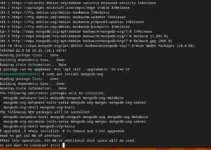
sudo fail2ban-client status
The output will be like this-
Status
|- Number of jail: 1
`- Jail list: sshd
Now, if we want to turn ON some Jail service, we need to add enabled = true in the jail.conf file after the jail service title. The following example shows how to enable the apache-auth jail:
Example- Let’s Turn on Fail2ban Apache-auth Service
Edit jail.local and find pre-defined Apache-Auth Jail Service

Save the File using Ctrl+X, Y, and by hitting Enter Key.
Restart Fail2ban server
sudo systemctl restart fail2ban
Now, again use the Fail2ban client to check how many Jail services are enabled-
sudo fail2ban-client status
This time the output will be-
Status
|- Number of jail: 2
`- Jail list: apache-auth, sshd
To know more information about the service use its name with the above command-
sudo fail2ban-client status apache-auth
Output:
Status for the jail: apache-auth
|- Filter
| |- Currently failed: 0
| |- Total failed: 0
| `- File list: /var/log/apache2/error.log
`- Actions
|- Currently banned: 0
|- Total banned: 0
`- Banned IP list:
Error:
If you are getting the following errors that means the particular service you want to enable is not yet installed on your system or sever. For example, If I have enabled Apache Jail but Apache itself is not available on my server then this kind of error will appear.
fail2ban.service: Main process exited, code=exited, status=255/EXCEPTION

[6613]: ERROR Failed to access socket path: /var/run/fail2ban/fail2ban.sock. Is fail2ban running?
Fail2ban Client Usage
Even we can use the client command tool of Fail2ban to deal with its various services- to see all commands related to it you can use the Help flag-
fail2ban-client -h
For example to ban or unban some IP for some service, use the following syntax
To ban
fail2ban-client set <JAIL-service> banip <IP>
To unban
fail2ban-client set <JAIL-service> unbanip <IP>
Example-
sudo fail2ban-client set sshd banip 192.168.0.6
Ending Note-
So, this was a quick overview of the Fail2ban installation and Configuration on Debian 11 Bullseye or 10 Buster. Although, the Fail2ban tool’s documentation is not vast, still if some want to look, check out its official website. Here are the links: Project page, Documentation, GitHub page for Source code