FileZilla is a free FTP client that offers many convenient functions and is easy to use. Although it is popularly used on Windows systems, however being an open-source application it is also available for Linux systems. Here we learn the commands to install FileZilla Client on Rocky Linux or AlmaLinux 8.
If you already have an FTP server, for example, on some hosting or cloud service, then easily upload and download the files using FTP/SFTP protocol with graphical clients such as FileZilla.
Apart from this, the FileZilla client also supports working with multiple FTP servers and different operating systems. FileZilla allows you to connect to an FTP server even if you use a firewall or want to use a proxy server. If desired, the connection can also be secured with SSL. Aborted downloads can also be seamlessly resumed. And if the server is busy, you can still continue your downloads thanks to the keep-alive system.
As a good alternative, we recommend the WinSCP client, which is also free. But it is not available for Linux systems, however, you can install the WinSCP client using Wine, here is the tutorial.
Steps to install FileZilla Client on AlmaLinux | Rocky Linux 8
The steps given here will also be the same for other RedHat-based systems such as CentOS and Oracle Linux.
1. Requirements
• Redhat based Linux
• A non-root user with sudo access
• Active Internet connection
2. Run DNF update
Here we will use the Almalinux or Rocky’s default package manager that is DNF to get packages from the system repository. Hence, before going further, once run the system update command:
sudo dnf update
3. Install Filezilla client on AlmaLinux or Rocky Linux 8
The packages to install the FileZilla client is already available through the default system repository of Rocky and AlmaLinux, hence we just need to run the DNF package manager with the installation command.
sudo dnf install filezilla
Press Y and then Enter Keys to start the setup process.

4. Run FileZilla Client Application
As you are done with the commands given above in this tutorial, you would already have the FTP client software on your system. Simply go to your Application launcher and search for Filezilla.
CLI– You can also start the app using your Terminal-
filezilla
Or via GUI:

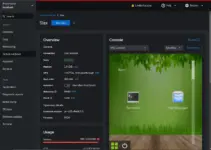
5. How to connect FTP Server
The interface of the application is simple to understand by novice as well. For instance, to connect to an FTP server, a user needs to enter the hostname or address of the server in the appropriate field. If you also need a username and password, enter this data as well. A click on the “QuickConnect” button then displays the contents of the server.
Once connected, on the right side of the FileZilla panel, you can now see the folder structure of the server, while on the left side you can see your computer’s folders. This means we can easily drag and drop files & folders from PC to the server or vice versa to download or upload.

6. Uninstall or Remove
Those who don’t want the Filezilla anymore on their Almalinux or Rocky can remove the same using the DNF package manager. Here is the command:
sudo dnf remove filezilla
Other Articles:
• Install FileZilla Client on Ubuntu 20.04 LTS Linux
• How to install FileZilla Server on Ubuntu 20.04/18.04 Linux
• Set up Hard drives & RAID on the NAS4server or XigmaNAS