Tutorial to learn the steps and commands for installing LibreNMS on Debian 11 Bullseye or Debian 10 Buster Linux using a command terminal to monitor network devices.
The monitoring of network environments is becoming more and more demanding as the complexity increases. Powerful systems such as LibreNMS usually provide a solid basic functionality, but they are often overwhelmed with special tasks such as monitoring or backing up configurations. LibreNMS has long integrated RANCID (Really Awesome New Cisco Config Differ), which specializes in monitoring Cisco router configurations. Using a simple router table with the login data stored there, the tool gains access to the configuration settings and can inform the administrator of any changes by e-mail.
LibreNMS is an open-source network monitoring system that can also graphically process the determined network data. In addition, the tool has a warning system that can also be used together with other tools. LibreNMS can be controlled with apps via Android and iPhone.
Few Key Features:
• Automatic discovery
• Customizable alerting
• API Access
• Billing system
• Automatic Updates
• Distributed Polling
• Offers Smartphone Apps for Android and iOS
• Based on MySQL & PHP
Steps to install LibreNMS on Debian 11 Bullseye
1. Requirements
To perform this tutorial to set up LibreNMS on your Debian Linux, the user needs a web server – Nginx or Apache. Here we are using Apache. Along with PHP and MariaDB, the user must have a system user with sudo access to install new packages.
2. Install Web server on Debian 11
We can use Apache or Nginx web servers, to install LibreNMS you can use any one of them. Here are the using the Apache, hence the command for it will be:
sudo apt install apache2
Start the webserver services:
sudo systemctl enable --now apache2
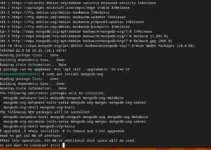
3. Install PHP, MariaDB, and dependencies
Here we will install PHP, MariaDB, and other required packages to set up LibreNMS easily on Debian 11 or 10. To install all of them, we can use the given command:
sudo apt install acl curl nano composer fping git graphviz imagemagick mariadb-client mariadb-server mtr-tiny nginx-full nmap php-cli php-curl php-fpm php-gd php-gmp php-json php-mbstring php-mysqli php-snmp php-xml php-zip rrdtool snmp snmpd whois unzip python3-pymysql python3-dotenv python3-redis python3-setuptools python3-systemd python3-pip
4. Configure MariaDB for LibreNMS
Before creating a database, let’s configure the MariaDB for LibreNMS, so edit the configuration file of the database server.
sudo nano /etc/mysql/mariadb.conf.d/50-server.cnf
Under [mysqld] add the following lines:
innodb_file_per_table=1
sql-mode=""
lower_case_table_names=0
Save the file by pressing Ctrl + O, type Y, and use Ctrl + X to exit.
Restart Database service:
sudo systemctl restart mariadb
And enable the same:
sudo systemctl enable mariadb
Secure your MariaDB:
sudo mysql_secure_installation
Follow the guided wizard, create a password for the database root user and remove the demo database, disallow remote login and anonymous users.
5. Login and create a Database
Now, let’s create a dedicated Database to store the data generated by the LibreNMS.
sudo mysql
Use the commands to create a Database.
Here we are using Database & Username- librenms, use whatever you want to use. Also, don’t forget to replace the password with what you want to set.
CREATE DATABASE librenms CHARACTER SET utf8mb4 COLLATE utf8mb4_unicode_ci;
CREATE USER 'librenms'@'localhost' IDENTIFIED BY 'password';
GRANT ALL PRIVILEGES ON librenms.* TO 'librenms'@'localhost';
FLUSH PRIVILEGES;
exit;
Set TimeZone for PHP:
sudo sed -i "s,;date.timezone =,date.timezone = \"Europe/Amsterdam\",g" /etc/php/*/apache2/php.ini
sudo sed -i "s,;date.timezone =,date.timezone = \"Europe/Amsterdam\",g" /etc/php/*/cli/php.ini
sudo sed -i "s,;date.timezone =,date.timezone = \"Europe/Amsterdam\",g" /etc/php/*/fpm/php.ini
Note: Change the Europe/Amsterdam as per your country. If you don’t know the PHP value for your timezone refer to the official page meant for it.
Also, change the system timezone accordingly:
sudo timedatectl set-timezone Europe/Amsterdam
sudo dpkg-reconfigure -f noninteractive tzdata
mysql_tzinfo_to_sql /usr/share/zoneinfo | mysql -u root mysql -p
sudo systemctl restart apache2 mariadb
6. Download LibreNMS on Debian 11
LibreNMS files are not present to download using the repository of Debian, hence let’s clone it using Git directly from its GitHub repository.
cd /opt
sudo git clone https://github.com/librenms/librenms.git
7. Add Librenms user
Let’s create a dedicated user that can only access the files of Librenms
sudo useradd librenms -d /opt/librenms -M -r -s /bin/bash
Also, add a LibreNMS user to the Apache Group
sudo usermod -a -G librenms www-data
Set permissions for downloaded files:
sudo chown -R librenms:librenms /opt/librenms
sudo chmod 771 /opt/librenms
sudo setfacl -d -m g::rwx /opt/librenms/rrd /opt/librenms/logs /opt/librenms/bootstrap/cache/ /opt/librenms/storage/
sudo setfacl -R -m g::rwx /opt/librenms/rrd /opt/librenms/logs /opt/librenms/bootstrap/cache/ /opt/librenms/storage/
Install the PHP Dependencies
Switch to LibreNMS created user and then install the PHP dependencies required by this network monitoring platform.
sudo -u librenms bash
cd
./scripts/composer_wrapper.php install --no-dev
exit
8. Configure PHP-FPM for LibreNMS installation
Create a PHP FPM configuration file for LibreNMS by copying the existing configuration file:
cd /etc/php/*/fpm/pool.d/
sudo cp www.conf librenms.conf
Now, edit the copied file
sudo nano librenms.conf
Replace [www] to [librenms]
Change user and group from data-www to librenms
user = librenms
group = librenms
Update listen to a unique path
listen = /run/php-fpm-librenms.sock
Save the file – Ctrl + O, press Enter and exit- Ctrl + X.
Come back to your root directory.
cd
Configure snmpd
sudo cp /opt/librenms/snmpd.conf.example /etc/snmp/snmpd.conf
sudo nano /etc/snmp/snmpd.conf
Change RANDOMSTRINGGOESHERE to LibreNMS and Save the file.
sudo curl -o /usr/bin/distro https://raw.githubusercontent.com/librenms/librenms-agent/master/snmp/distro
sudo chmod +x /usr/bin/distro
sudo systemctl enable snmpd
sudo systemctl restart snmpd
Create Cron job
sudo cp /opt/librenms/dist/librenms.cron /etc/cron.d/librenms
sudo nano /etc/cron.d/librenms
Add the following line at the end of the file:
*/5 * * * * librenms /opt/librenms/poller.php -h all >> /dev/null 2>&1
Save the file & exit the text editor using Ctrl+O and hit the Enter key.
Restart the cron service to apply the changes:
sudo systemctl restart cron
Enable the scheduler
sudo cp /opt/librenms/dist/librenms-scheduler.service /opt/librenms/dist/librenms-scheduler.timer /etc/systemd/system/sudo systemctl enable librenms-scheduler.timer
sudo systemctl start librenms-scheduler.timerCopy logrotate config
To make sure the LibreNMS logs not get too large, enable log rotating:
sudo cp /opt/librenms/misc/librenms.logrotate /etc/logrotate.d/librenmsA few other things need to be done:
Create Global lnms shortcut:
sudo ln -s /opt/librenms/lnms /usr/local/bin/lnmsEnable Bash completion for lnms command:
sudo cp /opt/librenms/misc/lnms-completion.bash /etc/bash_completion.d/9. Create an Apache virtual host configuration file
To access the LibreNMS web interface we need to tell our Apache server where the files of it located. For that, we create a virtual host configuration file:
sudo nano /etc/apache2/sites-available/librenms.conf
Add the following lines:
Note: Replace the Server name with your IP-Address or fully qualified domain name such as librenms.example.com
<VirtualHost *:80>
  DocumentRoot /opt/librenms/html/
  ServerName  librenms.example.com

  AllowEncodedSlashes NoDecode
  <Directory "/opt/librenms/html/">
    Require all granted
    AllowOverride All
    Options FollowSymLinks MultiViews
  </Directory>

  # Enable http authorization headers
  <IfModule setenvif_module>
    SetEnvIfNoCase ^Authorization$ "(.+)" HTTP_AUTHORIZATION=$1
  </IfModule>

  <FilesMatch ".+\.php$">
    SetHandler "proxy:unix:/run/php-fpm-librenms.sock|fcgi://localhost"
  </FilesMatch>
</VirtualHost>
Save the file by pressing Ctrl + O, Y, and Ctrl+X to exit.
Disable the default site and enable the newly created one
sudo a2dissite 000-default
sudo a2enmod proxy_fcgi setenvif rewrite
sudo a2ensite librenms.conf
Restart services:
sudo systemctl restart apache2
sudo systemctl restart php*-fpm
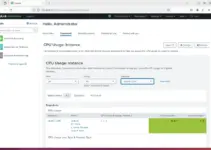
10. LibreNMS Web interface
Once the Configuration of LibreNMS is completed, go to your system browser and point it to the server IP address or domain name you have used.
for example- http://server-ip-address to http://your-domain.com
First, the installation setup will check for the dependencies required by the software.

After that add your MariaDB Database, Username, and password details. Once done check whether LibreNMS can connect Database or not. If it is then click on the “Build Database” button.

Create Admin User.

Login to LibreNMS backend.


Other Articles:
• Install Fotoxx Image Editor on Debian 11 Bullseye
• How to install Telegram on Debian 11 Bullseye
• Install Jupyter Notebook on Debian 11 Bullseye Linux
• How To Install Cacti monitoring Debian 11 Bullseye