Learn the commands to download & install Oracle Jave 8 64-bit on Ubuntu 20.04 Focal fossa or Ubuntu 22.04 Jammy Jellyfish using the terminal.
A programming language, in general, allows you to formulate programs and specify their behavior. For example, you can program your own pocket calculator with a few lines of text code.
And Java is a popular programming language owned by the company “Sun Microsystems” but later bought by Oracle in 2010. The first version of Java appeared in 1995 and, along with C, is one of the most famous programming languages in the world. It belongs to the group of object-oriented programming languages; which means written programs are structured in classes and objects. Java was mainly influenced by the programming languages C++, C#, and Objective-C. Java is primarily used to program web applications, desktop applications, and apps. For example, apps for Google’s Android operating system are developed in Java.
Well, as Linux systems are open source, hence the packages available to install via their official repositories are mainly free and open source. That’s is the reason why the Java version available in them to install by default using the package manager is OpenJDK- the open-source implementation of Java by its community. However, those who want to install the official Oracle Java 8 version on their Linux systems they can do that as well. And in this tutorial, we will learn how to do that.
Steps to install Oracle Java 8 on Ubuntu 20.04 | 22.04
The steps are given here to download and set up Java 8 on Linux will be the same for other distros such as Linux Mint, CentOS, RedHat, AlamLinux, Rocky Linux, Manjaro, etc.
Run system update, and have wget
Although running update is absolutely not necessary here but to get wget package and make sure the system repository cache is up to date, run it once. Along with the commands to install wget tool.
sudo apt update
sudo apt install wget
Download Oracle Java 8 for Linux
As we apprised before, officially Oracle Java 8 is not available to install using the APT package manager, instead, OpenJDK is there.
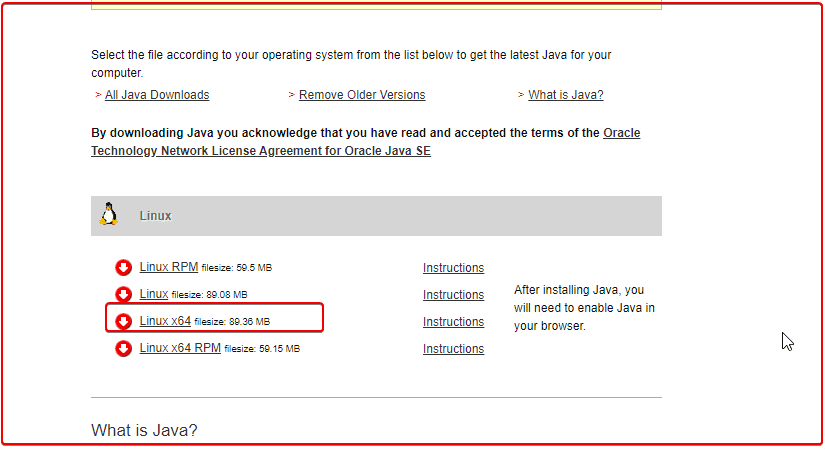
Visit the official website and download the Jave 8 for Linux.

You can also copy the link and download it using the command given below.
wget "https://javadl.oracle.com/webapps/download/AutoDL?BundleId=245797_df5ad55fdd604472a86a45a217032c7d" -O java-8.tar.gz
Extract Java 8 Tar file on Linux
Create a directory where you want to extract and keep the files safely to use with various applications that required java.
sudo mkdir /usr/java
Once you have the archive file downloaded on your system, extract it using the default Tar tool. Here is the syntax
tar -xf file-name.tar.gz -C /target-directory
Hence, the command will be:
tar -xf java-8.tar.gz -C /usr/java
Check Java 8 Version on Ubuntu 20.04 | 22.04
The Java binary is available inside the extracted folder under the bin directory, let’s first switch to that and then check the version we have received of the Oracle Java to use.
cd /usr/java/jre1.8*/bin
./java -version

Don’t get confused with 1.8.0_321 and Java v8, they are the same.
Add the folder to your system PATH
Now, let’s add the folder in which you have extracted the Java 8 to our system path to use it regardless of the current directory in which we are.
Here is the syntax to do that:
echo 'export PATH="$PATH:/full-path-to-executable-folder"' >> ~/.bashrc
For example, we have extracted the file under /usr/java/jre1.8.0_321/bin, hence this will be the executable folder path. Use the full path as we did, the version number would be different in your case.
Then the above command will be:
echo 'export PATH="$PATH:/usr/java/jre1.8.0_321/bin"' >> ~/.bashrc
reload bash shell:
source ~/.bashrc
Check version:
java -version

Uninstall or Remove Java 8 from Ubuntu
In the future, if you want to delete or remove the installed Java 8 version of Oracle from your Ubuntu 20.04 or 22.04 Linux, then run the following command:
sudo rm -r /usr/java/jre1.8*
Alsop, remove the exported path variable:
nano ~/.bashrc
scroll down and delete the line:
export PATH="$PATH:/usr/java/jre1.8.0_321/bin"
Save the file Ctrl+O, hit the Enter, and then Ctrl+X to exit.
Other Articles:
• 2 ways to install Oracle Java 17 on Ubuntu 20.04 | 22.04 LTS
• 3 Ways to install Zotero on Ubuntu 22.04 or 20.04 LTS
• How to install MySQL 8.0 Server on Debian 11 Bullseye


