If you have multiple PC or Laptops on the same network in your office or home, then you can install your own centralized open-source ads and trackers blocking solution called Pi-hole. Here we let you know how to set Pi-hole on Docker…
What is Pi-hole?
Pi-hole is open-source software available to install on Docker and Linux operating systems. The common function of it to block tracking and advertising while surfing various online websites, apps, and products. It is also based on Linux and optimized to run on computers with minimal equipment, even if we can use it on Raspberry Pie.
Although we can use the Adblocker extension in our browser to stop unwanted and malicious ads, however, the solution is still hovering around individual PC, not for the whole network. I mean it will not cover other devices such as smartphones, Smart TVs, and other guest devices.
Of course, advertisement is a revenue source for many online portals including ours, however, because of a growing proportion of defective online advertising, many users are turning to AdBlocker and integrating them into the browser. For example, surfing Torrent websites with full adult or malicious ads…
Thus, here the Pi-hole comes into the game, the users can set it up as an internal DNS server through which all network traffic must be routed. In this way, the filters can be applied and the advertising banners can be sorted out.
Moreover, using Pi-hole we can set filters based on exclusion lists. That means you get ready-made lists that you can have refreshed again and again, but you can also define blacklists and whitelists yourself.
However, apart from the benefits of Pi-hole, there are some disadvantages such as it can block certain pages
While using Pi-hole you may see a slight delay in the page view. Problems with controlling devices in the network are also possible, depending on the router.
Install and Setup Pi-hole on Docker to block Ads
Note: Before following this tutorial, please make sure Docker is already installed on your system. If not then first install Docker on Windows or Docker on Linux.
Although we can install Pi-Hole on Ubuntu, CentOS, or any other Linux system, however, installing on docker will not only keep it separate from our host system but also provides us a way to run various other applications side by side.
Create storage volume for Pi-hole and dnsmasq
To store data persistently generated by the Pi-hole, we create a storage volume which is nothing but a folder, and also one for dnsmasq to save the configuration file.
Thus, run these two commands with Sudo rights on your server or PC
sudo docker volume create etc-pihole

sudo docker volume create etc-dnsmasq.d
Note: Make sure your host IP address is static.
Command to Install Pi-hole on Docler
Here is the single command that you have to run on your Docker to not only install Pi-hole network adblocker but also to set server IP, ports, and other important settings…
sudo docker run -d --name pihole -p 53:53/tcp -p 53:53/udp -p 67:67 -p 80:80 -p 443:443 -e TZ="Asia/Kolkata" -v etc-pihole:/etc/pihole/ -v etc-dnsmasq.d:/etc/dnsmasq.d/ --dns=127.0.0.1 --dns=1.1.1.1 --restart=unless-stopped --hostname pi.hole -e VIRTUAL_HOST="pi.hole" -e ServerIP="127.0.0.1" pihole/pihole:latest
Note: You can change Time Zone in the above command as per your location, here it is “Asia/Kolkata”. If you don’t know yours then check out the Wikipedia page to find it.
Above command explanation:
-d = Executes the container in the background and outputs the ID of the container on completion.
–Name pihole = Names the container to pihole.
-p = Releases ports 53 (DNS), 67 (DHCP), 80 (Webadmin), and 443 (HTTPS Webadmin) on the host system.
-e TZ = “Asia/Kolkata” = Specifies the time zone.
-v = Releases the corresponding folder on the host system so that the container can save data persistently.
–DNS = 127.0.0.1 = Specifies a forced DNS server for the container. In this case the container pi-hole itself.
–Restart = unless-stopped = The container is restarted every time the host system is restarted unless it was stopped manually.
–Hostname pi.hole = Gives the container an explicit hostname.
-e VIRTUAL_HOST = “ pi.hole “ = Tells the pi-hole container that it can be reached at pi.hole .
-e ServerIP = “127.0.0.1 ″= Defines the LAN IP address for the Web and Lighttpd modules of the Pi-hole.
pihole / pihole: latest = The image name on hub.docker.com
Find or Set Pi-hole Admin password
If you have used the above command, an admin password has already been set by it, randomly. To find what is the password, so that you can log in to its web interface, we can use the command:
docker logs pihole | grep random
In case you want to change the Pi-hole password then use this command:
sudo docker exec -it pihole bash
The above command will drop you into the Pi-hole container Shell, with the root user. So, from here we can use the user password as we do in any Linux OS.
sudo pihole -a -p
Enter a new password two times…
Login Web interface
Finally, open your browser on local or any other system available on the same network and enter the IP address of your host system where the Pi-hole has been installed.
For example: If your host system where Docker has been installed is 192.168.189.110, then simply type: http://192.168.189.110/admin
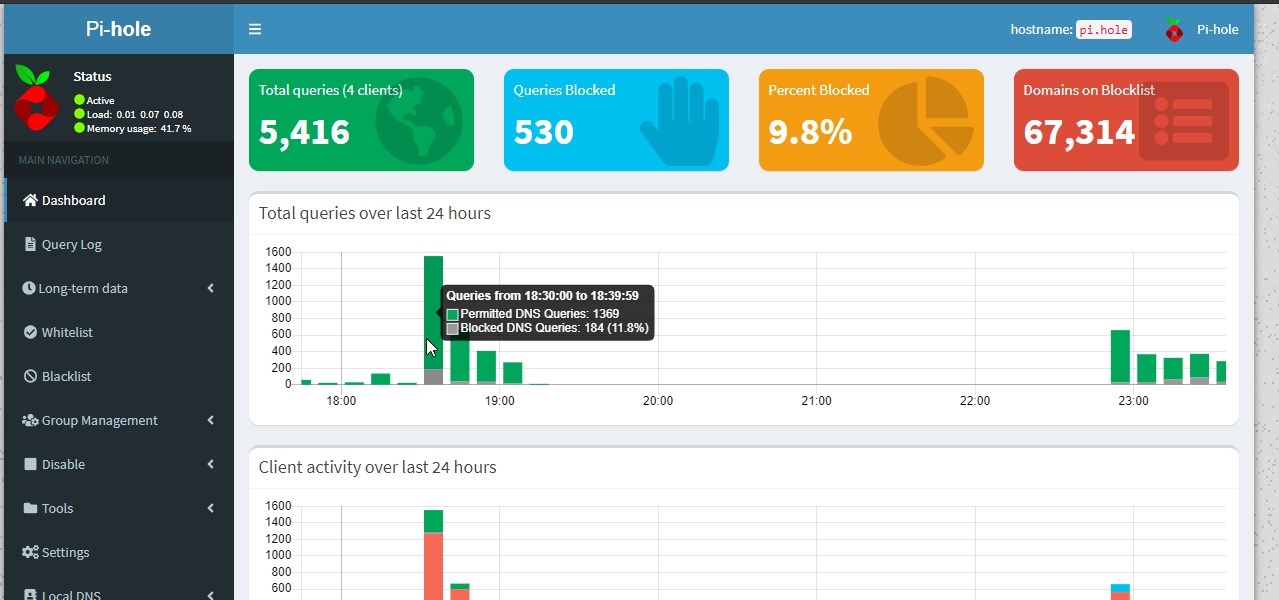
Enter the password and log in to get the Dashboard of Pi-Hole advertisement blocker.
Set DNS in router or PC to block ads
Pi-hole will work as a DNS server for our network, thus we have to supply the Ip-address of our Pi-hole as the DNS address for all the available systems. For this, we can go to our router and in the network setting, can manually set the IP address of Pi-hole as DNS for all systems. We can’t show that because various router models have different placements for these settings. However, you can easily get this online, the instructions to do it.
If you don’t want to change the settings in the router then simply open each computer network setting and manually enter the Pi-hole Ip-address as the DNS server address. This will much easy and more feasible option for a few PCs in the network.
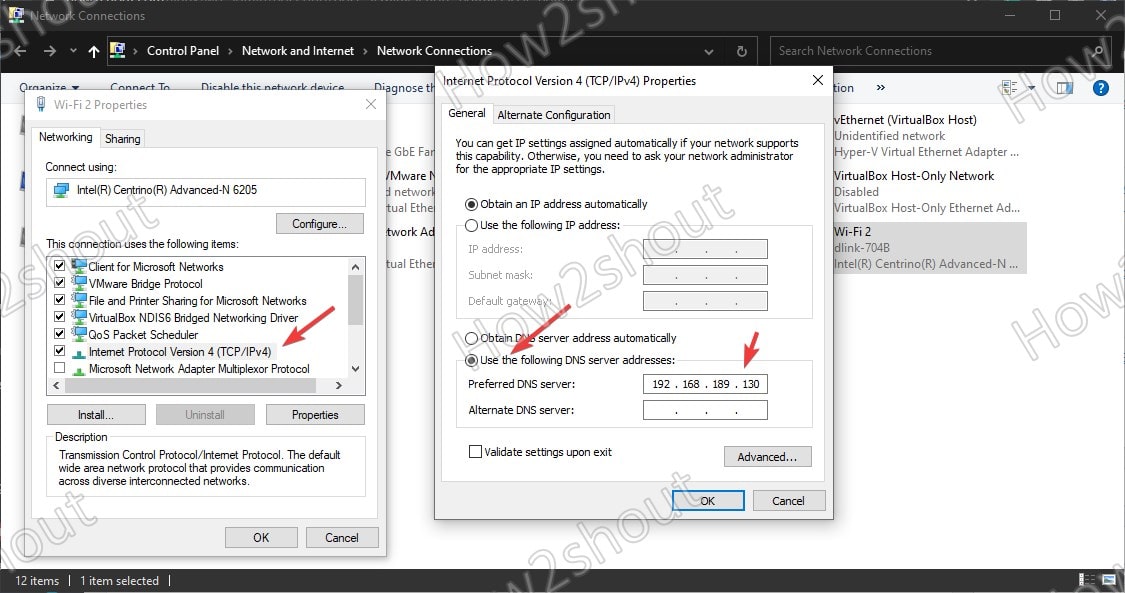
For example- on Windows, simply open Adapter properties, select IPv4, and then manually enter the DNS server address which is nothing but just your Pi-hole installed host address.
That’s it, in the same way on Linux change the DNS and the Pi-hole will start blocking all the advertisements…
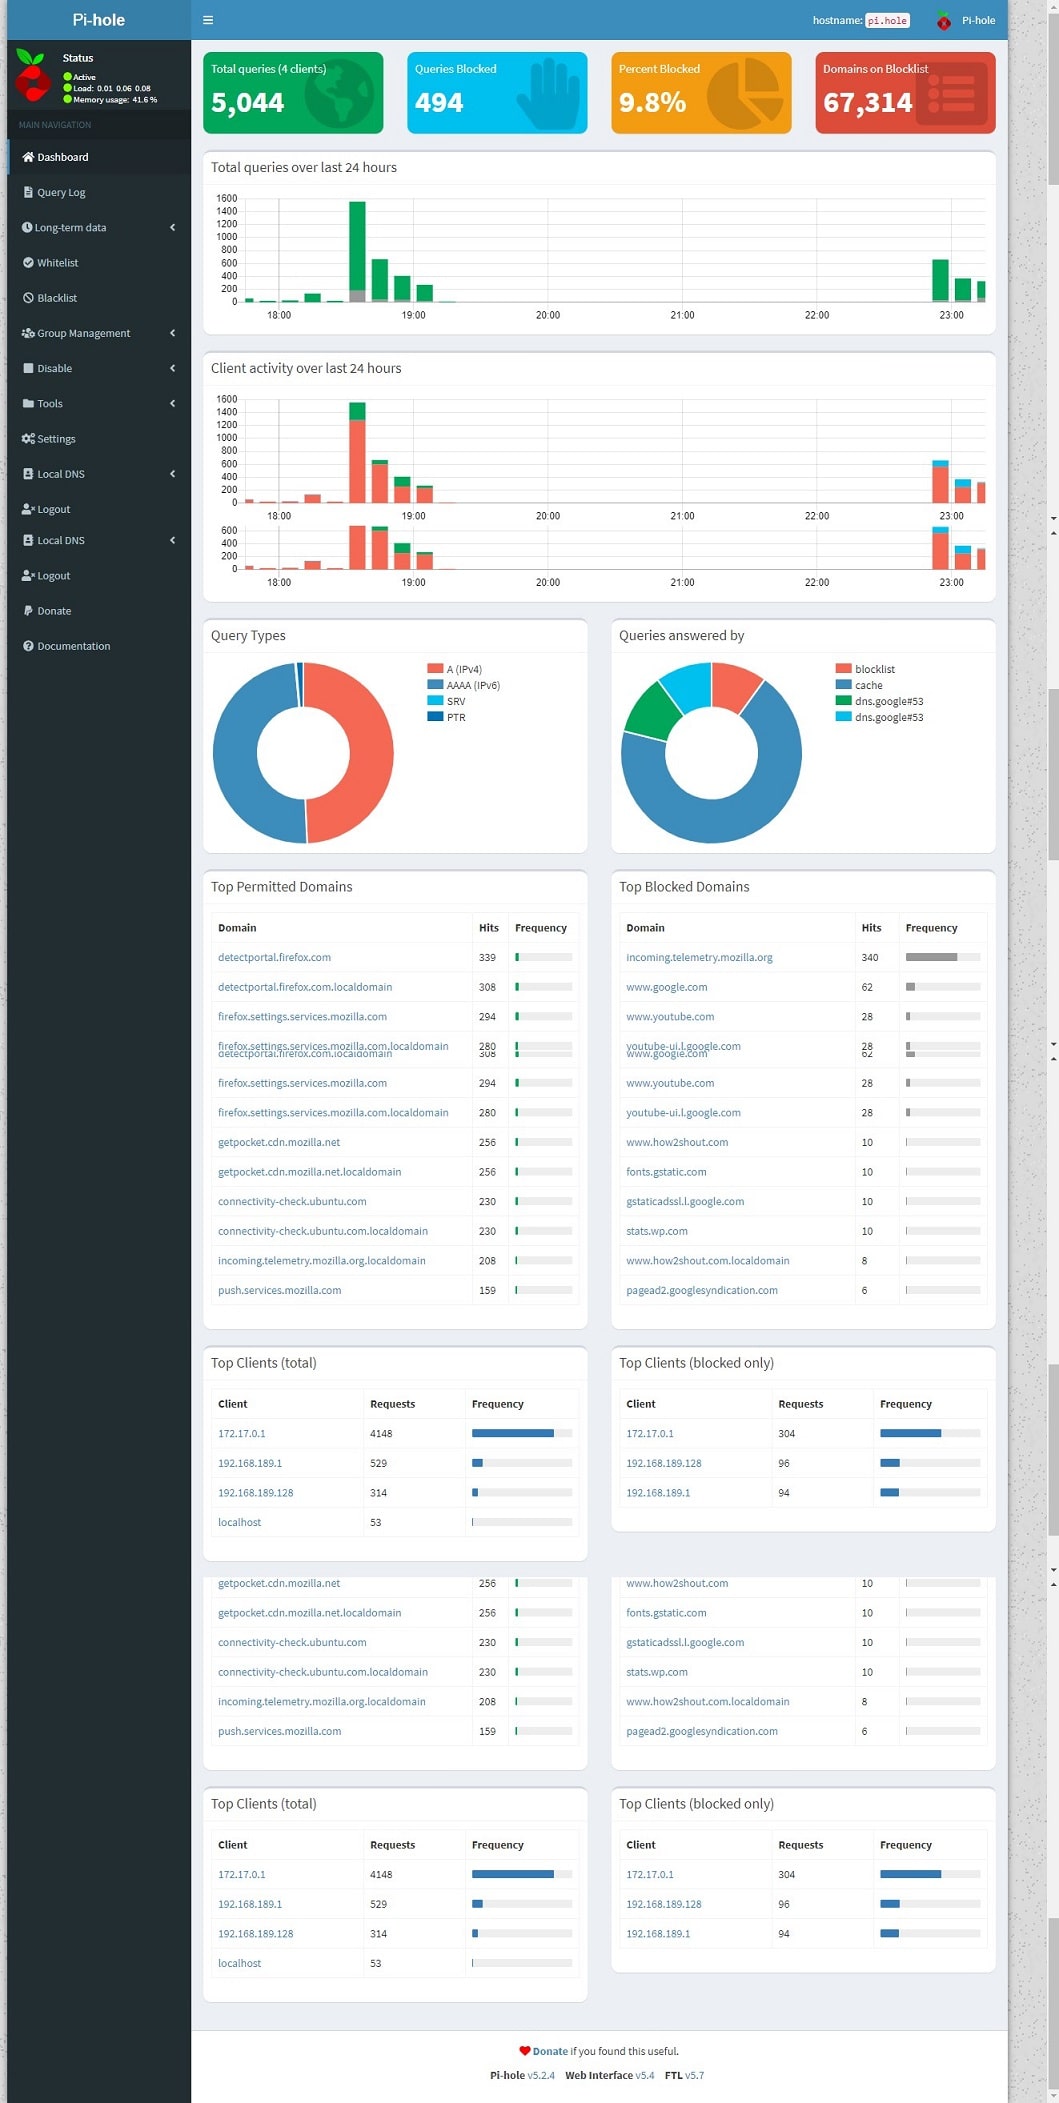
Complete Web interface
How to block or unblock websites on pi-hole
If you want to block some websites on your network then we can use the Pi-hole whitelist and blacklist feature. For example, if you need to block adult websites, social media, or any other dangerous page for your kids or in the office then we can do that as well.
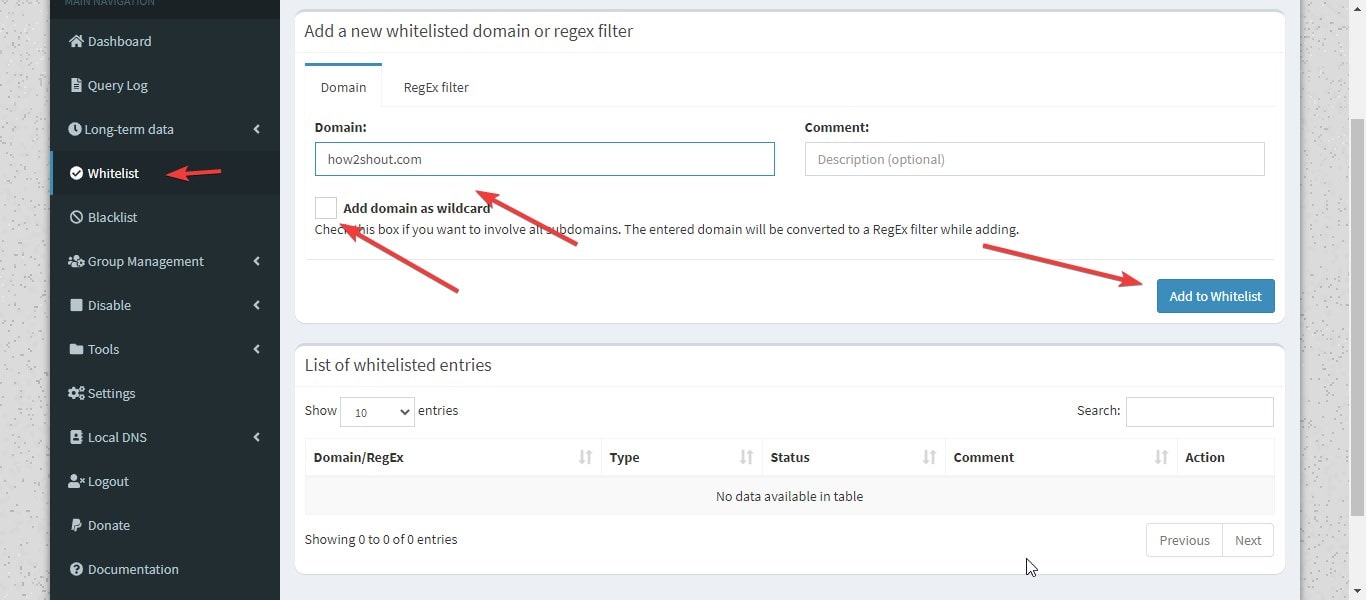
On the Pi-hole Dashboard select the Whitelist option from the left side panel. Enter the domain or website you want to whitelist, and select “Add Domain as Wildcard” so that it could whitelist all versions of the URL or domain.
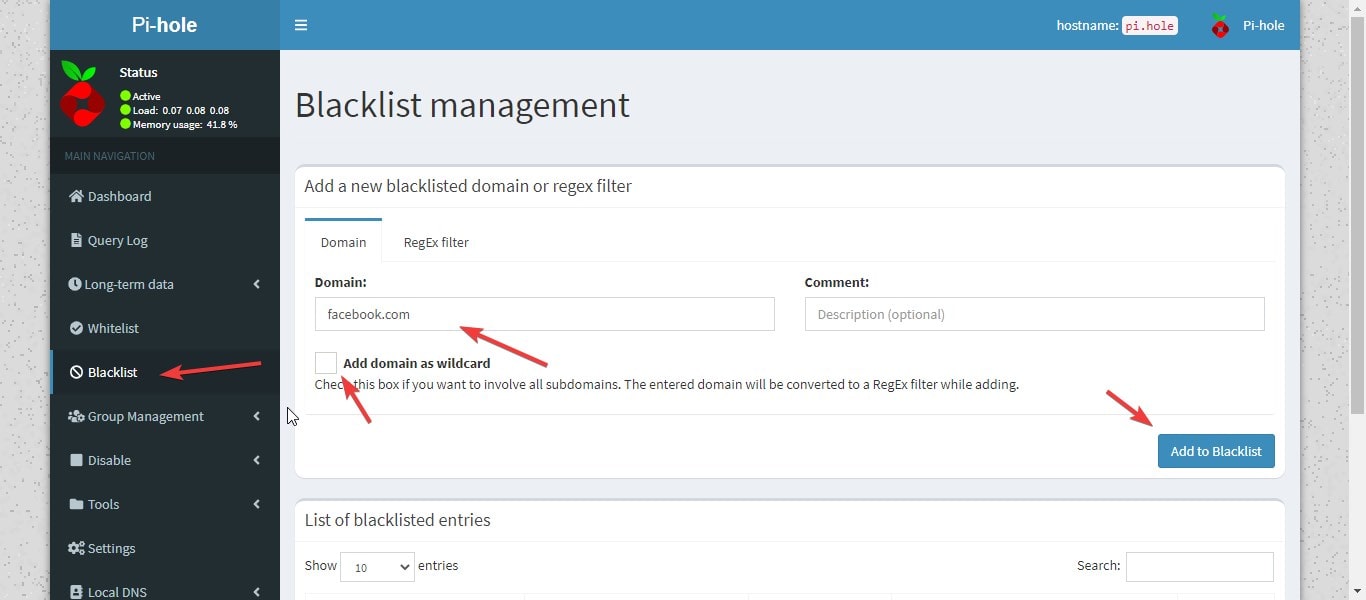
In the same way, we can block websites as well. Enter the name of the Domain, mark the wild card option, and hit the Add to Blacklist button.
Disable Ad-block for a certain period of time
As we cannot tell Pi-hole not to block ads on some particular website or domain. Thus, in case you want to check some advertisements or want to test something, we can disable Pi-hole from blocking advertisements for the whole network either completely or for a certain period of time.
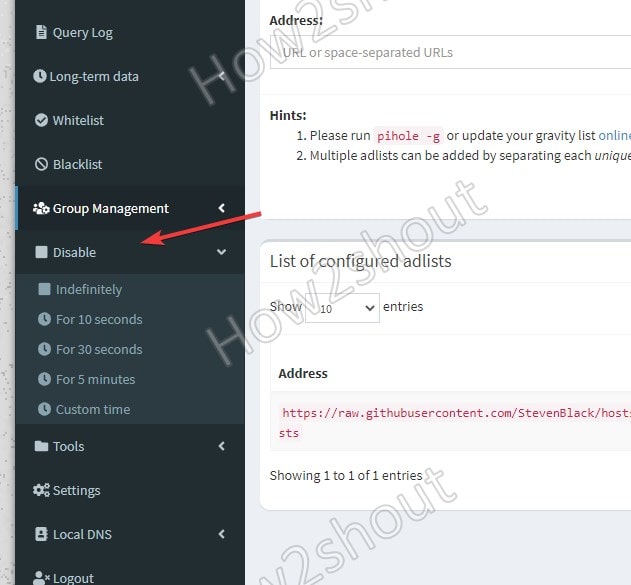
For that from the menu panel, select Disable and select the desired option.
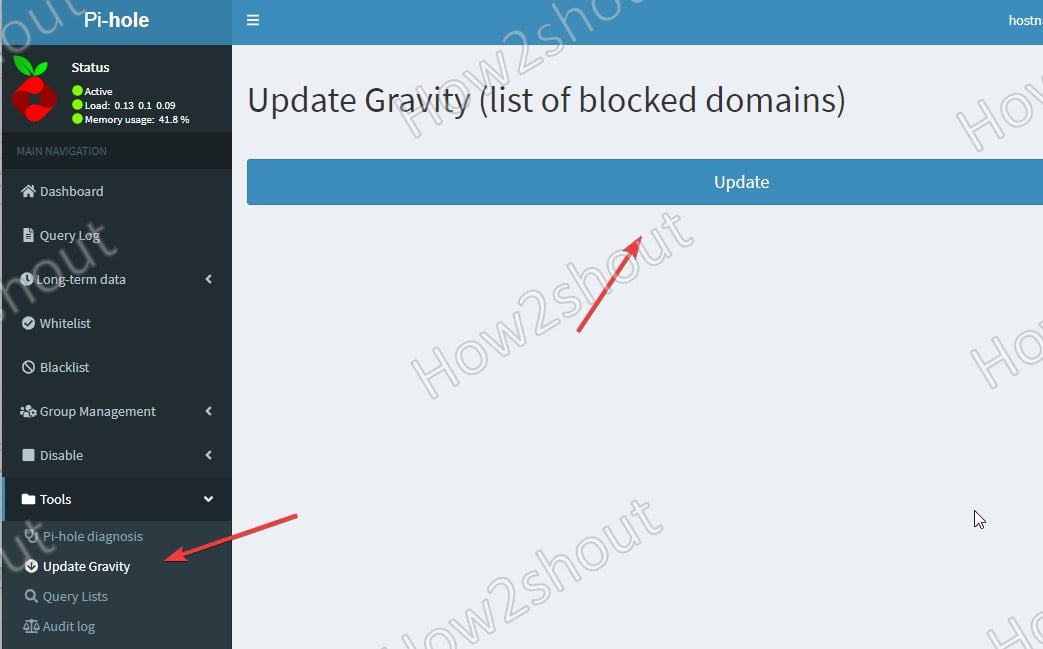
Update Gravity (list of blocked domains)
Pi-hole comes with its own list of malicious domains that are blocked by default using the Gravity database. Furthermore, as we start adding or deleting multiple domains manually from the blocked list, it starts creating junk. So, this feature will also flush and rebuilt the database, safely. Alternatively, you can use command- pihole -g
Update Pi-Hole
Remember as we are using Docker Image here, therefore the upgrading of pi-hole is not just simple as running the update command. For that, we have to remove the existing container and then need to pull the latest image to create a new container. Learn more on the GitHub page.



I have followed this manual and I have my pihole running, but when I try to update Gravity with “pihole -g” it returns the error:
“DNS resolution is currently unavailable”
Does anyone have any idea where the error might be?
Connect to pihole container-
docker exec -it pihole /bin/bashRun update-
apt updateInstall nano –
apt install nanoAnd then edit its resolving file-
nano /etc/resolv.confCheck it contains
127.0.0.1as nameserver or not. In case you have multiple entries then comment out them using #.After that save the file and exit its bash- by typing-
exitthen restart the container –
docker restart piholeFirst of all thanks for your help.
I can’t install nano because seems than the container can’t access internet. At the end I have edited /etc/resolv.conf with ‘cat’ command. After that I have restarted the container and I continue with the same issues 🙁