Learn how to install and enable the SSH server on Ubuntu 20.04 using the OpenSSH package and command terminal.
There was a time when computers on the net were accessible via the Telnet protocol. Since this protocol did not offer encryption, recording passwords became a trivial matter.
To secure remote access, Tatu Ylönen wrote a suite of programs in the mid-1990s – consisting of server, client, and utilities – which he called ssh (secure shell).
Later he founded the company ssh.com and offered version 2 of the SSH suite only commercially. As a result, developers of the OpenBSD operating system forked the public source code of version 1. They further developed the program under the name “OpenSSH”. This OpenSSH suite became an integral part of virtually all Linux distributions.
Three important characteristics led to the success of ssh:
⇒ Authentication of the remote site, no addressing of wrong targets
⇒ Encryption of data transmission, no eavesdropping by unauthorized persons
⇒ Data integrity, no manipulation of the transmitted data
Steps to install & enable SSH server on Ubuntu 20.04 LTS
1. OpenSSH Installation Requirements
• Ubuntu Linux
• A non-root user with sudo rights
• Terminal Access
• Internet Access
2. Run System Update
Let’s first run the system update command to refresh Ubuntu 20.04 repository cache. This will also update the packages installed on your system.
sudo apt update -y
3. Install the SSH server on Ubuntu 20.04
Like all the Ubuntu versions, the OpenSSH server is also available through the default system repository of Ubuntu 20.04 LTS Focal Fossa. Hence, we just need to run the system, APT package manager, to install it.
sudo apt install openssh-server -y
Enter your user password when the system asks for…
4. Enable and start the OpenSSH service
Once the installation is completed, let’s ensure the service of the OpenSSH is running without any error.
sudo systemctl status ssh
If it is not enabled and running already, then use this command:
To start it
sudo systemctl start ssh
To enable, so that SSH service can be started automatically with system boot.
sudo systemctl enable --now ssh
5. Open Port 22 on Ubuntu 20.04 LTS
Well, most of the time port 22 would already open in the firewall to access from the outside world, however, if not then we have to open the SSH service in the uncomplicated firewall of Ubuntu.
sudo ufw allow ssh
or
sudo ufw allow 22/tcp
Whereas, those who are on the cloud need to whitelist this port in their service provider’s firewall service.
6. How to connect server over SSH
After installing the OpenSSH server we can easily connect it from our local machine it doesn’t matter if you are using Windows, Linux, macOS, or any other, the command syntax will be the same.
Just open your system’s command terminal and use the given syntax:
ssh user@server-ip-address
⇓⇓⇓⇓⇓⇓⇓⇓⇓⇓⇓⇓⇓⇓⇓⇓⇓⇓⇓⇓⇓⇓⇓⇓⇓⇓
For example, if your user is h2s and the server-IP-address is 192.168.17.141, the command will be:
ssh [email protected]
7. How to Change default SSH port on Ubuntu 20.04
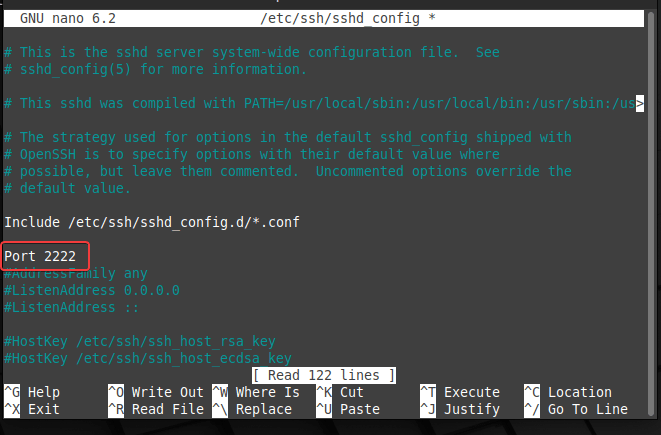
Well, if the default port number of SSH (22) has been occupied by some other service or just for security reasons you want to change it then edit the ssh_config file, here is how to do that.
sudo nano /etc/ssh/sshd_config
There find a line #Port 22. Remove the # tag available in front of that and change the default port 22 to whatever you want to set. For example 2222.
Save the file using Ctrl+O, hit the Enter key, and then Ctrl+X to exit.

Note: Don’t forget to restart the SSH service to apply the changes.
8. How to Disable root login on SSH Ubuntu 20.04 Server
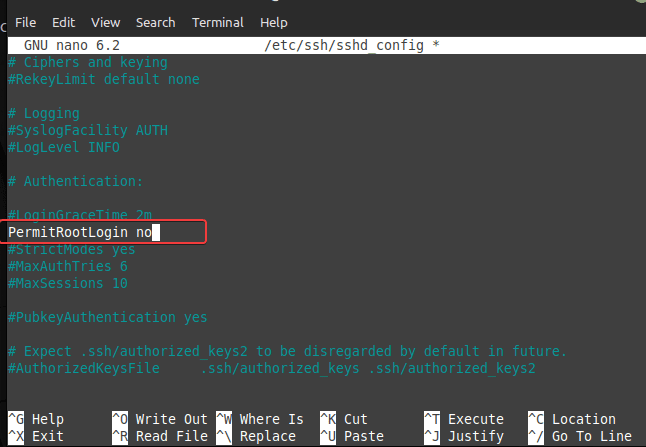
The SSH server running on Ubuntu 20.04 is accessible remotely using any available user on the system. However, if you want to restrict the users to login as root then that is possible as well. This means remotely the users can log in to Ubuntu 20.04 via SSH protocol with any other user except root.
To disable root user login, again edit the SSHD configuration file:
sudo nano /etc/ssh/sshd_config
Find the line #PermitRootLogin and remove the #tag from it, so that the system can read it. And set its value to no as shown below in the screenshot as well.
PermitRootLogin no

Note: Don’t forget to restart the SSH service to apply the changes.
9. How to restart the SSH service
The system while installing the SSH feature on our Ubuntu 20.04 with the help of the OpenSSH server package, it also creates a background service for it. This means with system boot it starts automatically if enabled. Hence, we can use systemctl to restart the SSH service to apply the changes we have made.
sudo systemctl restart ssh
10. How to stop or disable SSH
Well, if you don’t want anyone to log in Ubuntu 20.04 system using SSH protocol then we can stop and disable it.
To stop the SSH:
sudo systemctl stop ssh
However, after starting the service will automatically get started on the next system reboot if it is enabled. Hence, to disable that as well use:
sudo systemctl disable ssh
11. How to uninstall SSH server on Ubuntu 20.04
You may have your own reasons that lead to the removal of the SSH service from Ubuntu 20.04, if that is the case, then we can uninstall the SSH server easily. Here is the command to do that.
sudo apt autoremove --purge openssh-server
Ending Note:
So far using this tutorial, the user can install, enable, disable and restart the service of the SSH server on Ubuntu 20.04. If you want to learn more about then visit the official doc page of it.
Other Articles:
⇒ How to Enable SSH on Debian 11 Bullseye Linux
⇒ Install & Enable the OpenSSH server on CentOS 8 Linux
⇒ How to Enable SSH server on Ubuntu 22.04 Jammy Linux
⇒ Install CyberPanel on Ubuntu 20.04 LTS Server
⇒ Install Yandex Browser on Ubuntu 22.04 LTS


