If after installing Debian 10 or 11 Bullseye you get an error in UFW firewall usage- “The command is not found” then you have to install it. And in this tutorial, we will learn that.
UFW (uncomplicated firewall) is an interface to IPTables, which is supposed to simplify the process of configuring a firewall. The aim of UFW is a straightforward command-line-based front-end for the very powerful, but not exactly easy to configure IPTables to offer. UFW supports both IPv4 and IPv6. If you want to secure the network or want to monitor the incoming and outgoing connections of your server, there is no way around a firewall. UFW is a practical tool that can be controlled and configured via the terminal.
UFW is quite easy to install because it is included in the package sources – at least if you are using an Ubuntu or Debian distribution. Learn – How to Upgrade Debian 10 Buster to 11…
Install and Enable UFW firewall on Debian 11 or 10
1. Setup UFW on Debian 11/10
If after installing the Debian Linux you won’t be able to use of UFW command because of not found error then it needs to be installed first.
sudo apt update
sudo apt install ufw
2. Enable/Start firewall on Debian Bullseye
After setting up, the service of the firewall would not be activated by default, and to make it live, run:
sudo ufw enable
3. Check UFW Status
To confirm UFW firewall service is working properly without any error:
sudo ufw status
4. To stop or Disable (optional)
In case you want to stop or disable your firewall then run:
sudo ufw disable
5. Firewall rules- Allow or Deny ports
Activating the firewall without defining rules already means that all incoming connections are forbidden and all outgoing connections are allowed.
ufw uses a three-level set of rules, which is stored in three configuration files. These are read and evaluated in the following order:
/etc/ufw/before.rules
/var/lib/ufw/user.rules (or /lib/ufw/user.rules – in which the rules defined in the command line are also persisted)
/etc/ufw/after.rules
This means that rules in user.rules may overwrite those in before.rules and rules in after.rules those of user.rules
Default rules files of UFW contains some basic rules to allow problem-free internal network traffic. However, you can add rules in ufw with a very simple command syntax given below:
sudo ufw allow|deny|reject SERVICE
For example:
To allow port number 8080 in UFW, the command will be:
sudo ufw allow 8080
to Deny Access:
sudo ufw deny 8080
6. Allow special port ranges and IPs
UFW can enable access to port ranges instead of individual ports. Here you have to specify the protocol – i.e. UDP or TCP – for which the rules should apply.
If the range of ports that you want to allow extends from 5000 to 5010, then you must execute the following commands for UDP and TCP in the terminal.
sudo ufw allow 5000:5010/udp
sudo ufw allow 5000:5010/tcp
It is also possible to specify allowed IP addresses with UFW. For example, if you want to allow connections from the private IP address 192.168.0.104, execute the following command:
sudo ufw allow from 192.168.0.104
You can also allow certain ports for an IP address. To do this, you need to mention that particular port such as 22 if you want to establish a connection via SSH to the above-mentioned IP address. This works with the following command:
sudo ufw allow from 192.168.253.49 to any port 22
7. Application filter
Few common services file automatically gets created when a service/program to be protected by ufw is installed. The corresponding configuration files are located in the /etc/ufw/applications.d/ directory. These are simple text files that contain the service name, a brief description, and the ports and protocols to be opened.
An overview of all current application filters can be obtained with the command
sudo ufw app list
This looks like this, for example:
Available applications:
Apache
LDAPS
LPD
MSN
MSN SSL
Mail submission
NFS
OpenSSH
POP3
POP3S
PeopleNearby
SMTP
SSH
8. Allow all default incoming and outgoing UFW connections
To deny or allow all incoming connections:
For Denying all connections:
sudo ufw default deny incoming
For Allowing all connections:
sudo ufw default allow incoming
To deny or allow all outgoing connections:
Allow all outgoing
sudo ufw default allow outgoing
Deny all outgoing
sudo ufw default deny outgoing
9. List & Delete UFW Firewall Rules on Debian 11 or 10
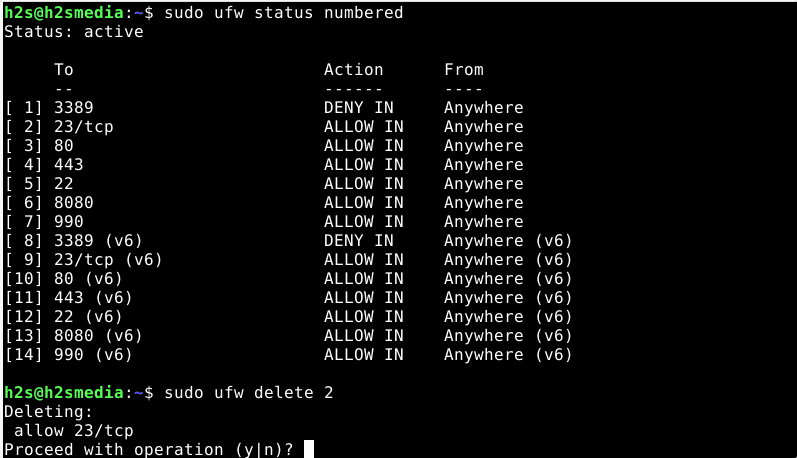
Before deleting let’s first see a list of all the active rules in the UFW firewall. For that we can use:
sudo ufw status numbered
You will see all the UFW rules along with the serial number in which they have been activated. TO delete any of them just use the given command along with the serial number of same. For example, in the above command, I want to delete the second rule 22/TCP. Then the command will be:
sudo ufw delete 2
10. Graphical user interface for UFW firewall on Debian 11 or 10
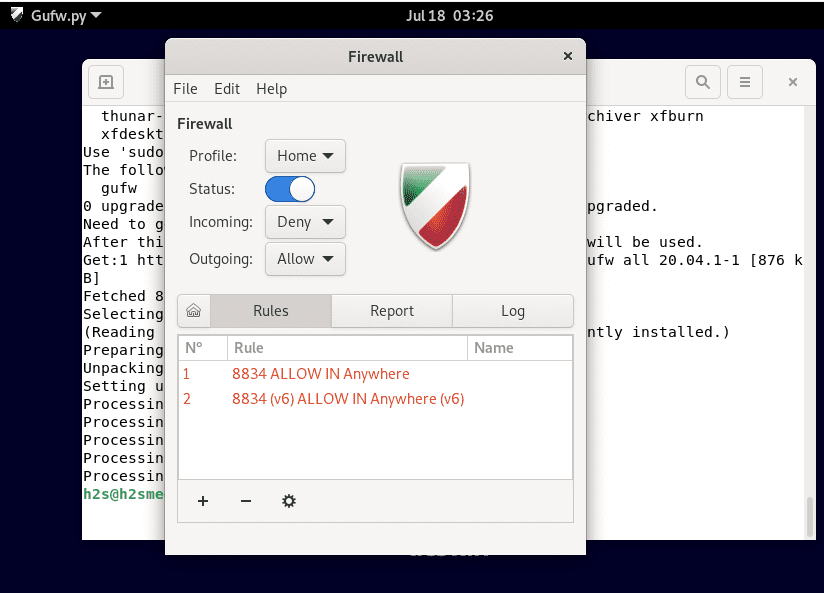
Those who are using Graphical Desktop Linux can install a graphical user interface for their UFW firewall called “GUFW” (Graphical Uncomplicated Firewall) to operate it easily. The tool provides an interface with which you can comfortably create rules for incoming and outgoing connections.
sudo apt install gufw
Other Articles:
1. How to Open or close ports in AlmaLinux 8 or Rocky Firewall
2. Install Vmware tools Debian 11 or 10
3. Install Debian 11 Bullseye on VirtualBox
4. 7 Steps to install Webmin on Ubuntu 20.04 LTS focal fossa
5. Install Chrome browser on Debian 11

