Magento is an open-source, cloud-based eCommerce platform owned by Adobe. The community version of the e-commerce platform can be self-hosted by users who wish to start their e-commerce website. Apart from the self-hosting, businesses can opt for the cloud solution managed by Adobe, it is also based on Magento but known as Adobe commerce. It offers scalability, extensive integrations, and more.
Well, Magento has already been used by thousands of retailers around the world to create and manage successful online stores. It is because of its wide range of features that allows businesses to easily customize their eCommerce store and give customers a tailored shopping experience.
In this article, you’ll learn the steps required to install and set up Magento on Ubuntu 22.04 Linux to start your online business.
Magento Installation on Ubuntu 22.04
1. Prerequisites
1. To perform the steps given in this tutorial, the user must have Ubuntu 22.04 running server.
2. Access to root or sudo users for installing packages such as Web server.
3. Internet connection
2. Access the command terminal
Use SSH to access your remotely running Ubuntu server or those with a locally installed server system can directly access the terminal to run the commands. Once you are on the terminal, follow the next steps given in this tutorial.
For SSH, the standard command syntax to connect to the remote server is:
ssh username@server_IP_AddressReplace username with root or any other user you want to access whereas the server_IP_Address is the address of the Ubntu 22.04 server. By default the above command will use port 22, if you are using any other then mention that with the -p option.
ssh username@server_IP_Address -p Port_numberReplace Port_number with the custom one you are using.
3. Update Ubuntu 22.04 System Packages
First, start with the system update command to ensure all the packages available on your Ubuntu 22.04 are up to date. This will also refresh and rebuild Ubuntu’s APT package manager index cache.
sudo apt update && sudo apt upgrade4. Install the NGINX Web server
Although we can use the popular Apache Web server, because Nginx is lightweight and has better speed, here we are using it. Nginx can be installed easily using the system’s package manager, here is the command to follow:
sudo apt install nginx-fullStart and enable its service:
sudo systemctl enable --now nginxTo check the service is running without any errors, use the following:
systemctl status nginx --no-pager -lRead more…. and know how to Set Up Nginx as a Reverse Proxy For Apache on Ubuntu 22.04
5. Install PHP for Magento
The default version of the PHP available to install on Ubuntu 22.04 is php8.1, which is the latest and most stable one while writing this tutorial. Therefore, execute the given command to not only install the PHP but also the extension we required for the proper functioning of Magento on Ubuntu 22.04 Linux.
sudo apt install php php-{bcmath,intl,mbstring,mysql,soap,xml,xsl,zip,cli,common,curl,fpm,gd}To check the PHP version you can use php -v
Now, let’s edit PHP Configuration File and increase the PHP memory limits, upload file size, and configure a few other things of PHP required by Magneto.
Increase Memory:
sudo sed -i "s/memory_limit = .*/memory_limit = 2G/" /etc/php/8.1/fpm/php.iniIncrease File Upload Size:
sudo sed -i "s/upload_max_filesize = .*/upload_max_filesize = 128M/" /etc/php/8.1/fpm/php.iniEnable Zlib Compression:
sudo sed -i "s/zlib.output_compression = .*/zlib.output_compression = on/" /etc/php/8.1/fpm/php.iniIncrease the Maximum execution time of the PHP process:
sudo sed -i "s/max_execution_time = .*/max_execution_time = 18000/" /etc/php/8.1/fpm/php.iniOnce done, restart the Nginx server:
sudo systemctl restart nginx6. Install MariaDB Server on Ubuntu 22.04
To store data generated by the Magento E-commerce store, here we are using the popular open-source MySQL Database server. Let’s install it using the given command:
sudo apt install mysql-server-8.0Check MariaDB is running properly:
systemctl status mysql --no-pager -lIf it is not running, then here is the command to make it.
sudo systemctl enable --now mysql7. Create a Database for Magneto
Now, let’s create a Database to use with Magento installation and the same will be used by it to store all future generated data as well.
Login to MySQL
sudo mysql -u rootNow, create the Database user first:
Note: Replace myuser with whatever name you want to give to your user and mypass with the password you want to set for it in each command. Whereas mydb with the name of the database you want to use.
CREATE USER 'myuser'@'localhost' IDENTIFIED BY 'mypass';Create Database
CREATE DATABASE mydb;Give complete access to the users of the created Database.
GRANT ALL PRIVILEGES ON mydb.* TO 'myuser'@'localhost';Finally, flush and exit the command line:
FLUSH PRIVILEGES;exit;8. Install and Setup ElasticSearch
ElasticSearch is one of the requirements to install Magento because online stores generally have a large catalog and when users search for any product the result must be quick. Hence, ElasticSearch is going to help us with that.
Although the latest version of the ElasticSearch is 8.x while writing this article, however, Magento supports 7.x. Therefore. let’s add the repository and GPG key to install it.
First, add the GPG key:
sudo apt-get install apt-transport-https curlwget -qO - https://artifacts.elastic.co/GPG-KEY-elasticsearch | sudo gpg --dearmor -o /usr/share/keyrings/elasticsearch-keyring.gpgAdd the ElasticSearch Repository
echo "deb [signed-by=/usr/share/keyrings/elasticsearch-keyring.gpg] https://artifacts.elastic.co/packages/7.x/apt stable main" | sudo tee -a /etc/apt/sources.list.d/elastic-7.x.listRun system update command:
sudo apt updateInstalling ElasticSearch on Ubuntu 22.04
sudo apt install elasticsearchAlso, one would like to know how to install ElasticSearch on Ubuntu 20.04 and How to install Kibana Dashboard on Ubuntu 22.04 | 20.04 LTS
Start and enable Elastic Search Service
To make sure Elasticsearch runs automatically with even system boot, use the given commands:
sudo systemctl daemon-reload
sudo systemctl enable elasticsearch.service
sudo systemctl start elasticsearch.service
To confirm there is no error and the service is running perfectly fine use:
systemctl status elasticsearch --no-pager -lTo further verify the working of Elasticsearch, use:
curl -X GET "localhost:9200"You will have an output similar to the one given in the screenshot.

9. Install PHP Composer
One of the easiest ways to download and install Magento on Ubuntu 22.04 is using the PHP Composer. It is an application-level dependency manager for the PHP programming language. As Magento is PHP based platform, hence this helps to install all the required dependencies by it automatically using a single installation command.
Download the Composer installation script:
curl -sS https://getcomposer.org/installer -o composer-setup.phpStart the installation process:
sudo php composer-setup.php --install-dir=/usr/local/bin --filename=composer10. Create NGINX Server block
Let’s create a server block or configuration file for Magento so that our NGINX could know where are the Magento files and how to serve them.
sudo nano /etc/nginx/sites-enabled/magento.confPaste the following lines:
upstream fastcgi_backend {
server unix:/run/php/php8.1-fpm.sock;
}

server {
server_name yourdomain.com;
listen 80;
set $MAGE_ROOT /var/www/magento;
set $MAGE_MODE developer; # or production

access_log /var/log/nginx/magento-access.log;
error_log /var/log/nginx/magento-error.log;

include /var/www/magento/nginx.conf.sample;
}
Note: don’t forget to replace yourdomain.com with the Domain name that you are planning to use for Magneto.
Save and exit the editor by pressing Ctrl+X and then typing – Y and hitting the Enter key.
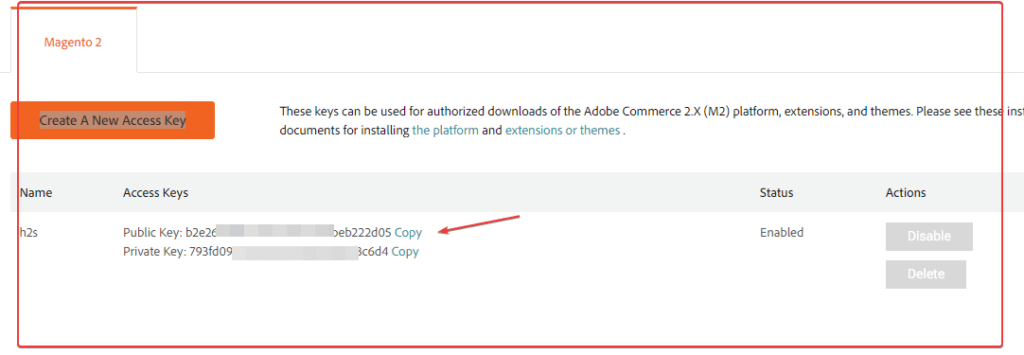
11. Create Magento2 Public and Private Keys
We need to authenticate the copy of Magento we are about to download using the Composer on Ubuntu 22.04 only after that we will be able to install it.
For that, we need public and private keys and to get them we need an Adobe Magento Market Place account, if you don’t have one then use the given link.
Once you have the Account or you already have one then go to your Magento Market Place Account API key area and there click on the “Create A New Access Key” button, soon you will have your Private and Public keys.
12. Download Magneto to install
Finally, we have configured almost all the required things we need for the installation of Magento on Ubuntu 22.04. Now, let’s use Composer to download the latest available version of Magento and start installing it.
Create a directory for Magento, which we set in the NGINX Server block configuration file i.e /var/www/magento
sudo mkdir -p /var/www/magento/Also, create a directory to store the data of the www-data user
sudo mkdir -p /var/www/.config/Change the permission of the www folder, so that the web-server user (www-data) can write it:
sudo chown www-data:www-data /var/www/ -RSwitch to the /var/www directory to start the downloading and installation process of Magento:
sudo -u www-data composer create-project --repository-url=https://repo.magento.com/ magento/project-community-edition magentoSoon, it will ask for Username and password. Now, go to the Market place where you have created the Public and Private keys.
Copy the Public key and paste it, when the Composer asks for Username to authenticate. Whereas, the Private key is a password.
Note: When you paste the private key nothing will appear and the section will remain blank. You just need to press the Enter key after pasting.
When it asks for “Do you want to store credentials for repo.magento.com in /var/www/.config/composer/auth.json?” press Y and hit the Enter key.

13. Installing Magneto on Ubuntu 22.04 Server
Once the Composer is done with the downloading of Magento files, switch to its directory and run the executable Magneto setup file with essential parameters; to configure your Domain name, and Database; to set up an Admin user- add whatever name you want to use including a password and other items such as email, currency and Time.
sudo -u www-data bin/magento setup:install \
--base-url=http://xyz.com \
--db-host=localhost \
--db-name=mydb \
--db-user=myuser \
--db-password=mypass \
--admin-firstname=admin \
--admin-lastname=admin \
--admin-email=[email protected] \
--admin-user=admin \
--admin-password=admin123 \
--language=en_US \
--currency=USD \
--timezone=America/Chicago \
--use-rewrites=1 \
--search-engine=elasticsearch7 \
--elasticsearch-host=http://localhost \
--elasticsearch-port=9200 \
--elasticsearch-index-prefix=magento2 \
--elasticsearch-timeout=15 \
--elasticsearch-enable-auth=0Note: I initially got an error: Could not validate a connection to Elasticsearch. No alive nodes are found in your cluster.
It was because I was using 127.0.0.1 instead of localhost for the ElasticSearch host.
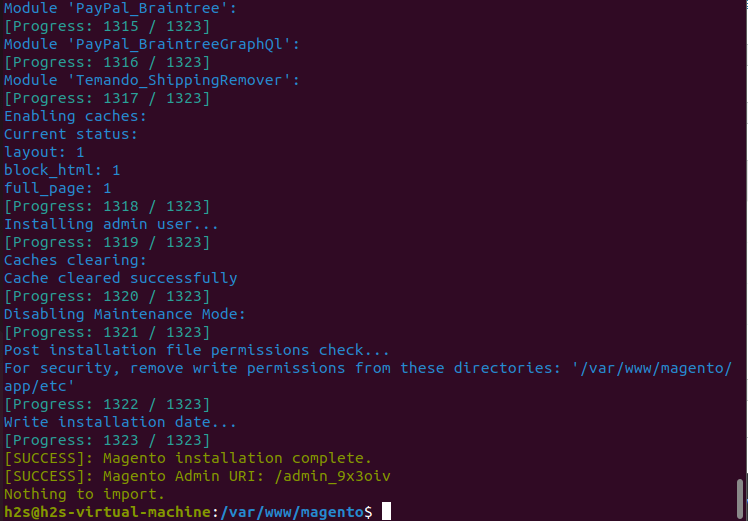
Once the installation is completed you will see the message displaying the same along with Admin URL to access the Magneto Backend.
Now, reload the NGINX Web server:
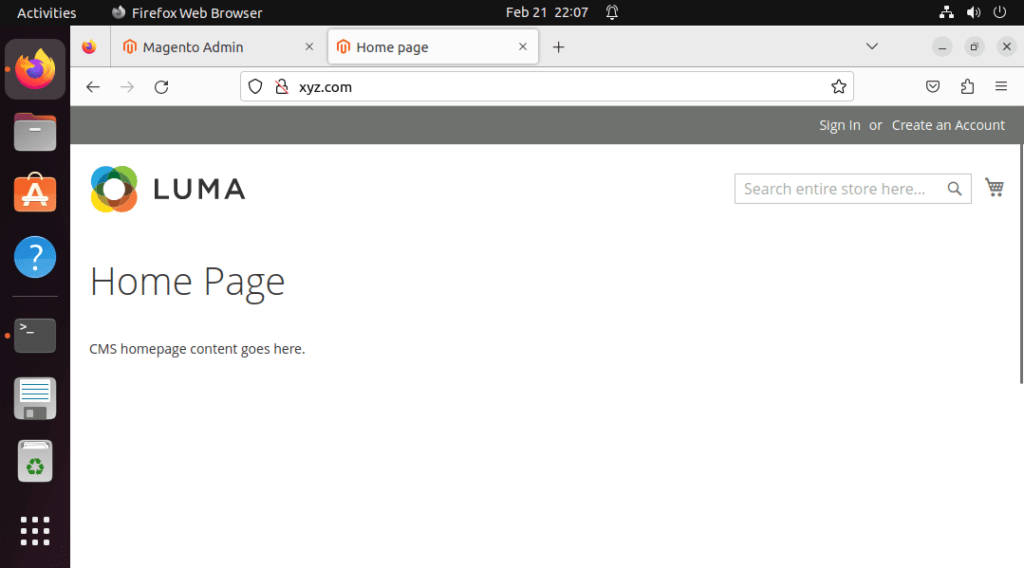
sudo systemctl reload nginxThat’s it go to your browser and type the domain name configured to access Magento. For example, here we are using XYZ.com
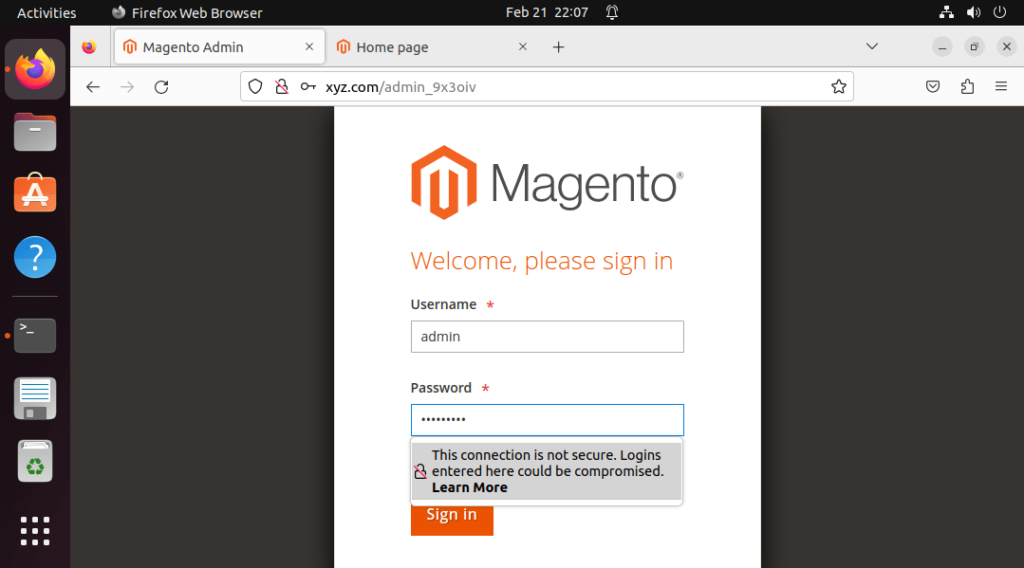
14. Access Magento Admin Dashboard
We already have the Admin URL which we can use after the Magento domain name, configured for it. For example- yourdomain.com/admin-url
Replace yourdomain.com with the domain you are using and admin-URL with whatever you got at the end of the Magneto installation.
However, if you forget to note down your admin URL then to find the Magento Admin URL we can use this command:
sudo /var/www/magento/bin/magento info:adminuriLog Magento
Enter the username and password once you get to the Login screen. The credentials will be whatever you have configured in Step 13 of this tutorial.
15. Disable Two-Factor Authentication
By default, Magento will have active Two-Factor Authentication, however, it needs an active Postfix SMTP relay on your Ubuntu to send Emails. Nevertheless, if you don’t have configured SMTP currently on your system then disable the 2FA module to log in to Magento without it.
sudo -u www-data bin/magento module:disable Magento_TwoFactorAuth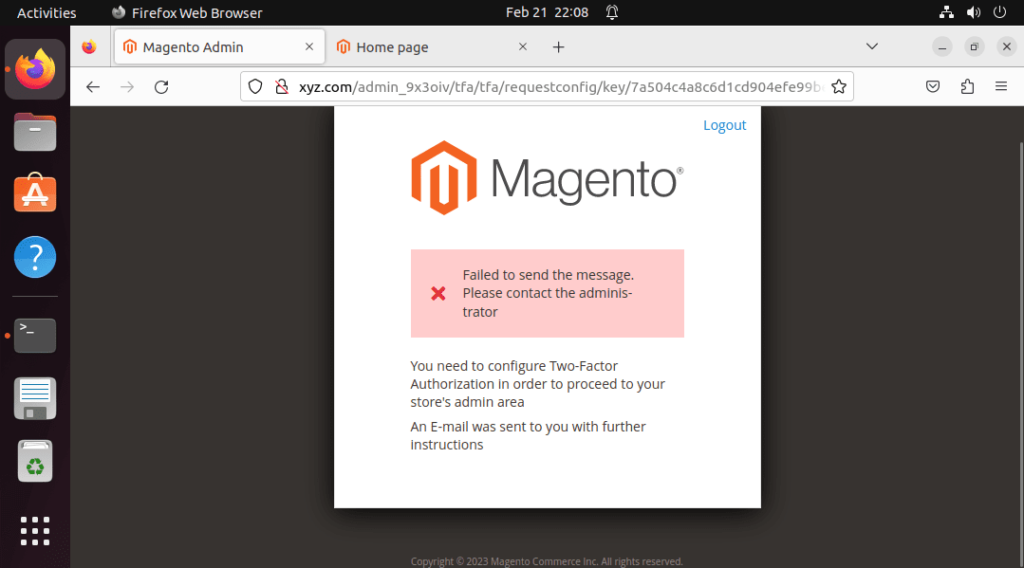
16. Set Cron Jobs
Once you logged in, a warning will appear on the Dashboard – ” One or more indexes are invalid, Make sure your Magento cron job is running.”
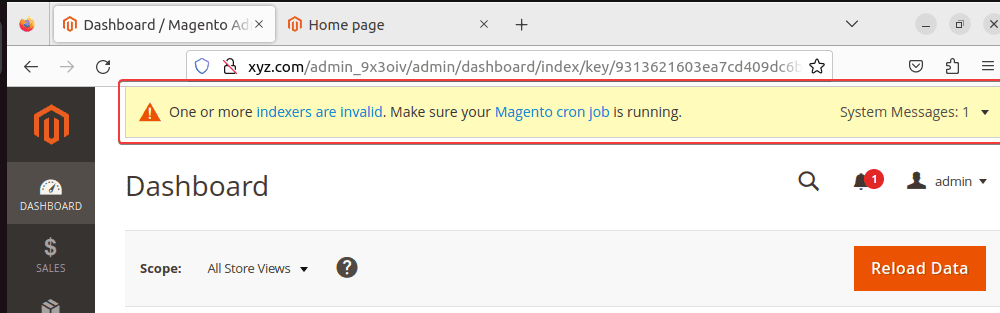
To remove this warning, go to the command terminal and run:
cd /var/www/magentosudo -u www-data php8.1 bin/magento cron:installRefresh the Admin Dashboard and soon the warning will disappear.
17. SSL Certificate – HTTPS
The last thing I would like to discuss is getting SSL verification using Let’s Encrypt.
sudo apt install certbot python3-certbot-nginxNow, issue the SSL certificate for the domain you are using for Magneto.
sudo certbot --nginx -d example.com -d www.exmaple.comOnce done, restart NGINX:
sudo systemctl reload nginxNow, to change the base URL of Magneto from HTTP to HTTPS, use:
cd /var/www/magento/ sudo -u www-data bin/magento setup:store-config:set --base-url="https://example.com/"sudo -u www-data bin/magento setup:store-config:set --base-url-secure="https://example.com/"Replace https://example.com/ with your domain name.


Another interesting plugin for image optimization – OptiPic CDN: https://marketplace.magento.com/optipic-optipic.html OptiPic automatic convert image to Webp (for webp-supported browsers) and compressed/optimized png/jpeg (for webp-unsupported browsers).
When I try to run “sudo -u www-data composer create-project –repository-url=https://repo.magento.com/ magento/project-community-edition magento”
I got the error mkdir(): Permission denied
Any help?
Never mind. I found the mistake. I was not switching the directory to /var/www before executing the installation