The May 2020 update of Windows 10 is live, it and it is here with a number of new features and improvements, most users were waiting for, for a long time now. You can see this story to find out the new features and improvements that are available on the Windows 10 May 2020 update. Among the many new features available within the latest update, one of them is the support for WSL or Windows Subsystem for Linux version 2. If you use the Windows subsystem for Linux in order to run Linux programs on Windows, this is going to be really useful for you. The latest windows subsystem for Linux or WSL 2 has support for full system call compatibility, which makes it easier for the user to use Linux on Windows.
You can also run several new components like Docker on Linux due to the improvements. It comes with a custom-built Linux kernel specially designed for Microsoft Windows 10 which is yet another reason, the experience of using the Windows subsystem for Linux will be even better. You can also create your own Linux Kernel, and make WSL use it, and that is yet another big improvement. With faster performance and beta functionalities, it is always a good idea to use WSL 2, if you have upgraded to the latest version of Windows 10. Enabling WSL 2 on Windows is not as easy as updating to the latest version of Windows 10, and thus, I will discuss the steps so that you can get started with WSL 2, here in this story.
So, without any further delay, let’s get started with how you can start getting the best of WSL 2 on your Windows computer.
Install Linux distro apps with WSL 2 on Windows 10
- After you have already downloaded the May 2020 update of Windows 10, you should enable the ‘Virtual Machine Platform’ option.
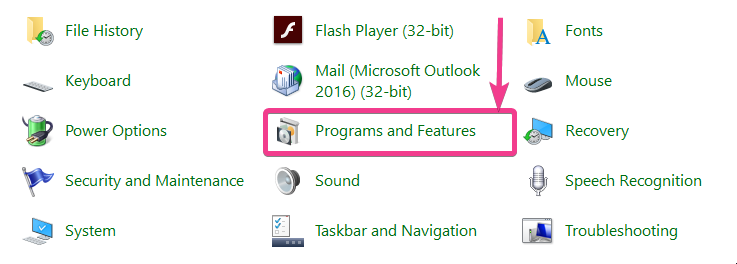
- To enable ‘Virtual Machine Platform’, open ‘Programs and Features’ within ‘Control Panel’.
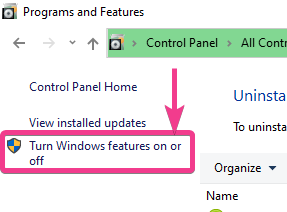
- Now click on ‘Turn Windows features on or off’ on the left side.
- In the new window that appears, scroll down, and mark the option that says ‘Virtual Machine Platform’, and click on ‘OK’.
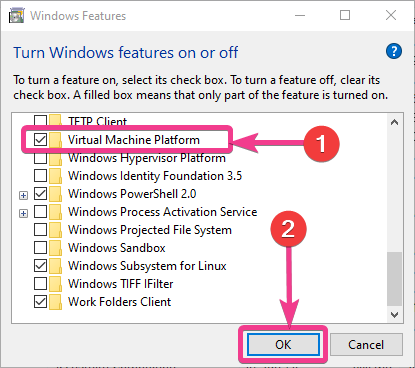
- Now, you will have to restart your computer after the feature is enabled. You will be prompted to restart your computer after this process.
- Now, you will have to update the WSL 2 Linux kernel. To do that, open this link, and click on the link I have highlighted in the screenshot. Alternatively, you can click on this link to directly download the kernel.
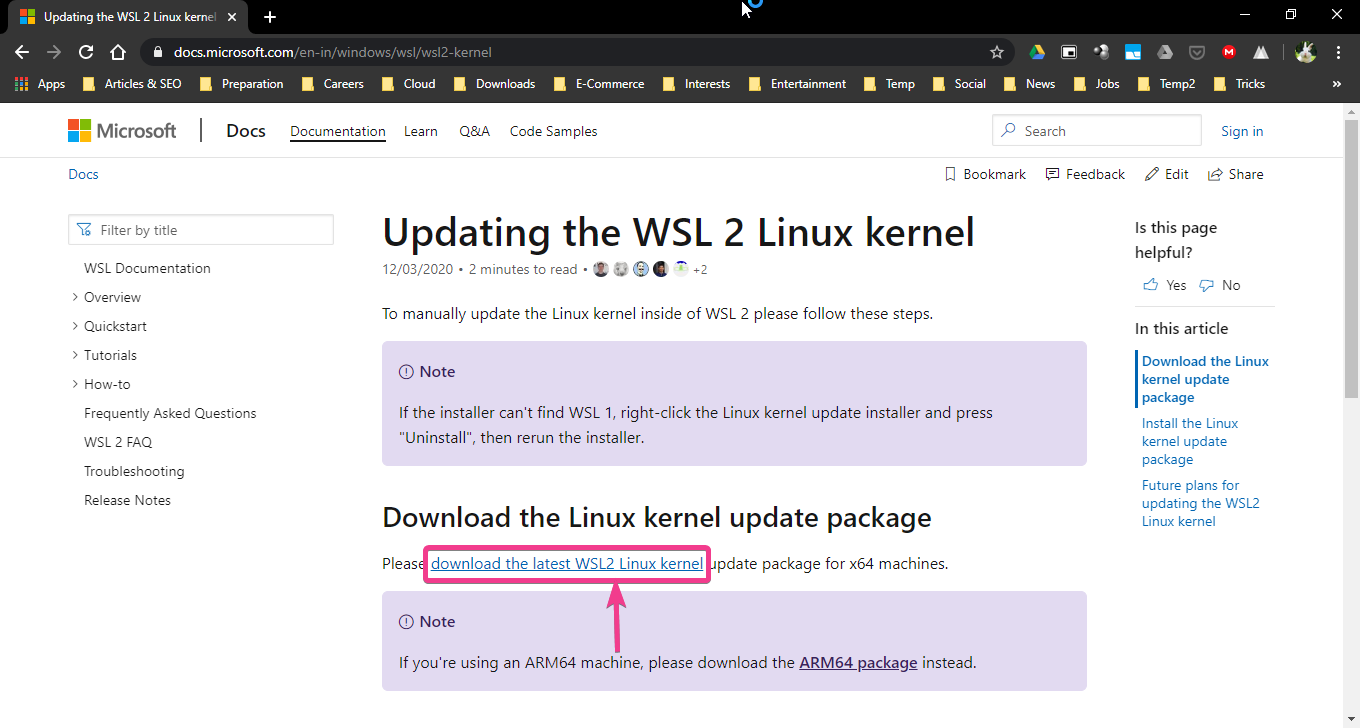
- The update will be downloaded in MSI format. You can install the kernel exactly the way you install other MSI packages. After the installation is complete, you will again have to restart your computer.
- The next time you log in to your Windows computer, open Command Prompt with administrator privileges. To do that, open ‘Run’ with the ‘Windows + R’ shortcut key, and type in ‘cmd’ without the quotes. Finally, use the ‘Ctrl + Shift + Enter’ to open Command Prompt with administrator privileges.
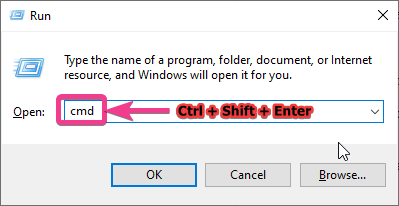
- In the Command Prompt, type in the following command and hit the enter key.
wsl --set-default-version 2
- If you do not get any errors, WSL 2 will be selected by default for all the distros that are already installed, and all the future distros.

- Now, you just need to download a Linux distro from the Microsoft Store and get started with WSL in the usual way.
- To find the list of Linux distributions that are using WSL 2, type in one of the following commands in the Command Prompt, and hit the enter key.
‘wsl --list --verbose’ or ‘wsl -l -v’
- You can see the WSL version each Linux distribution is using, using this command.
- However, if you want certain Linux distributions to use the old WSL, or a certain Linux distribution is still using WSL 1, and you want it to use WSL 2, you can use the following command to change the WSL version each distribution will be using.
wsl --set-version <distribution name> <versionNumber> For example: wsl --set-version Ubuntu-20.04 1 - This will make the distribution with the name Ubuntu-20.04 use WSL version 1. You can replace the ‘1’ with ‘2’, to make it use WSL 2. The choice is yours.

So, that’s how you can get started with WSL 2 on your Windows 10 computer that has the latest May 2020 update installed.
WSL is now quite improved and you can use it for most day-to-day Linux oriented tasks without running a virtual machine separately. Most users will find it really handy, of WSL keeps improving with time, and it starts supporting More Linux features with time.
So, that was all about, how you can get started with Windows Subsystem for Linux or WSL 2 on Windows. Do you have any questions? Feel free to comment on the same below.

