Google website optimizer is another free and great tool just like Google Analytics. The basic role of this website optimizer tool of Google is to test the conversion goal of a website; useful especially for e-commerce websites. Any website owner can use it free of cost. However, it is really recommended to integrate another free tool which I mentioned above i.e Google Analytics solution into it. It is really easy we will show how to do that too in this article.
Now, the question might be in your mind that why we need to integrate the website Analytics in Website Optimizer; when what I need is just a testing. It is really a great question and here are a few reasons why you should…
First of all the Website Optimizer is limited to binary goals i.e 0 or 1, I mean with the help of this tool you only know whether your testing pages get the conversion (1) or not (0). But sometimes you need to see the variations of your testing on continuous elements those decrease or increase every movement. For example the revenue, and in an e-commerce store, all products are not created equal. So, with website optimizer only, you can’t differentiate the different conversions rates, like the purchase of a product that cost $5 would exactly be treated as a product 0f $1000 in Google optimizer tool. It is why, because the conversion is just a conversion. However, being a store owner you must be much interested in the revenue generated by the website when you do any sought modifications to your website; in form of raw numbers. Another reason for integrating Google Analytics is the Google optimizer tool can only track a single goal, it means it considers all conversion pages as one and gives you an overall view. However, but in the real world, in a business, we have multiple goals associated with a website such as we want to track the Newsletter Signups, leads, sales and more. And getting Analytics into it will show us the impact of all such goals visually. We can compare everything from bounce rate to time most of the users spend with which elements on the website.

Create and run experiments in Google website optimizer
We already have shown in our previous article (How to set up Google Website Optimizer Account) about the process to create an account with Google Optimizer and here we go little further and discuss how to integrate Google Analytics and create Google A/B Testing.
First, we connect or integrate the Google Analytics account to Google optimizer
- After creating Optimizer account, on the right panel, you will see an option Google Analytics.
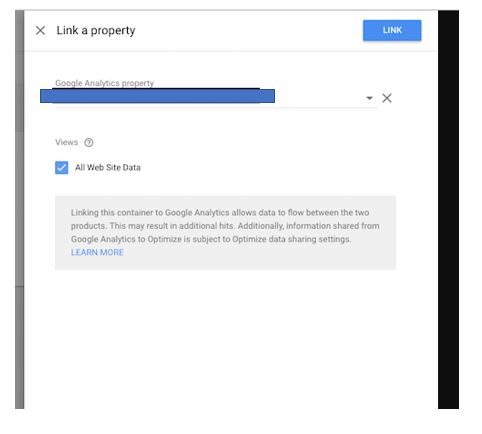
- Click on that to link your website Analytics account to Google Optimize website.
- Note: Make sure that the email you used to sign in with Google Optimize should same Gmail ID that has the access to your Google Analytics.
- Now, If your Google Analytics email and Google Optimizer’ account is same you will see all your Analytics property. Just click on the drop-down box give under the Google Analytics property option and select the one which you want to use.
- Check the box All website Data and click on the Link button.

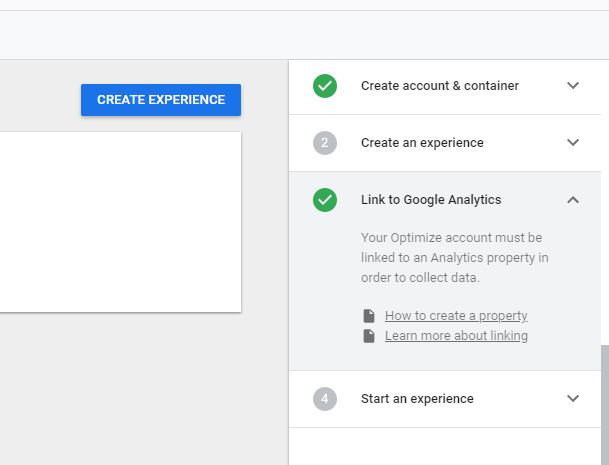
- Once you successfully connect the Website’s Analytics property, it will show the green mark.

- Deploy Optimize using analytics.js: Now you will get a pop-up screen with a modified Google Analytic tracking code. Copy it and replace the one which is already existed or implemented on the website which you want to use with the website optimizer. And click on the Next button.

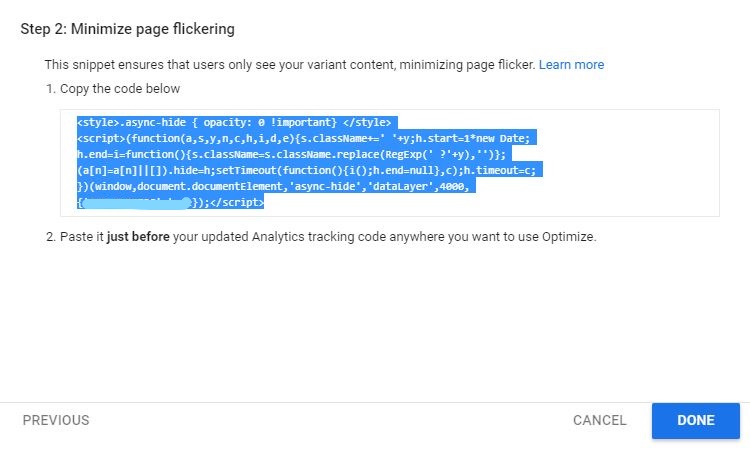
- Minimize page flickering: As soon as click Google will provide one more script code that saves your website pages from any kind of flickering effect. After implementing the above tracking code just above that place this code which you will get in this step. Once copied and pasted on the website click on the DONE button.

- Note: More information about tracking code deploying you can also visit the Google official website: LINK.
Add Optimize to your website: Get the Chrome Extension
In order to run experiments or personalizations, you need to install Optimize on your website in form of Chrome Extension. Here is the link to install the Google Website Optimizer extension (optimizer extension).
Setup Google website optimizer Experiment
- Click on the Create Experiment button given on the Dashboard of the Optimizer.
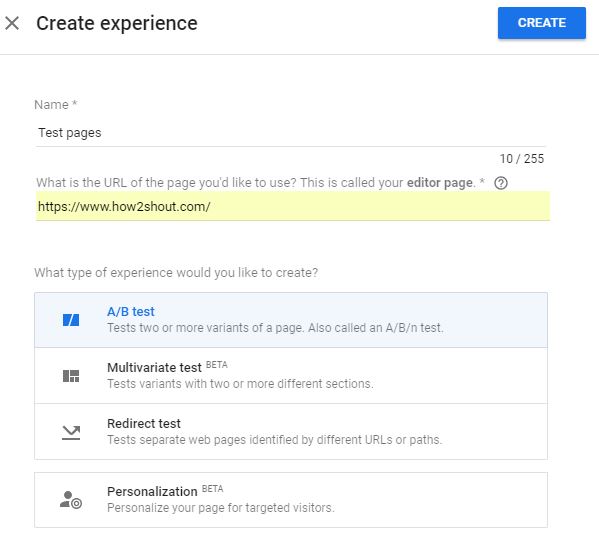
- Provide some name to your experiment.
- Enter the URL of the page that you want to test with Optimizer.
- There are four types of experiments that available on the Google Optimizer are: A/B test, Multivariate test, Redirect test and Personalization.
- Here we create a Google A/B test. Just select the A/B test and click on the CREATE button.

Creating an experiment - Now you will see your created experiment, click on the name of your experiment to access it.
Google Website optimizer tutorial
Step 1: To work with the A/B test there should be one original variant of your website, added, which we already have done in the above steps. Now its time to add a custom variant of our website in order to compare.
Step 2: Click on the New Variants options:
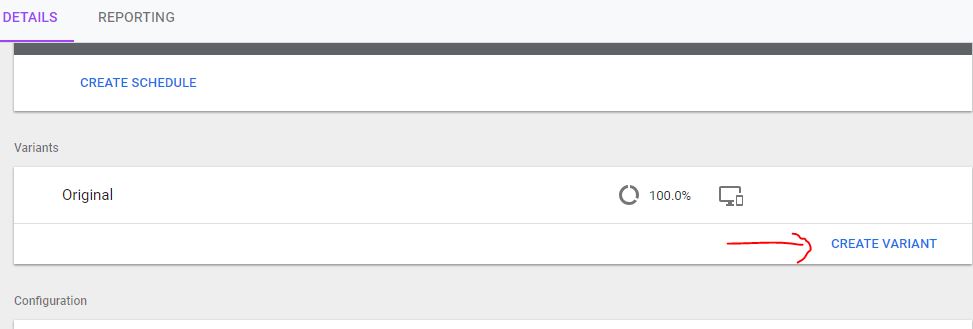
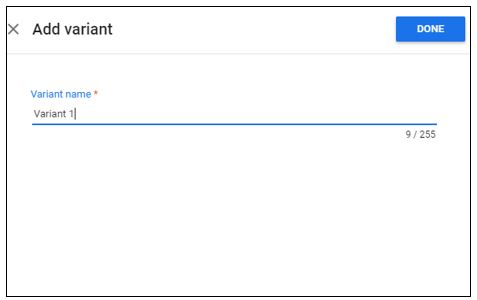
Step 3: Give some name to your Variant. For example, we have given Variant 1. And then click on the DONE button.
Step 4: Click on your New variant and first it will ask to click on Save and Continue, just do that; after that, it will redirect to your website.
Step 5: The Optimizer Chrome extension will open with HTML and CSS visual editor option on your website. Change, edit or customize the elements those you want on the website to enhance the user experience. For example color, header, banner, menu and more.

Step 6: You can also view the customization as per different devices. For example: how it looks on mobile phones after altering.
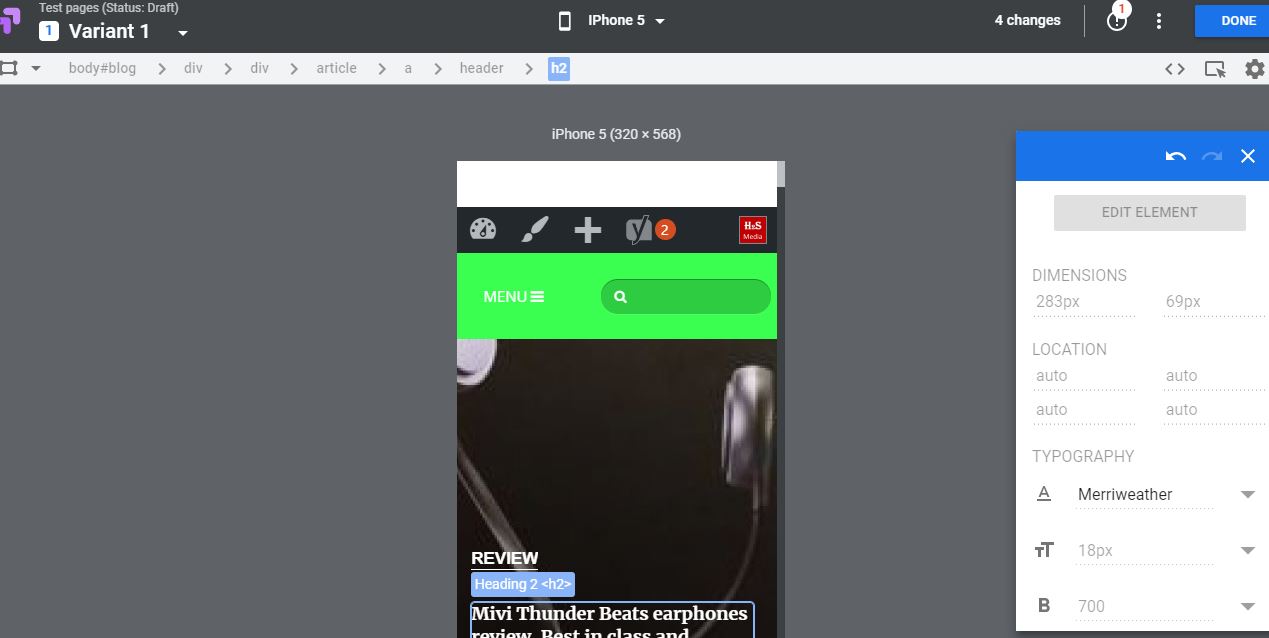
Step 6: Once the customization is done, click on save button.
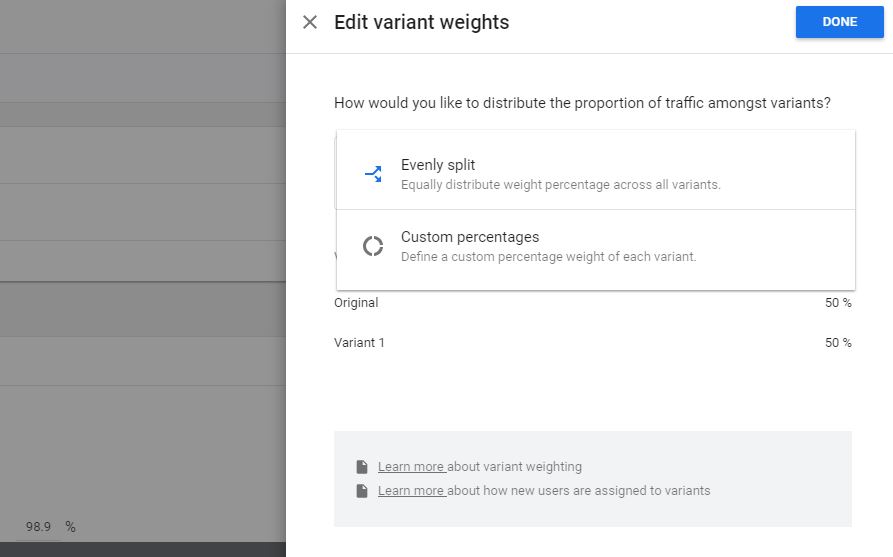
Step 7: The percentage given at the front of various Variants can be changed to decide how many visitors of your website will get the altered version. By default, the ratio of percentage is equally divided between among all the Variants.
- To change the weightage of a custom variant page to a limited number of users, click on the given percetnage value.
- Then Click on the Evenly Split.
- Select the Custom percentage
- Add the custom amount of percentage to redirect the particular amount of visitors to your website’s to a new variant page in order to test the conversion goals.

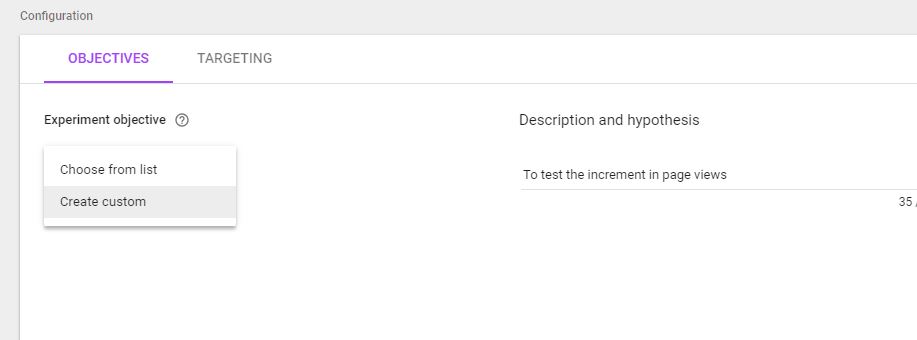
Step 8: Set Objective configuration: At this step we set, what exactly we want from this experiment we have created, I mean what is the primary objective or goal of it.
- From the Objective section, give some description to your experiment, so that you can remember the goal of it in the future.
- Click on the Experiment Objective option drop down box and select the Choose from list that fetches the pre-defined goals from the Google Analytics. In case, what you want to measure is not in the list then you can go for custom one and create your own.

- From the Goals created in Analytics, you will see something like shown in the below images. For example, in my case, I have Adsense clicked, Adsense Revenue, Pageviews, Bounce, and Session. Now, if I want to compare mine Orginal and customize Variant of the same page against the Pageviews then I will select the Pageviews option. In this way, you can choose one for yourself to improve revenue, sales, page views or other goals.


Step 9: Under Targeting, you will get the option to change the percentage of visitors to those the Variant will show, however, no need to modify again because we already did this before in the above steps.
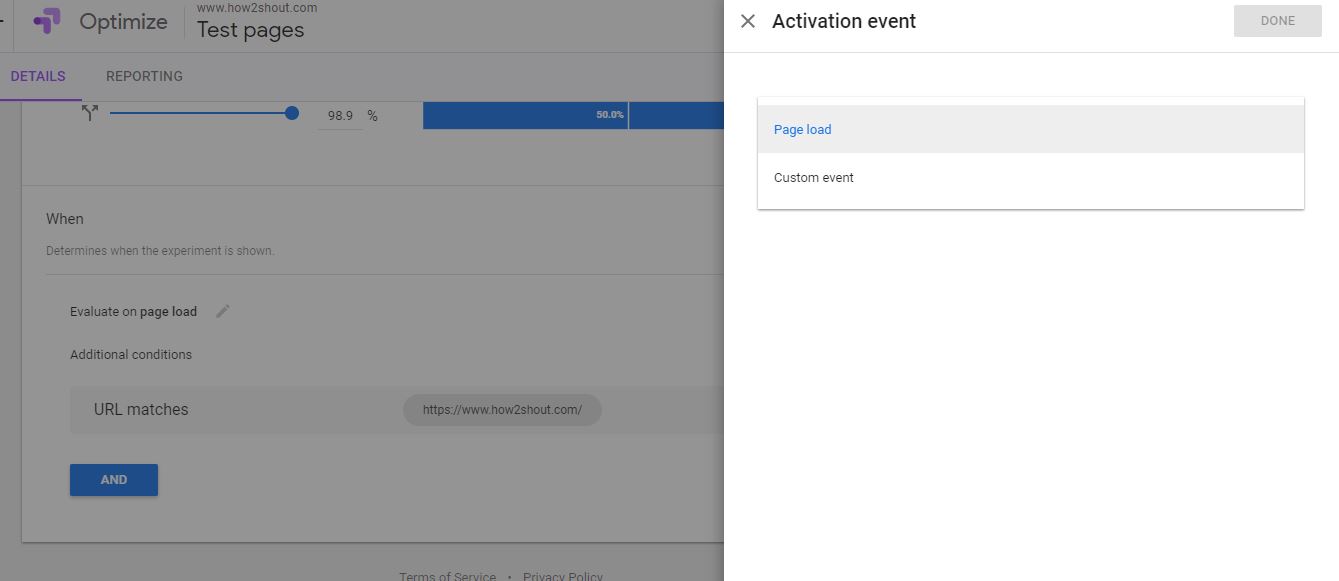
Also, you can define an action on Optimizer to tell it when to trigger the A/B testing. For this, you will find an option “When“.
By Default, the A/B test occur as soon as the page load. It means the Google website optimizer will start evaluating the custom variant against the original one when the page load. If you want some custom action click on the pencil icon and add the custom event.
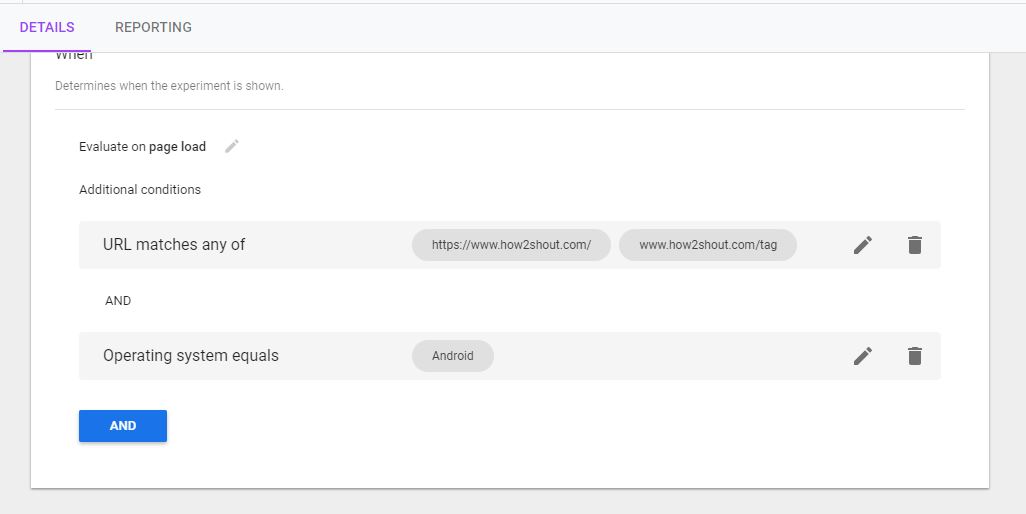
By default in Google website optimizer test, one the original page URL defined in the Additional conditions against which your custom page will compare. You can add more if you want.
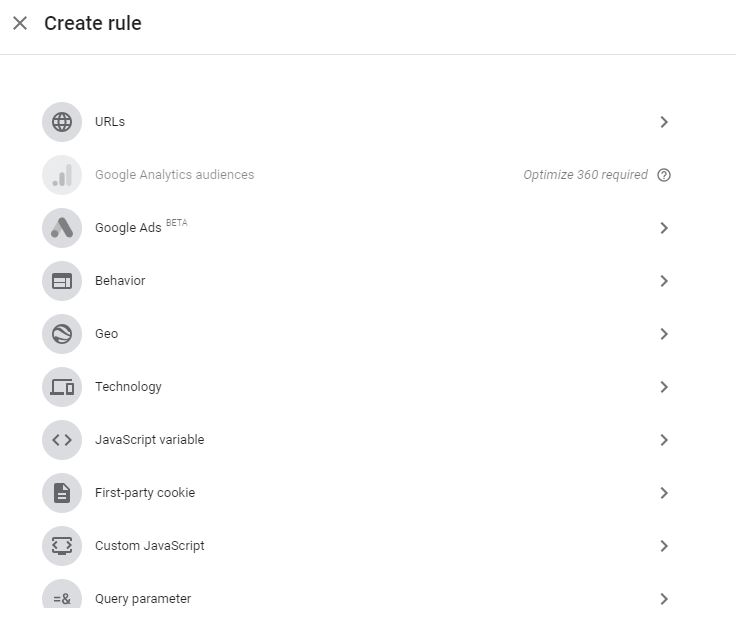
At last one more Conditional option you will find “AND“.
Using the AND option, the user can give more conditions to Google Website Optimizer. The pre-defined conditions/rules are URLs, Google Ads, Behaviour, Geo, Technology, Javascript variable, First-party Cookie, Custom Javascript, Query parameters and Data layer variables.
For example, you want to tell the optimizer that only compare A/B test when the user operating system is Android. Now, what you have to do click on the AND button choose the Technology option-> Operating System->Android and condition you need to choose equals. This trigger a message that when the visitors operating system is equal to Android then show X percentage (defined above) the custom Variant page of my website. In this way, you can confine the measurement and conversion goals.

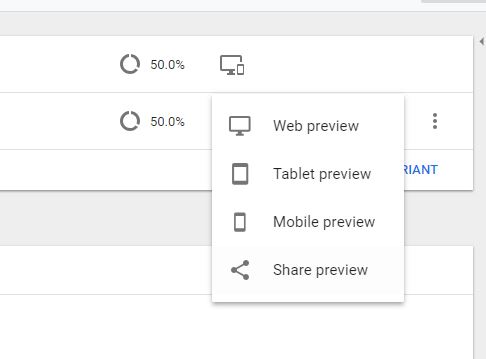
Once everything is done, click on the SAVE button and Click on the computer icon given at the front of the Variant to see the preview of your changes. The previews of the variants provided by Google Optimizer are Web Preview, Tablet Preview, Mobile Preview and share preview (to someone else).
If everything is done and okay, you can move to ignite your project. Yes, to start or schedule the experiment, scroll up and click on the Start experiment button. If you want to schedule the obvious the left side button.
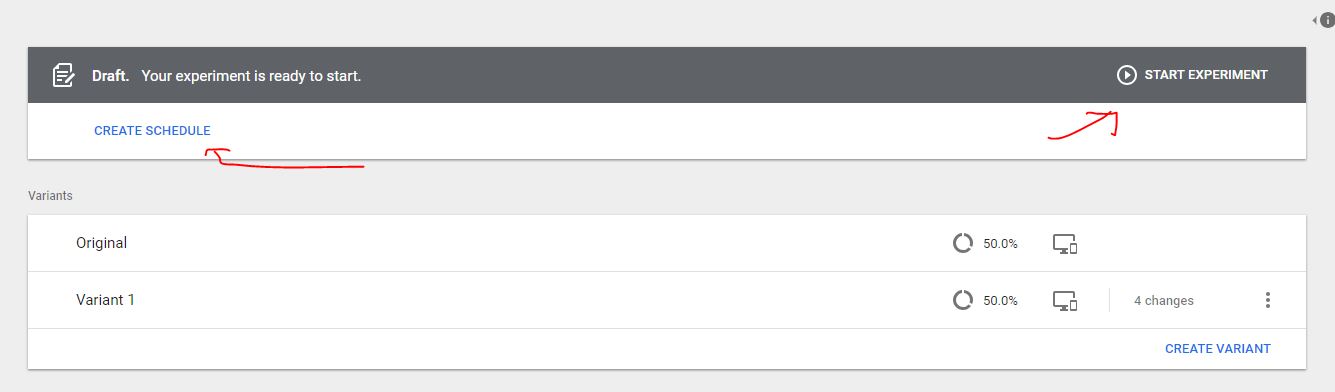
The Schedule option would be helpful for those want to run the experiment for a certain period of time and after that, it should stop automatically. For that just click on the Create Schedule and enter the start and end time for Google optimizer tool experiment.

I hope this article would help you in somehow, however, it is not possible for me to explain other Optimizer’s experiments in the single article. Yet, in case, you have some doubt or confusion, where I can help, please let me know the comment box is all yours!!
- Add payment methods, addresses and change the Google Chrome new tab background
- How to stop Gboard from censoring text using block offensive words feature
- Setup and Activate Google Analytics on WordPress
- How to play soothing nature sounds with Google Assistant
- How to Remove WordPress Admin Page Traffic From Google Analytics
Related Posts
How to set Gemini by Google as the default Android assistant
Google’s new AI Content Moderation Policy for Play Store Apps
Google Meet now offers Full HD streaming for group video meetings
Googlе and Applе Facе Finеs of Ovеr $50.5 Million for App Storе Violations
Google’s new update allows Android users to delete up to 50 emails at once in Gmail with the “Select All” option
Google to display only interest-based ads using a privacy sandbox