When it comes to Linux distributions, we have a lot of options to choose from. To some, a good user interface is something that plays the most important role, while for others, entertainment is important, and there are even some, who are looking for the best nesting hub for developing their projects. When it comes to good entertainment friendly distribution for Linux, and you also want a very good user interface, and that is by far the most important point for you, you can try out Deepin Linux, which is one of the best Linux distributions that you can use. It is a full-fledged Linux distribution for the users that features a great user interface with cool animations.
I have recently downloaded the latest version of Deepin Linux, and I will talk about how you can install it on your computer, or on a virtual machine, to try the distribution out, before you finally install it on your computer. I will be talking about, how you can install Deepin Linux on Oracle VirtualBox, which is undoubtedly the most popular virtualization platform out there. If you are trying to attempt the installation of Deepin, your computer should have at least 2 GB Of RAM, for a decent performance, or 4 GB will be even better, and it should be powered by at least a computer running Pentium IV, as per the official documentation on the Deepin website.
So, without any further delay, let’s get started with the download of Deepin Linux, and then with the installation.
Configuring the virtual machine for Deepin Linux
Step 1: Download Deepin Linux ISO
Open the following link to find various options to download Deepin. I would recommend you to download from Mega cloud for getting the best speed while downloading Deepin. But you will need a Mega account to download Deepin ISO from Mega.

Step 2: Run VirtualBox and create a new VM
After you have downloaded Deepin 15.11, which is the latest version of Deepin, on your computer, open VirtualBox, and click on the ‘New’ button to configure setting up a new virtual machine.

Step 3: Name and select Type of OS on VirtualBox
Now, in the name, you can use ‘Deepin’, and change ‘Type’ to ‘Linux’, and ‘Version’ to ‘Other Linux (64-bit)’. Now, click on ‘Next’.

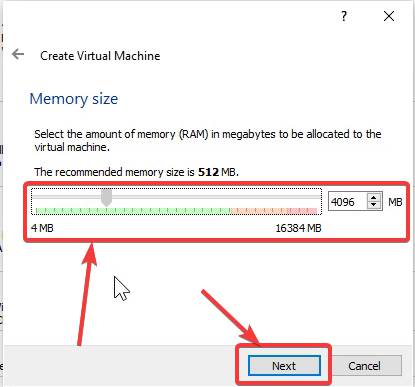
Step 4: Set VirtualBox RAM for Deepin
Now, assign at least 2 GB of RAM, using the slider, or you can assign even more if it doesn’t interrupt you in doing your normal work, and click on ‘Next’. Here, I’m assigning 4 GB of RAM.
Step 5: Set Virtual Disk type
Next, select ‘Create a virtual hard disk now’, and click on ‘Create’.

Step 6: Select Hard disk file type
Now, select ‘VDI’ as the hard disk type, and click on ‘Next’.

Step 7: Storage process on the physical hard disk
Next, choose ‘Dynamically allocated’ to conserve disk space, and click on ‘Next’.

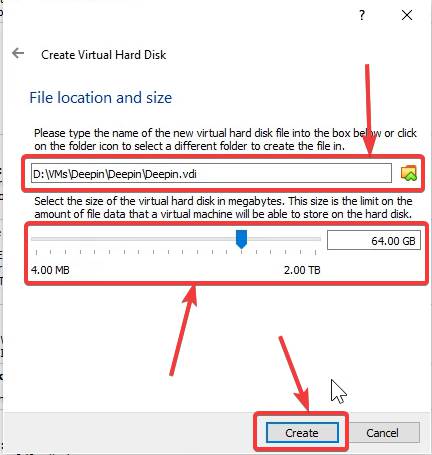
Step 8: Deepin VDI file location and size
Now, assign the size of the hard drive. I will recommend you to assign 32 GB, but you can even assign more if you have. I am assigning 64 GB here. After you are done, click on ‘Create’.
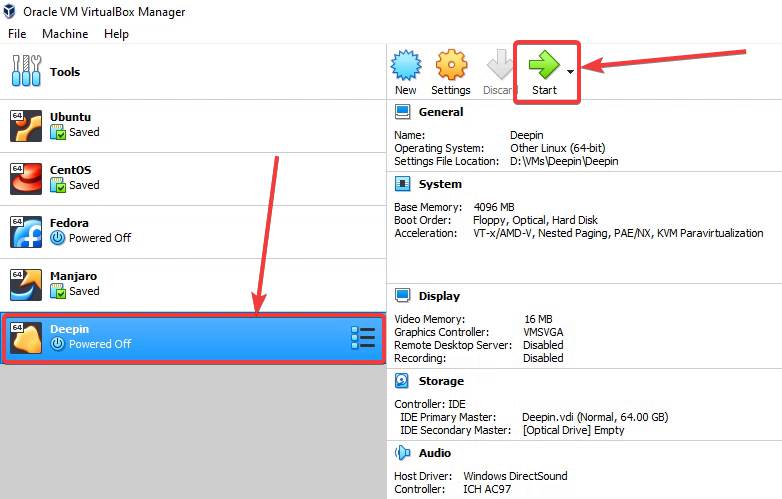
Step 9: Start Deepin Linux VM
The Deepin virtual machine is ready to be booted up. Just select the Deepin on the left, and click on ‘Start’ on the top.
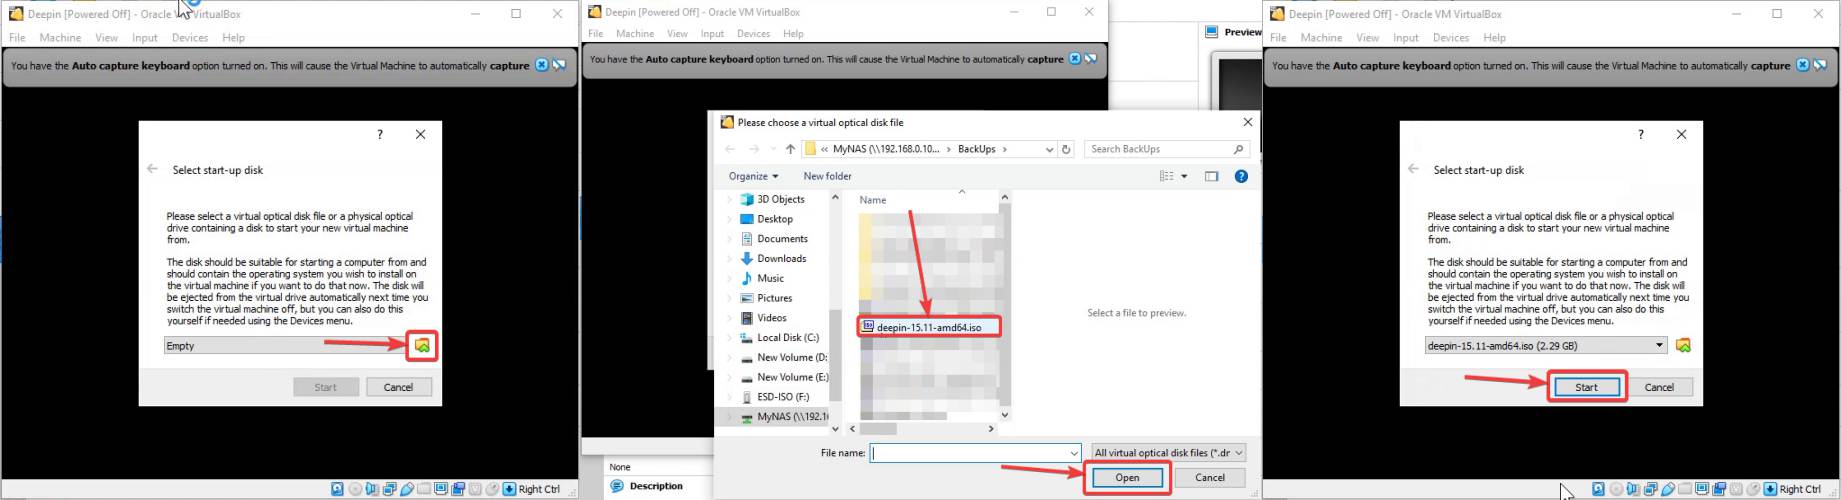
Step 10: Deepin virtual machine starts up
After the Deepin virtual machine starts up, click on the small icon corresponding to ‘Empty’, to find the Deepin ISO file, and click on ‘Open’. Now click on ‘Start’ after you have selected the ISO.
If you are installing Deepin on a dedicated computer, the tutorial is going to be the same for both a virtual machine and a dedicated system.
Step 11: Installation of Deepin
The boot menu of Deepin will appear. Just choose the first option that says ‘Install Deepin’, and hit the enter key.

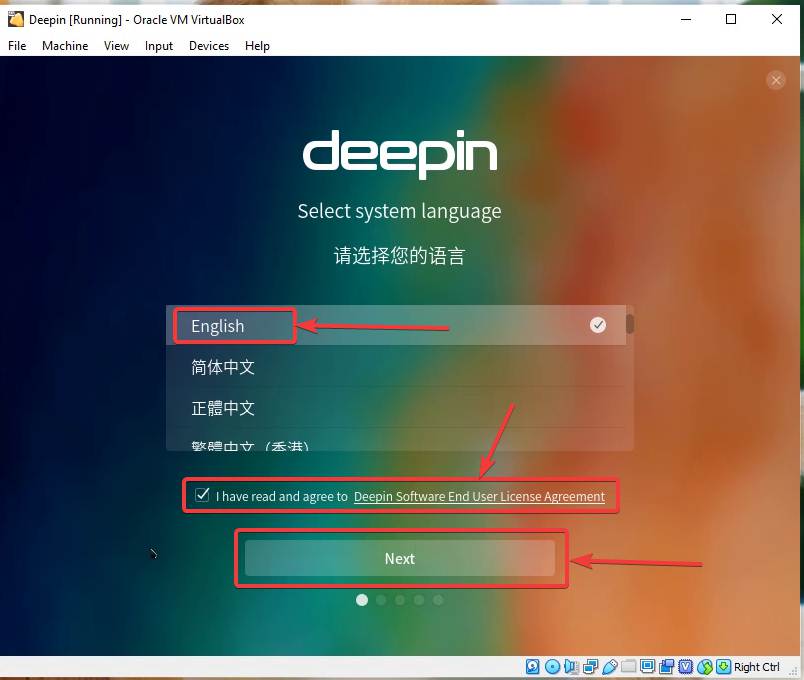
Step 12: Choose your language
It will take some time for Deepin to start up, and once the basic steps are complete, choose your language, which will be ‘English’ for me, and accept the end-user license agreement by marking in the appropriate area, and click on ‘Next’.
Step 13: Deepin Virtual Machine installation reminder
Depending upon whether you are installing it on a virtual machine, you will get a friendly reminder, which will request you to use a physical machine to install Deepin. Just click ‘Continue’ to smile and move on.

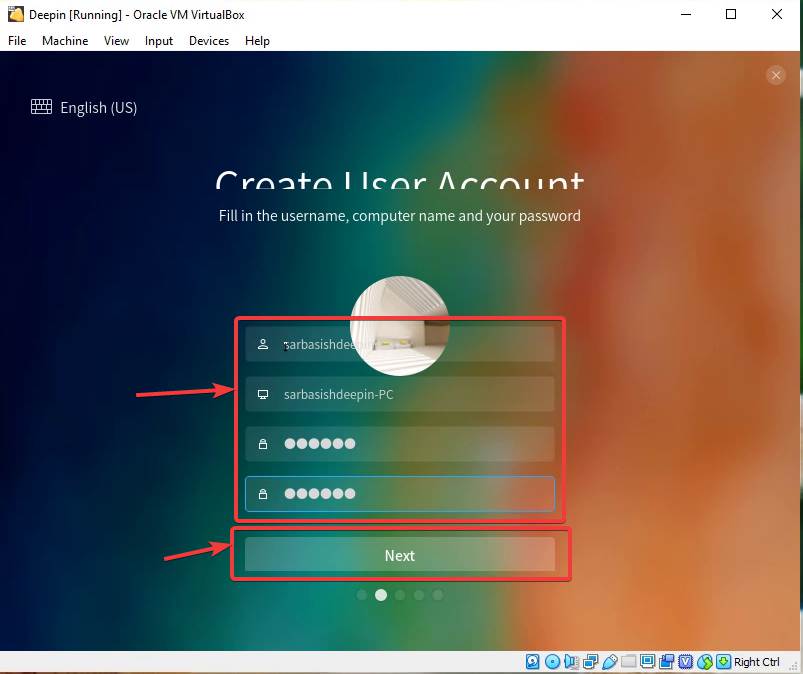
Step 14: Create a user account and password
Create a user account, with your name, which should start with a letter having a lower, case, the password, and click on ‘Next’.
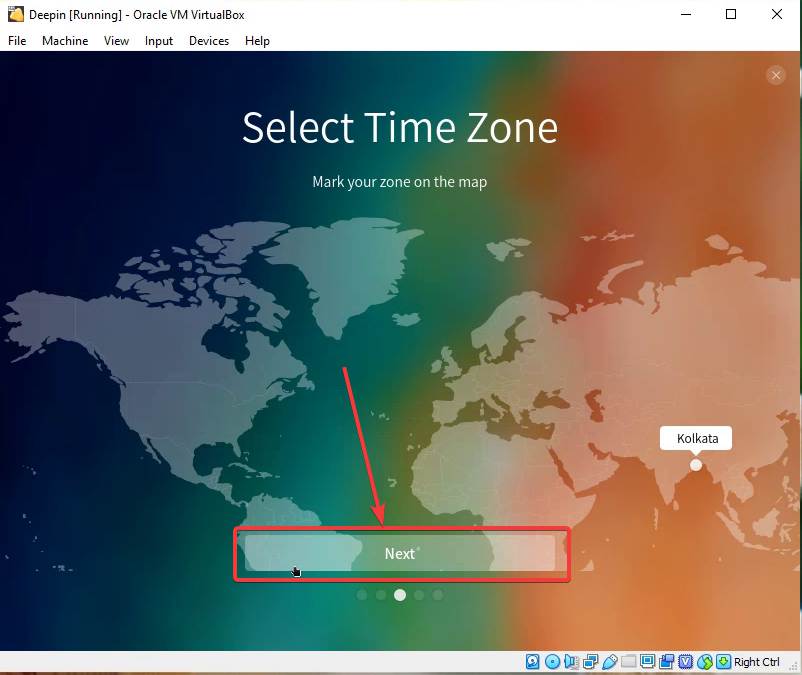
Step 15: Select Time Zone
Choose your location for the time zone, however, that should automatically be chosen, if you are connected to the internet. After that, click on ‘Next’.
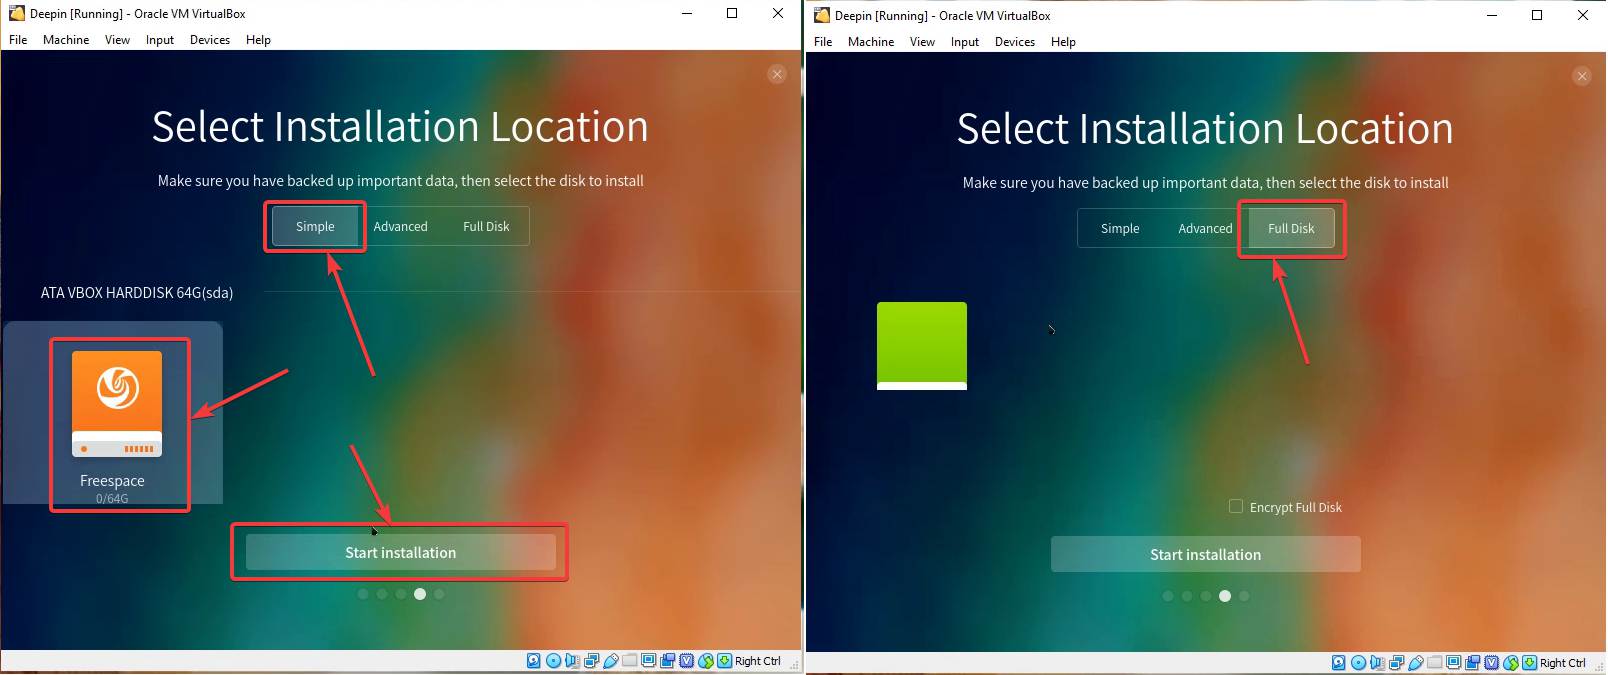
Step 16: Disk setup
Now, you will have to choose the drive, where you want to install Deepin. Simply click on the drive, and click on ‘Start installation’, or you can create partitions, using the ‘Advanced’ option.
You can even encrypt your disk, under ‘Full Disk’, if you want to.
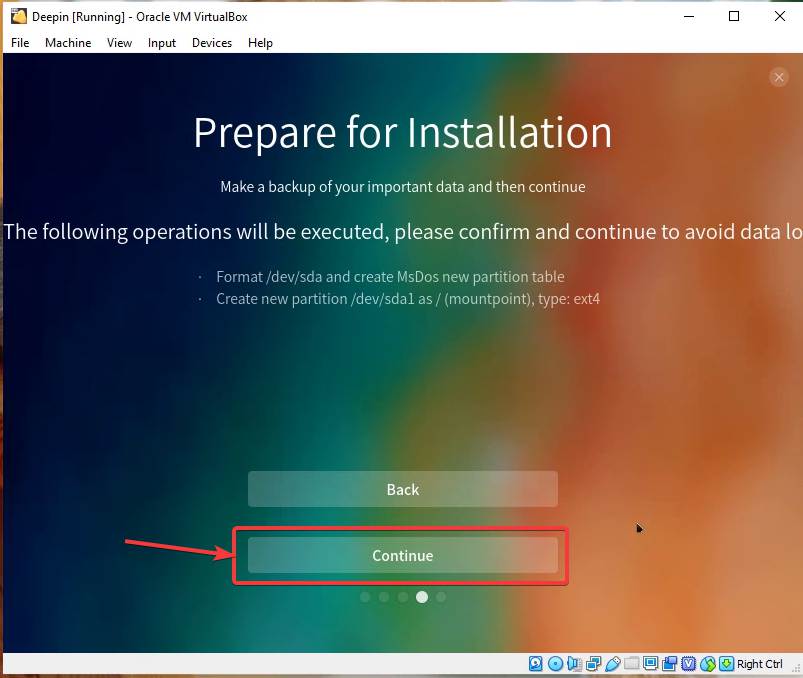
Step 17: Prepare for Installation
After you click on ‘Start installation’, you will have to click ‘Continue’ to proceed with the installation, using the selected options.
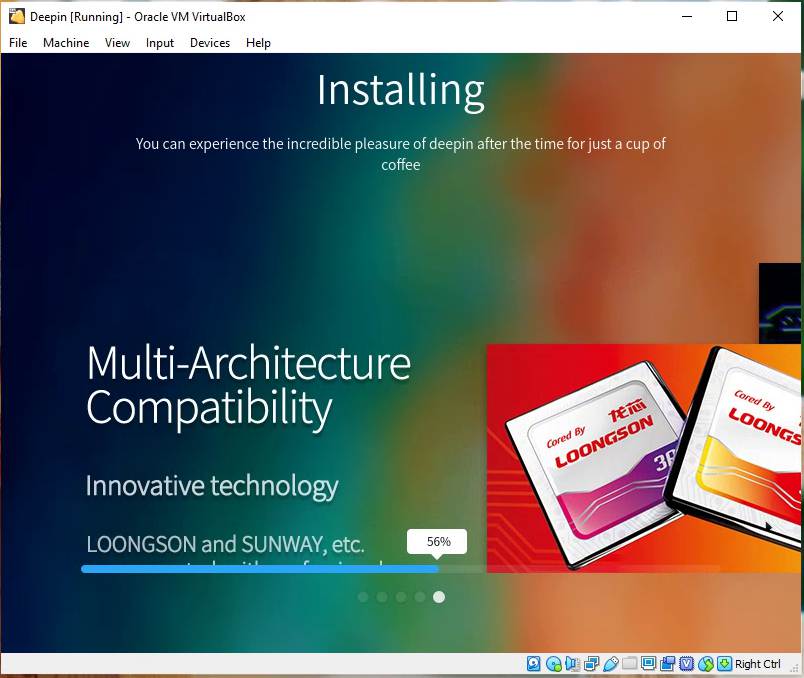
Step 18: Installation has been started
Now the installation will take a few minutes, and you can see a slideshow of the Deepin operating system features and functions, while the installation goes on.
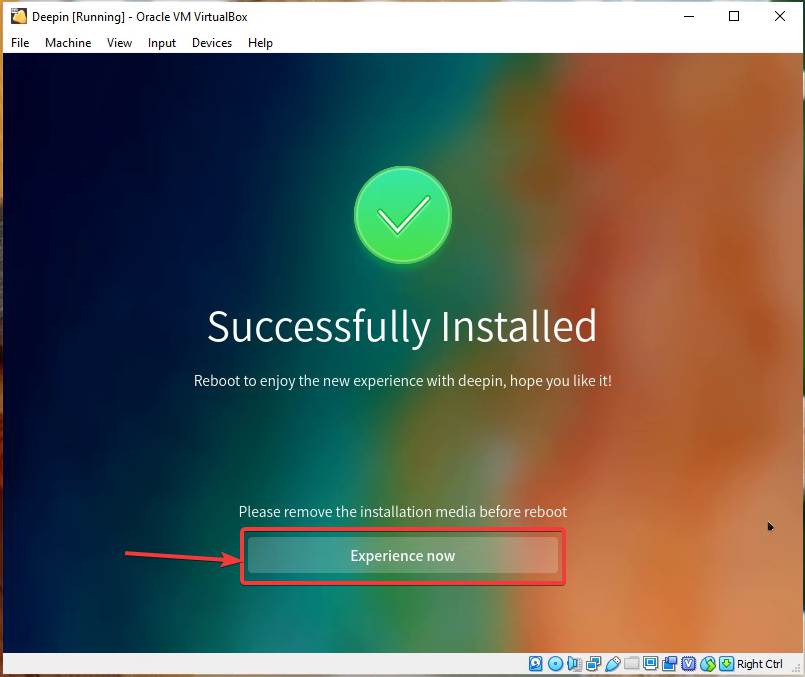
After the installation is complete, click on ‘Experience now’ to finalize the installation.
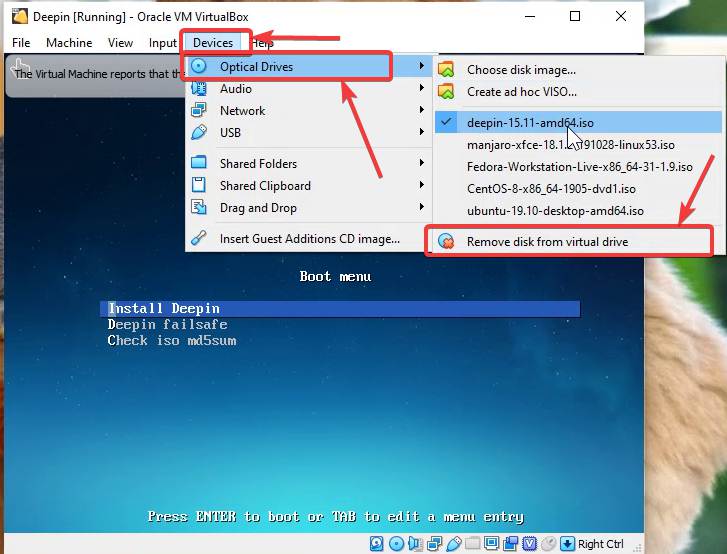
Step 19: Remove Deepin ISO image from Virtual Drive
Just remove the boot media from the computer. To unmount the ISO from VirtualBox, to prevent the installation from starting all over again, by clicking on ‘Devices’ in the menu bar, and then by clicking on ‘Remove disk from virtual drive’, under ‘Optical Drives’.
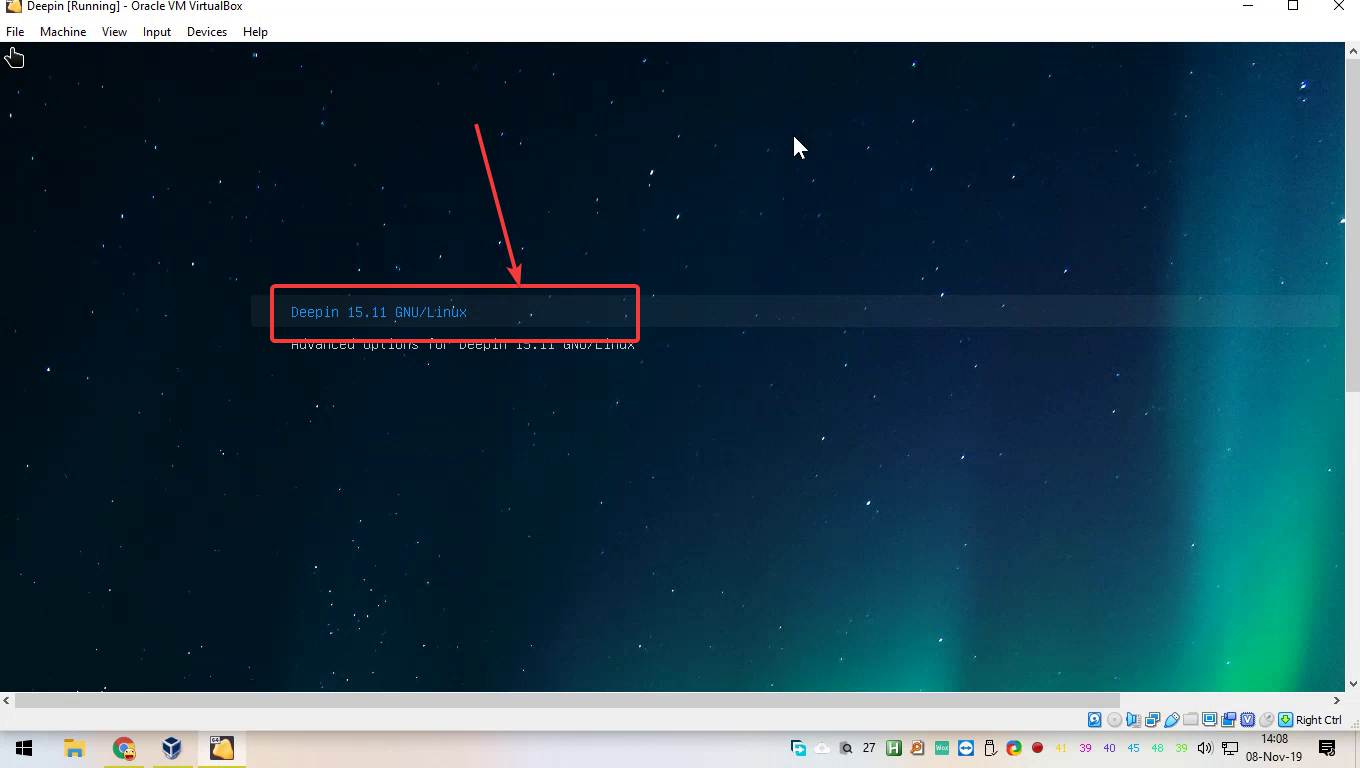
Now after Deepin starts up, select the first option that should be ‘Deepin 15.11 GNU/Linux’, using the up and down navigation keys, and hit the enter key.
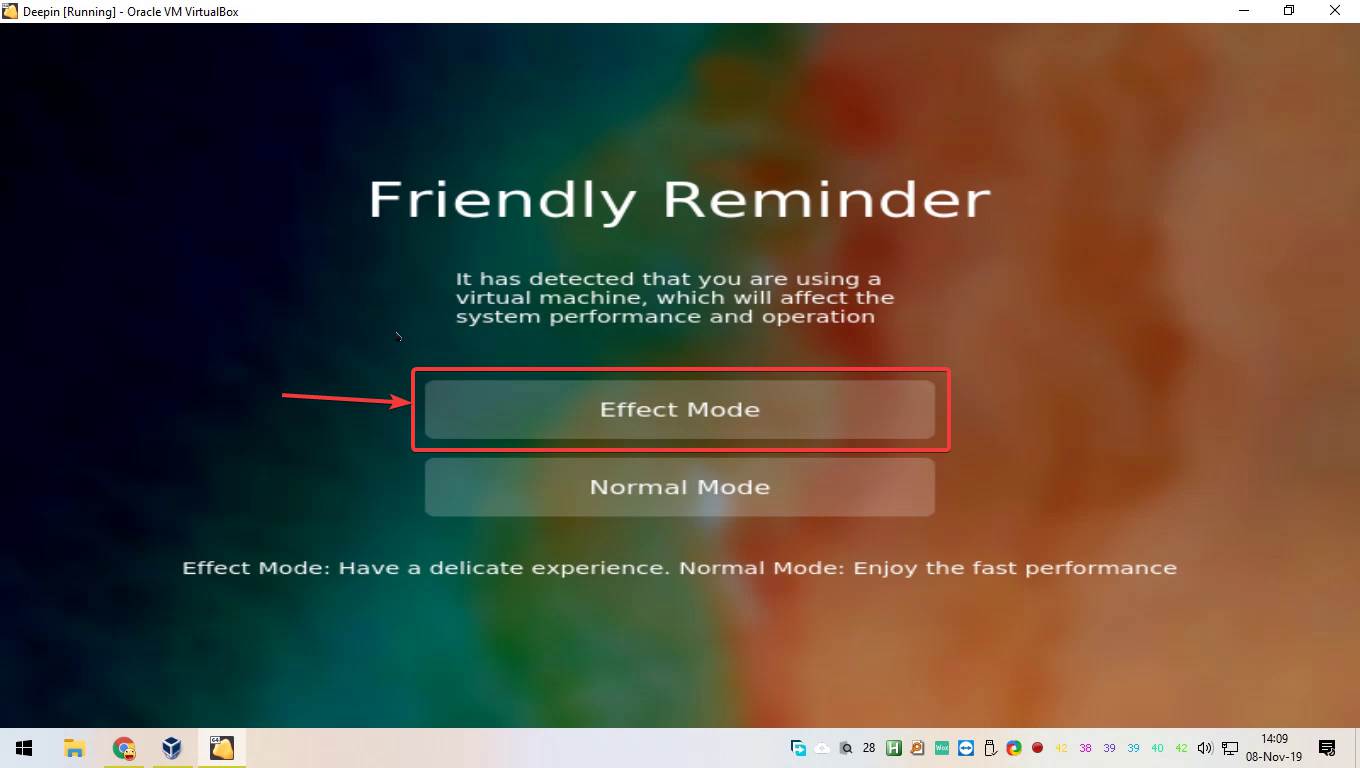
After you boot into Deepin for the first time, you will again be asked, whether you want ‘Effect Mode’ or ‘Normal Mode’, if you are on a virtual machine. If you want the fastest performance, I will recommend you to choose ‘Normal Mode’, else ‘Effect Mode’ should work perfectly.
Now just log in, and you should land on the really cool and refreshing user interface of Deepin, which is the reason, most people use it for.
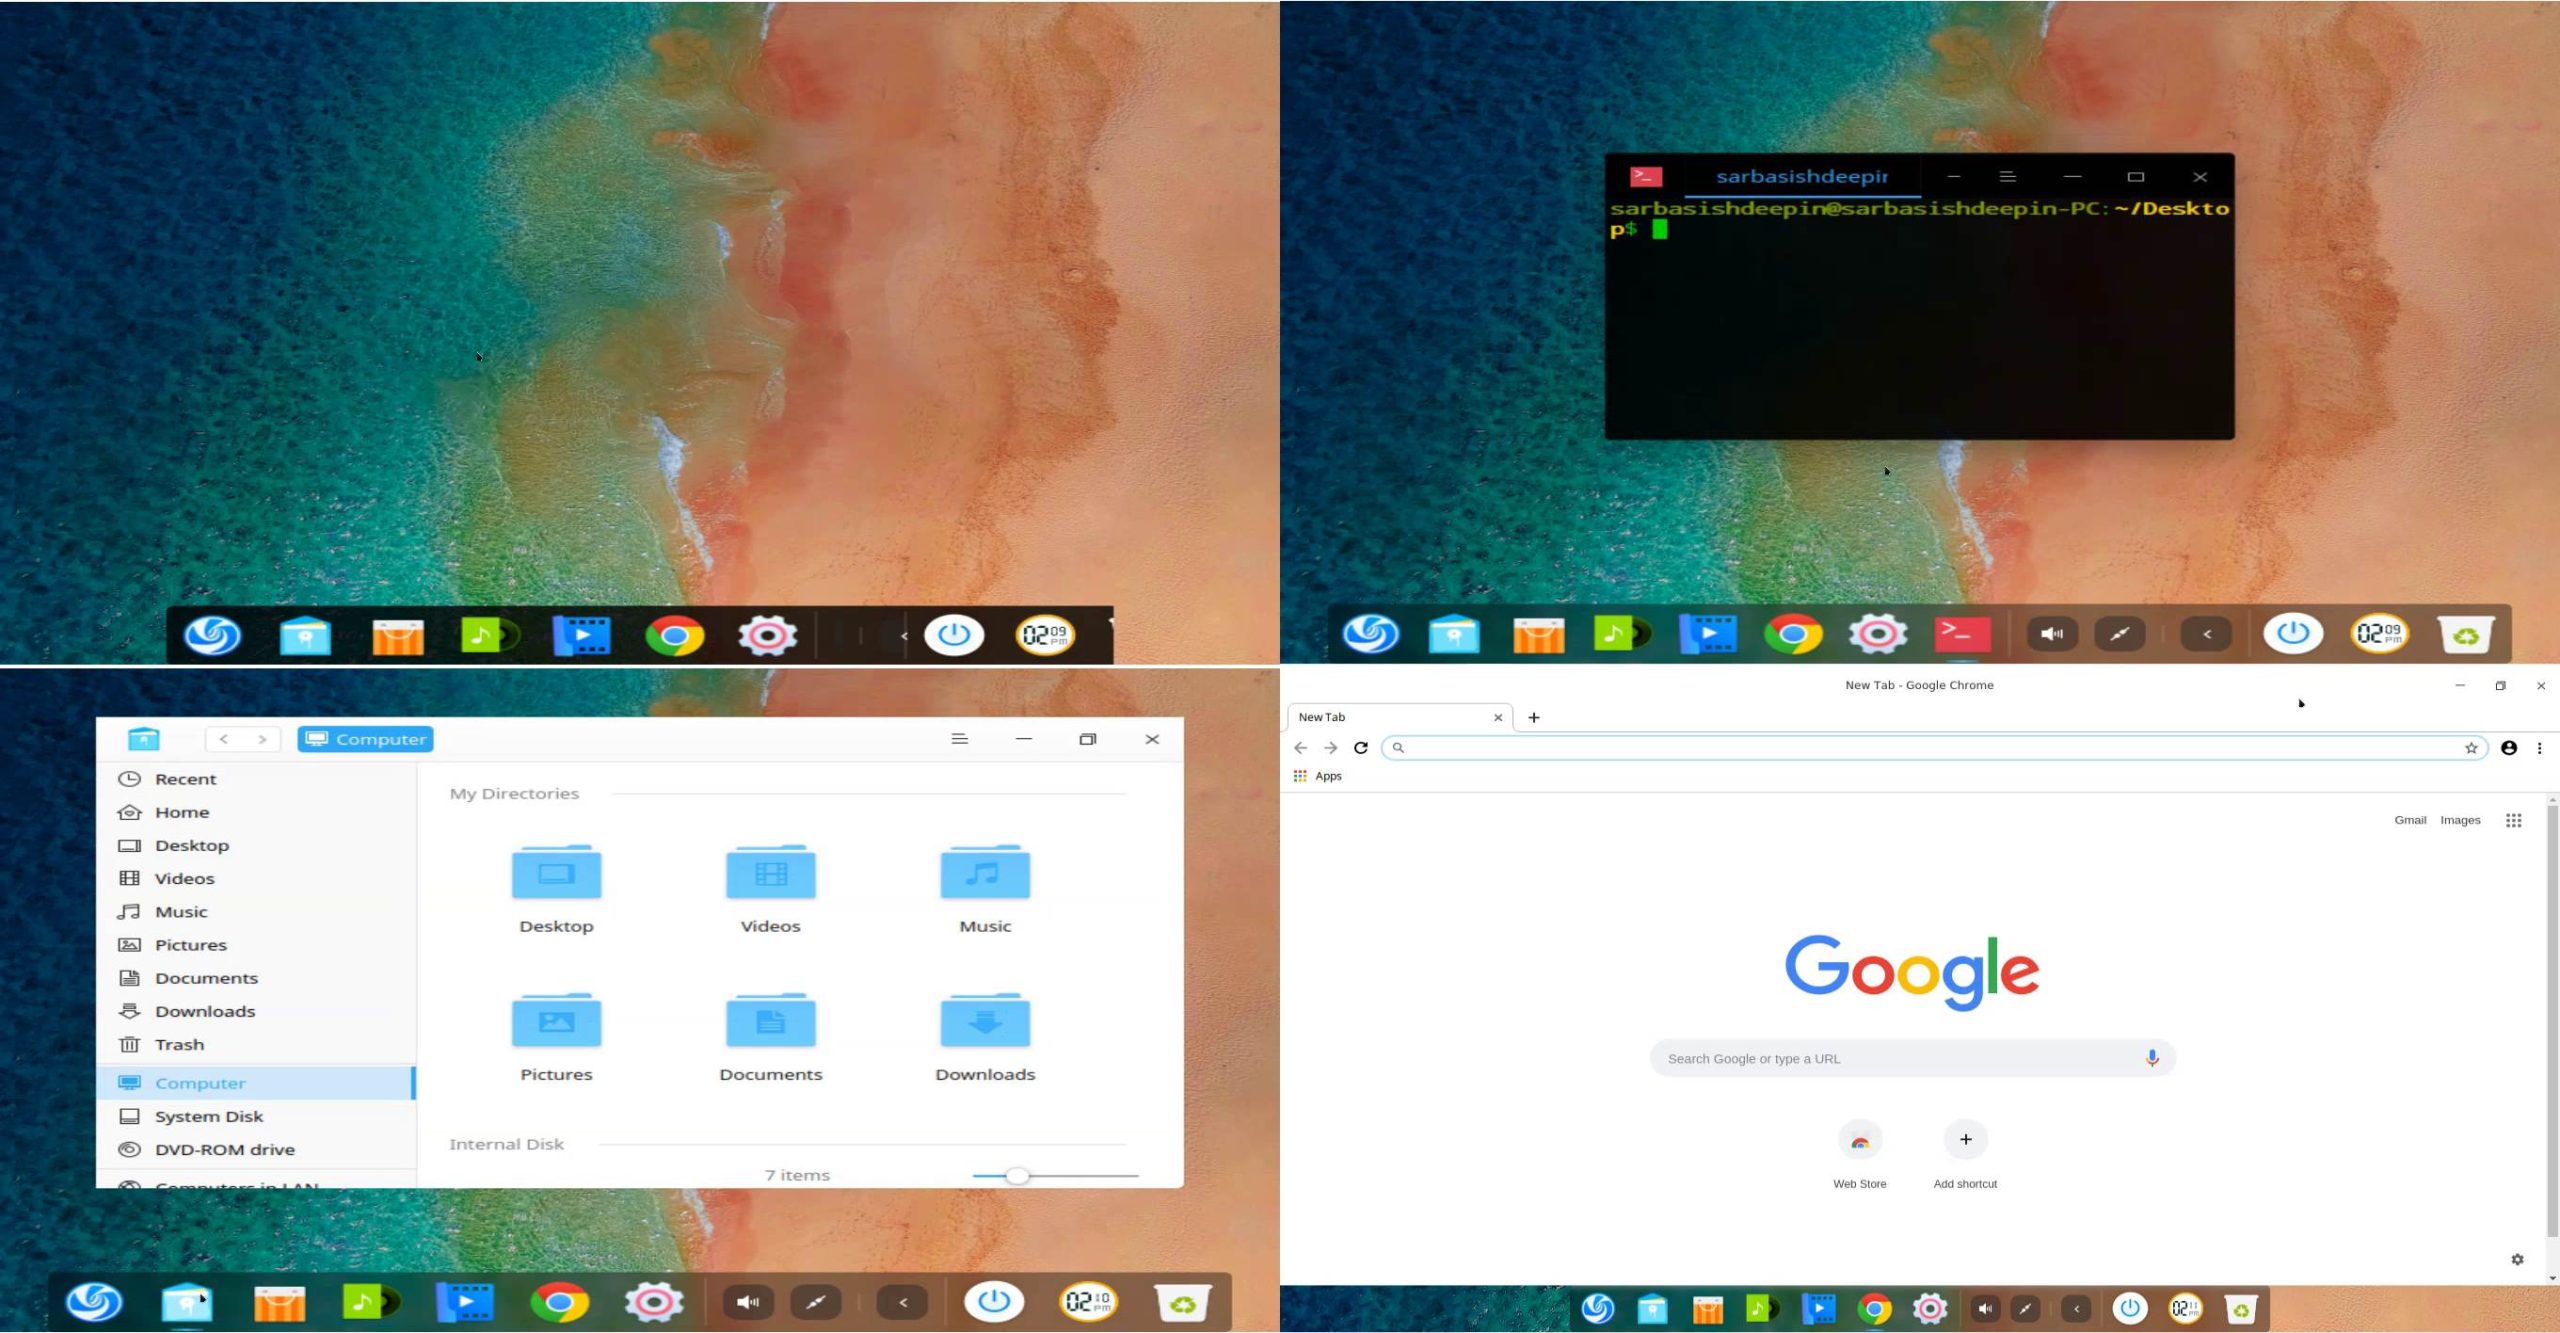
Deepin also comes Google Chrome, not Chromium, which is the most user’s favourite. Considering everything, there is no reason, you shouldn’t try out the Deepin distribution of Linux.
I will recommend you to upgrade packages after you install Deepin, using the following command for getting the best performance.
sudo apt upgrade
So that was all about, how you can install Deepin Linux on a virtual machine, or your PC. Do you have any questions? Feel free to comment on the same below.
Other Articles to Read:
- How to download and install Unix Solaris OS on VirtualBox
- Download and Install KaOS Linux on VirtualBox
- install MX Linux on VirtualBox VM
- Download and install Ubuntu 19.10 ISO image on VirtualBox VM
- How to install CentOS 8 Linux on VirtualBox


Thank youvery much for this tutorial. I am missing a manual how to install virtualbox guest additions. Can you help?
Greetings
Thomas
Here is the link showing the steps to install VirtualBox Guest Additions… https://www.how2shout.com/how-to/how-to-install-virtualbox-guest-additions-windows-or-linux.html
Tried to install deepin on virtualbox but every time is install it, it tells me to reboot it, not experience now. How can I solve this issue?
In advance,
Thank you.
Remove the attached ISO file. Go to Virtual Box Menu -> Devices -> Optical Drives and select the inserted ISO file of Deepin to remove it, once the installation of the OS is completed. After that, reboot your Virtual machine and you will have a running Deepin.