A step by step guide to install and set up a WordPress website on WPMU DEV WordPress hosting service along with an overview of the WPMU DEV dashboard, plugins & tools.
In today’s internet world when everything is online, human being life is extremely comfortable that was never been before. And to spread or grasp any information floating over the internet we use websites, a soft platform using different web technologies and protocols to disperse knowledge. A huge part of websites running over the internet uses a popular platform called WordPress, of course, people those are in technology field must have heard about this nifty CMS-Content management platform which has changed the lives of people due to its ease of usage and setup.
However, there was some technical part like setting up it on the server which further simplified by the different fully managed WordPress hosting services. These services stipped down the direct access of hosting server files and other complications of setting up any WordPress by implementing a layer of their custom web software. Means, no troublesome of uploading WordPress files, setting up a database for it, dealing with htaccess file, after installation optimizing it etc.
What is WPMU DEV?
There are so many popular WordPress management hosting services out there such as Bluehost, SiteGround, WPengine and more, out of them one if WPMU DEV, the main vision of them is to provide as simple as hosting platform for WordPress, so that a user could set up his own WordPress website in just a few clicks of mouse without any developer support. And here we will show how?
In this article, we are going to use 30 days free trial of WPMU DEV to set up a website on it. So, let’s get started. Also, see the review of WpmuDev.
Step 1: Sign up for 30 days of WPMU DEV trial
Well! on one hand, it is a great thing that WPMU DEV is providing a 30 days trial of their hosting service, so that user can try it to understand how it works before actually investing money into it. However, there are lots of new bloggers or users those don’t posses credit card, yes, to sign up for 30 days you need a credit card without that you can’t experience it. Nevertheless, if you have one then visit WPMU DEV official website to signup.
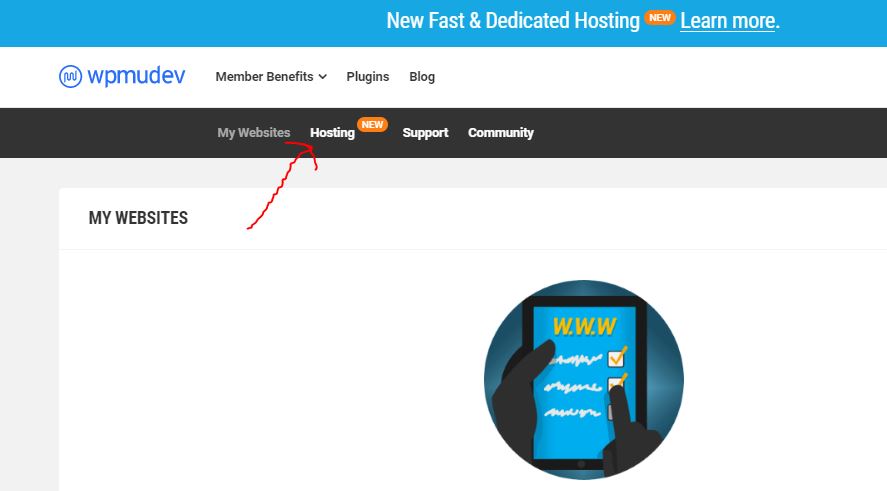
Step 2: Access Hosting service
In the menu of the WPMU DEV, you will see an option called hosting. Click on that to create a new WordPress website on it.
Step 3: Create a website on WPMU DEV hosting
To add a website click on the + icon given just beside the Hosting text.

Now, a pop-up will happen with two options: Create a New Website or Migrate Existing Website. If you already have tested the WPMU DEV and want to migrate your live WordPress on it, just click on the Migrate Existing website. Where you will get an option to enter the website domain which you want to migrate and then install a plugin of WPMU DEV on your existing website to import all the data. The procedure is very simple and everything is guided by the hosting service itself.
However, here we will go for Create New Website, as the tutorial theme is on that.

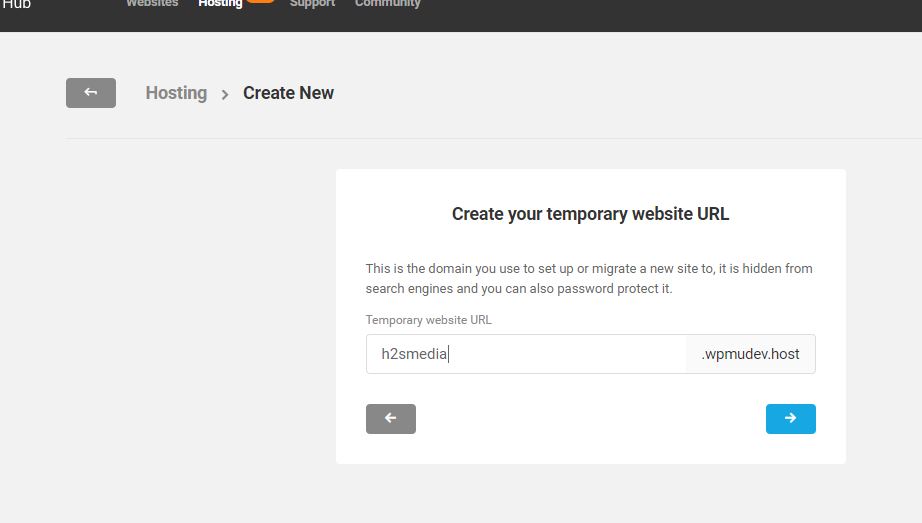
Step 4: Create your temporary website URL
To make things easy, while creating a WordPress website, it will not give you an IP address which generally happens to access installed web application on traditional web hosting services. Instead, a fully qualified subdomain on the hosting domain of WPMU DEV will be created for you. You can type whatever you want to set as a subdomain name, for example, we are using h2smedia. Furthermore, this temporary link will not get crawled by the search engine at all, the Google and other SE will recognize your website only by your own fully qualified domain pointed to this WordPress hosting service. Thus, don’t worry about SEO of domain.
Step 5: Create a WordPress Administrator Account
After creating a URL, now create an admin account for your WordPress website. This account will be going to use further to access the backend of the installed WordPress. So, make sure to use a strong password.

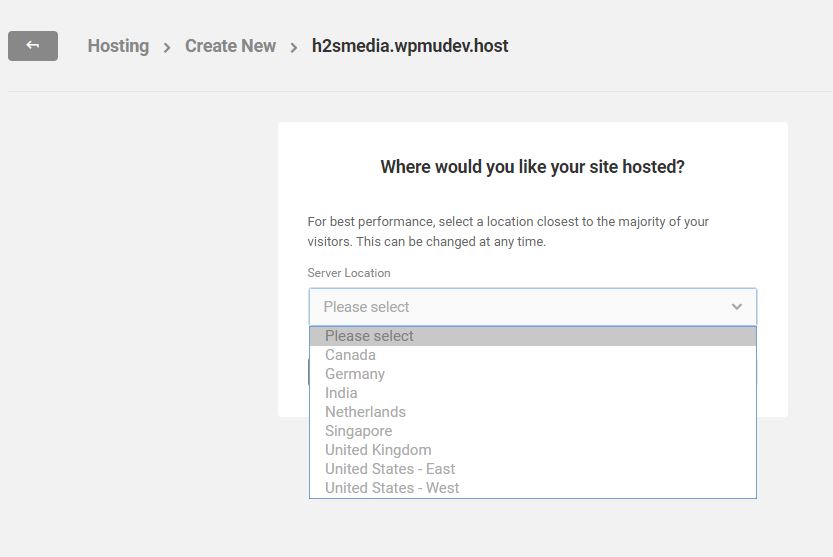
Step 6: Select the hosting server location to host the website
In this step, the setup wizard will offer you a few location of different data centres where you can host your websites such as Canada, Germany, India, Netherlands, Singapore, United Kingdom and United states East-West. So, select the one which is nearer to your location or the majority of your visitors are coming from; to get the best performance of the hosting service.
Step 7: WPMU DEV Dashboard to manage hosting service
Once the installation gets completed, the temporary subdomain for your installed website will be shown, click on that to access further options to manage your site.
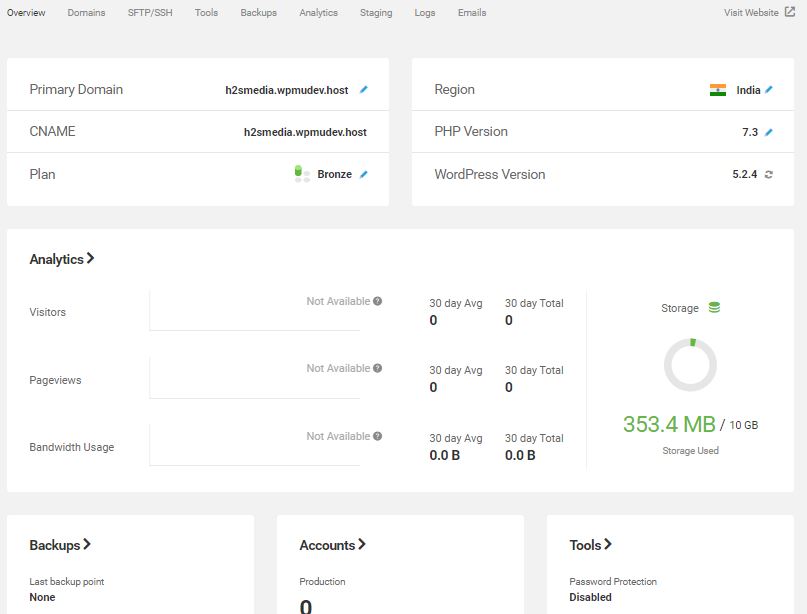
1. Overview
The Overview section of the hosting panel will show all core information about the website set up over it. Such as Domain Region of the installed server, PHP and WordPress version, Analytics- so that you can know how much bandwidth you have consumed in a month; the number of backups made so far; Account and tools available to secure and work with hosting.
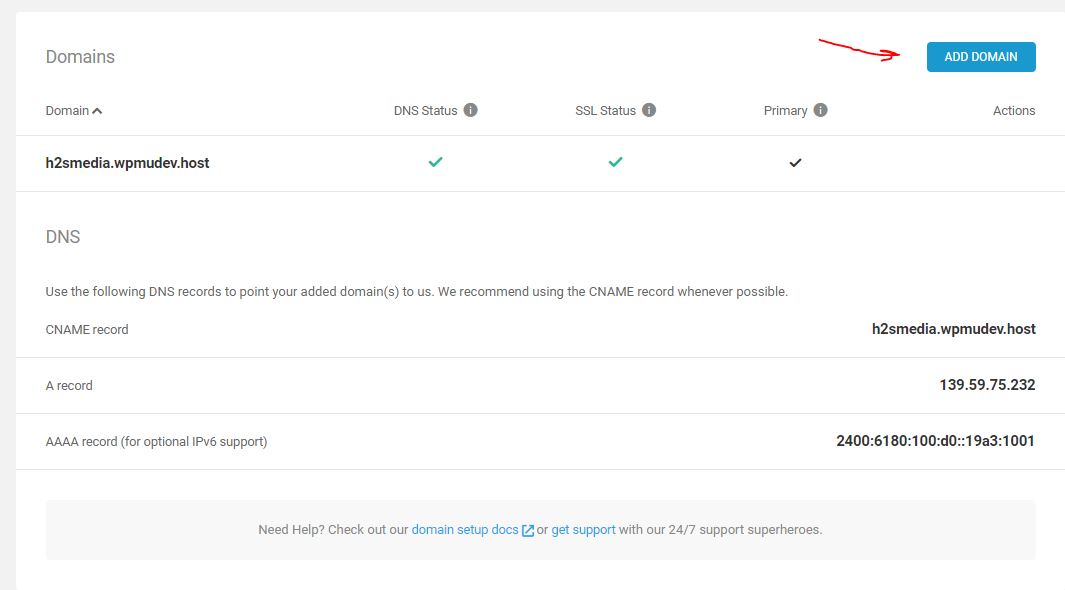
2. Domains
If you want to set up your own custom top-level domain with the hosting, just click on the pencil icon given in front of Primary domain or just use the Domain tab.
After that click on the Add Domain button, a pop-up will happen, where you have to enter your domain name without http or https, I mean a naked domain. Once that is done, enter the given DNS records – CNAME record, A record and AAA record to the DNS of the service from where you have bought your domain.
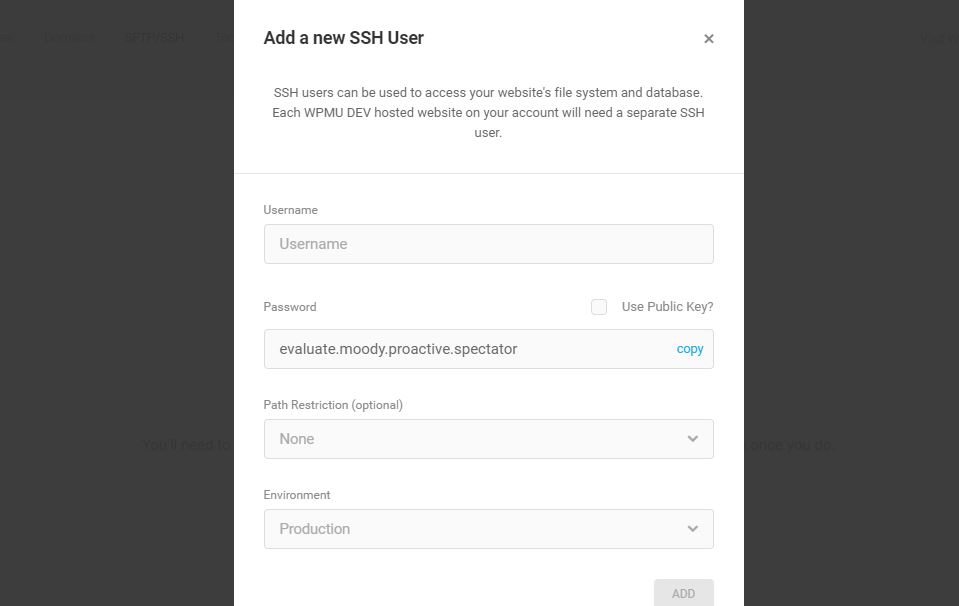
3. Add an SFTP or SSH User
On WordPress managed server you will hardly get access to its core file graphically like Cpanel File manager because everything is going to arrange and set up by the hosting itself. However, if you know what are you doing and want access the filesystem of your installed wordpress then you can either use SSH to access it using the command line or SFTP using some software graphically like MobaXterm.
4. WPMU DEV hosting WordPress toolkit
List of all tools to manage and handle the installed Content Management system.
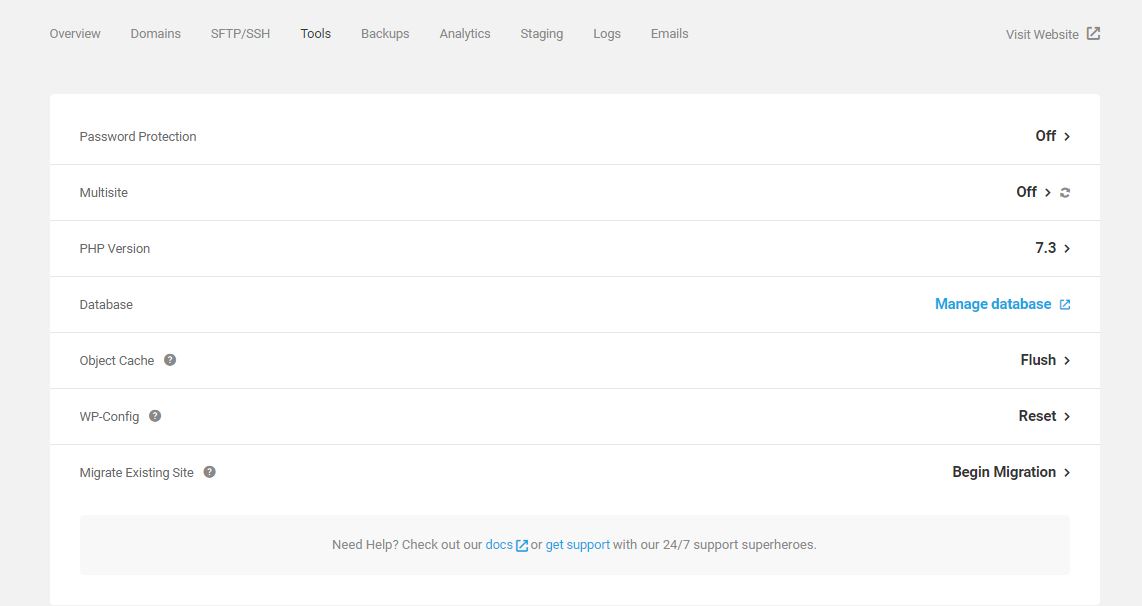
Password Protection
Password protection hides your site from visitors and search engines. Usually, it’s a temporary measure when you don’t want your site public during maintenance or development.
Multisite
Convert your WordPress single site into a WordPress multisite network. This change is irreversible.
PHP Version
Allow you to select the best the latest available version of PHP for the fastest, most secure site.
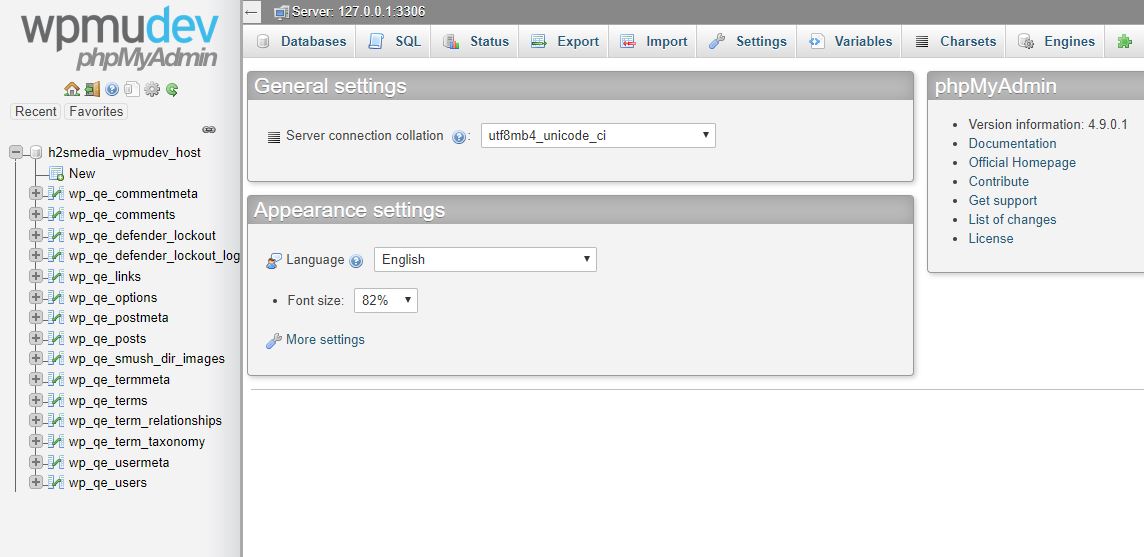
WPMU DEV Database
This will allow accessing phpMyAdmin so that you can manage your database associated with the installed WordPress website.
Object Cache
Object Caching greatly accelerates site performance by storing queries to the database in memory, but in very rare cases can cause problems with some plugins. You may need to flush this cache if you get inconsistent behaviour during development or after making direct database edits.
WP-Config
This file is located in the root of your WordPress file directory and contains your website’s base configuration details, such as database-connection information. If you did a migration from another host, this information may need to be reset.
Migrate Existing Site
If you don’t have (S)FTP access to the site you want to migrate here, you should be able to create (S)FTP credentials in your current host’s control panel. Or you can try migrating with our Shipper plugin instead.
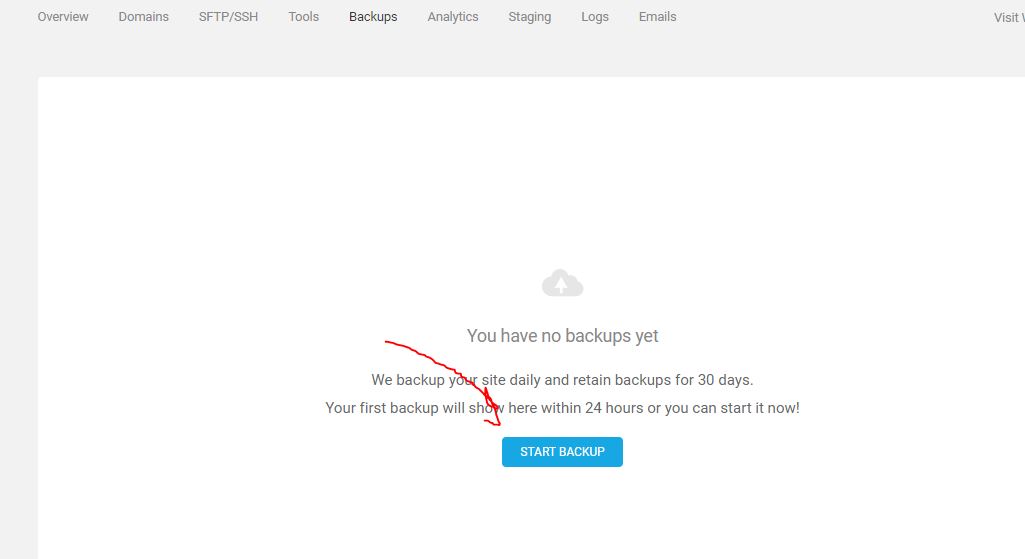
5. WPMU DEV Backup
The hosting service will backup your website automatically daily, however you can start it manually.
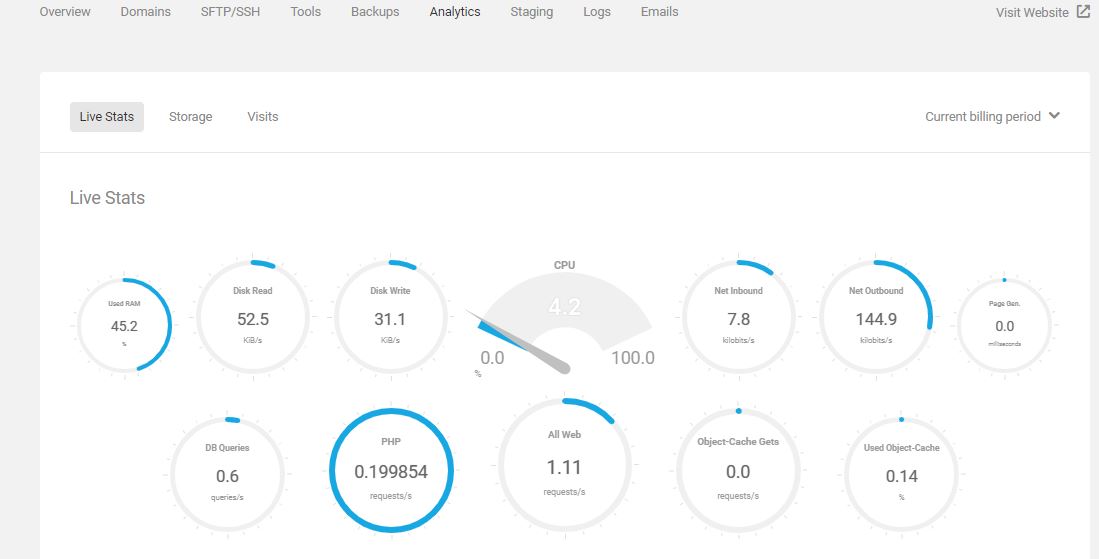
6. Analytics
This is a really handy tool as it provides very intuitively about the load of the hosting server services such as network, disk read and write, CPU, PHP, RAM, Cache, Storage, number of users visited our website and more.
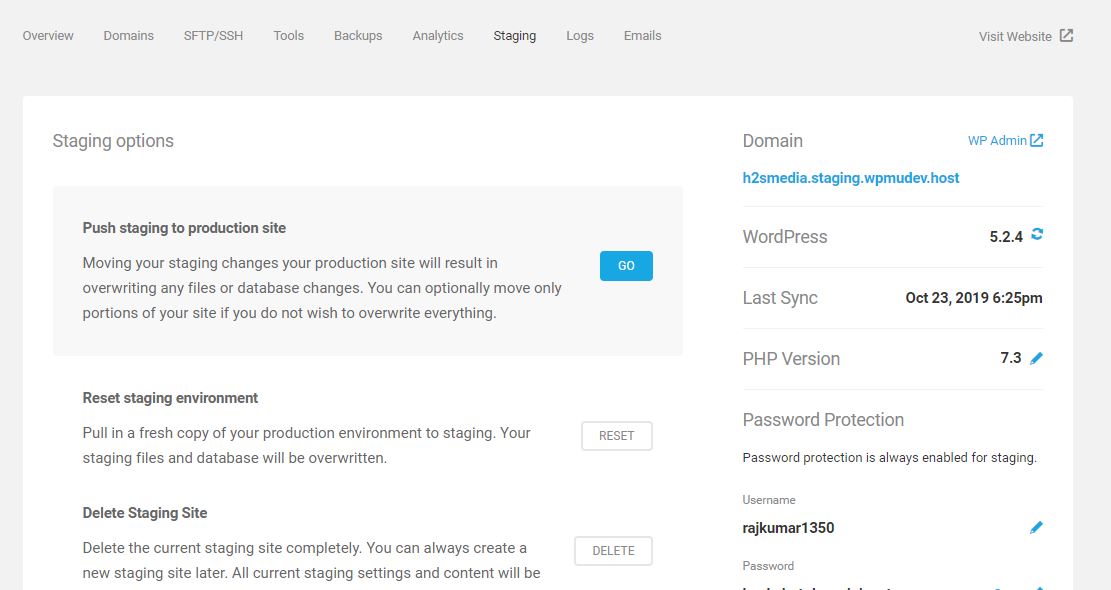
7. Staging environment of WPMU DEV
Another feature of this WordPress hosting service which helps a lot to the developer or those are into web development. Using staging mode we can create a replica of our production website to test out different plugins, codes etc for further improvements.
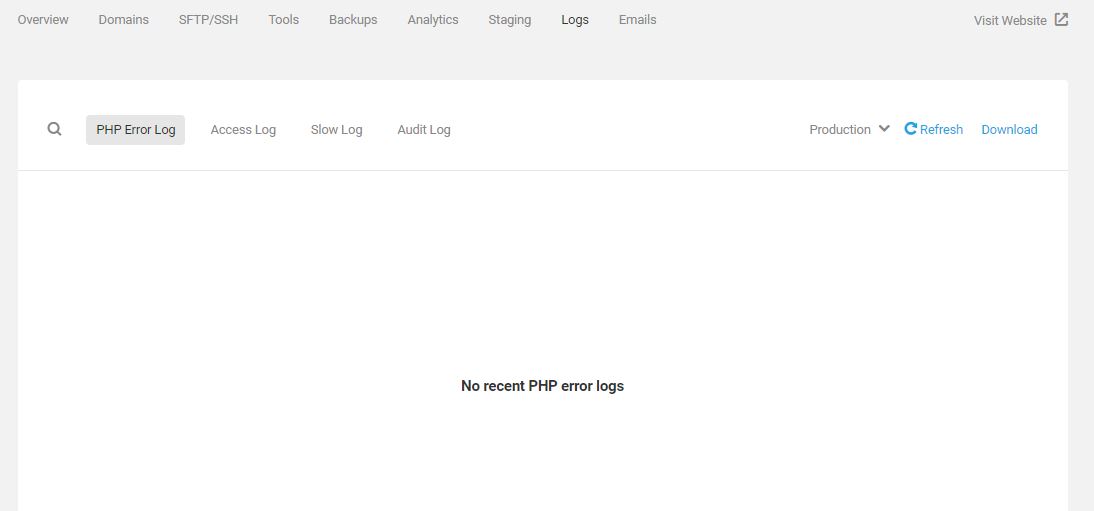
8. Logs
If anything happens wrong you can scrutinize the logs to know exactly where is the bottleneck.
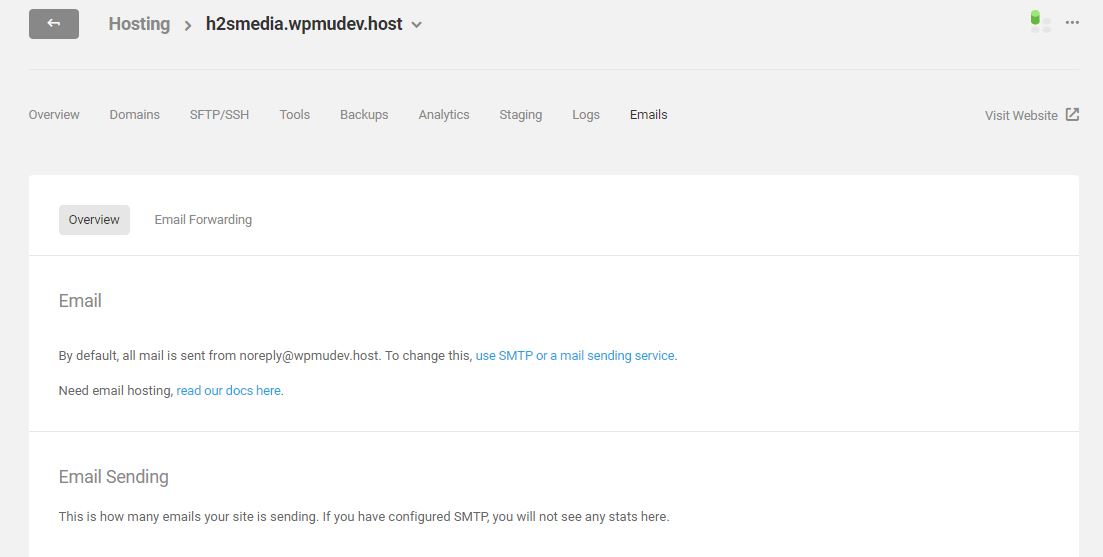
9. Email
Email forwarding is an easy way to receive an email at your domain. For example, you can create [email protected] and forward all mail sent to this address to your personal @gmail.com account or any other email address.
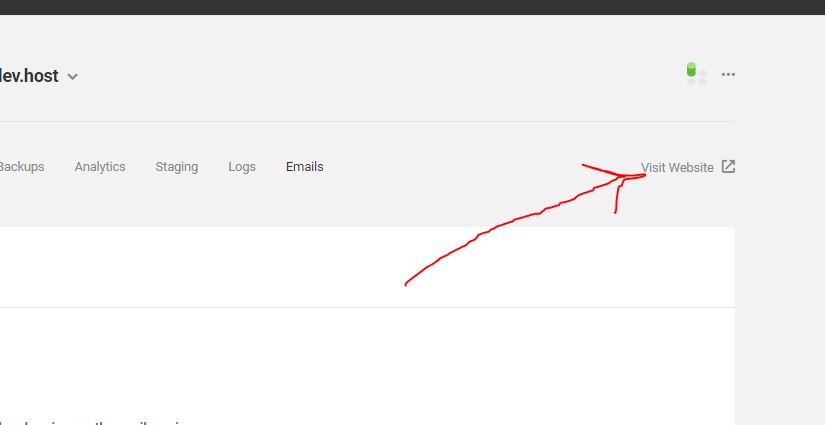
Login Your website
Finally, to log in your WordPress website click on the Visit Website link.
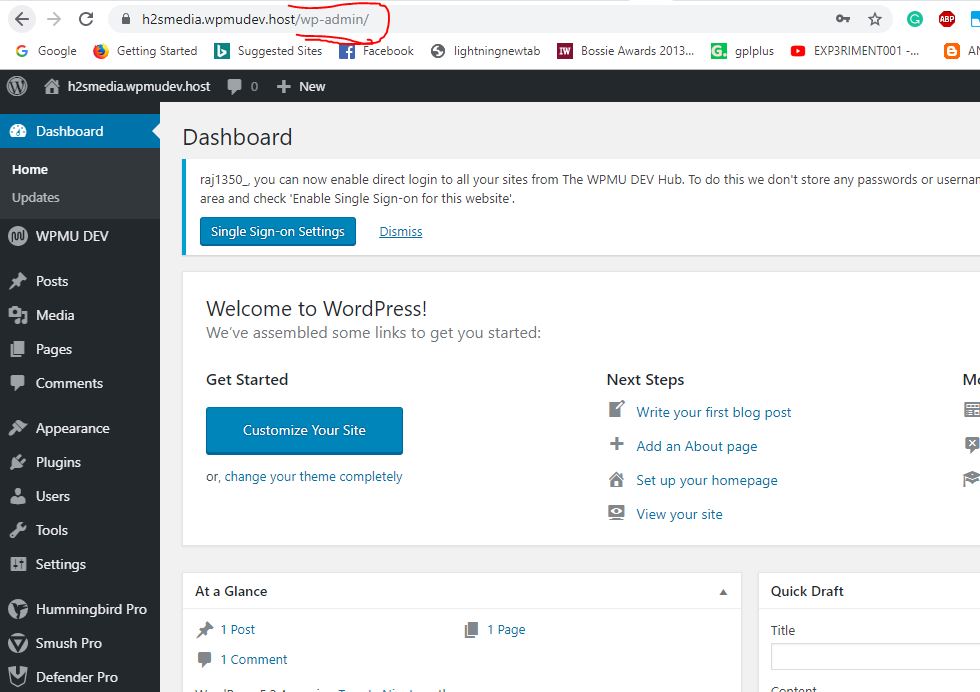
To access the backend of the WordPress, simply type wp-admin at the end of the website URL, see in the below screenshot.
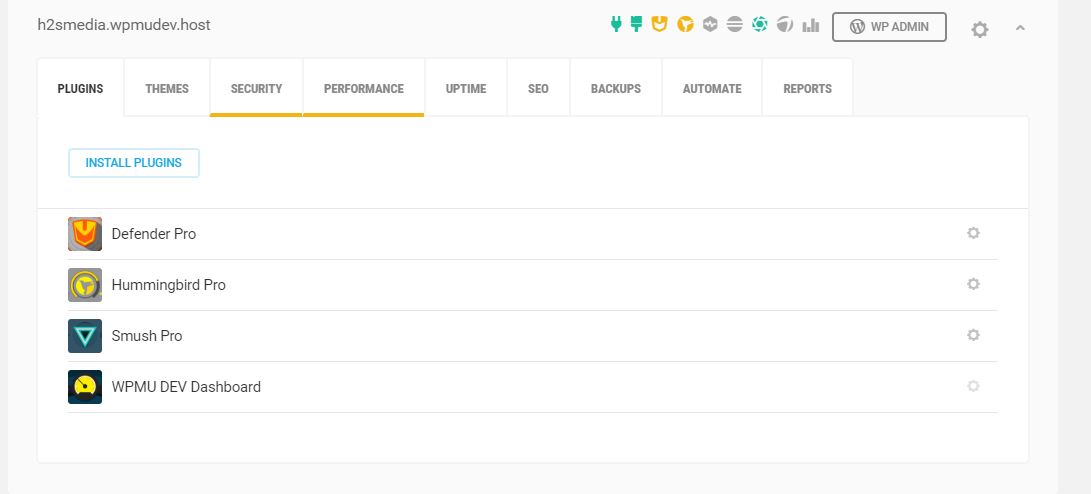
WPMU DEV Plugins
To install any WpmuDev plugin or theme you don’t need to visit your WordPress backend, you can do all that the hosting service Dashboard.
From the hosting menu click on the MyWebsite option and then select the Plugins tab. You will see all the pre-installed plugin tailored by the WPMU DEV to boost the security, cache and optimization of the installed WordPress. Defender Pro, Hummingbird Pro, Smush Pro and WPMU DEV Dashboard are the default one.
WPMU DEV Themes
All the installed themes will be here, by default Twenty Nineteen, Twenty Seventeen and Twenty Sixteen will be there.
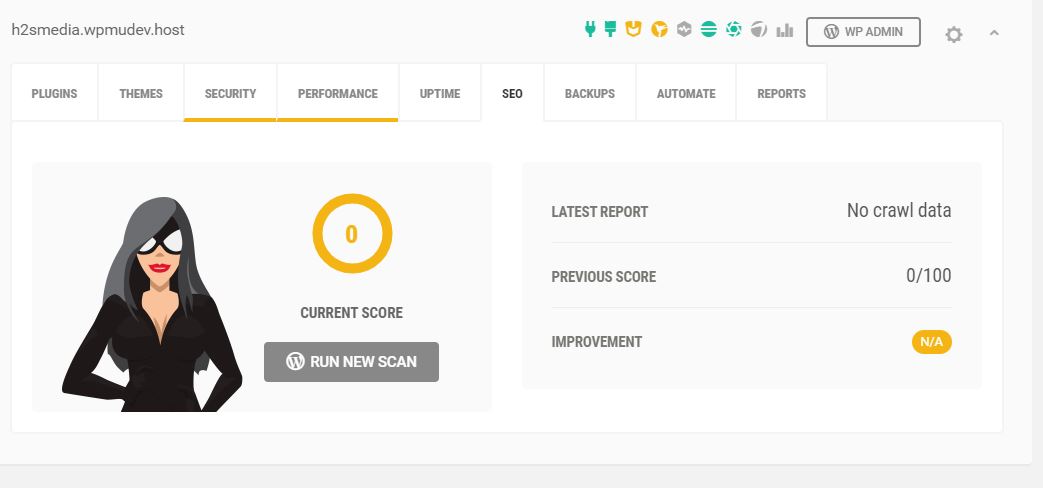
WPMU DEV SEO – Smart Crawl plugin
Although we can install any other SEO plugin like Yoast SEO, however, for convenience the Wpmu Dev has given its Smart Crawl plugin to ensure the optimization of the website for search engines. But this plugin just ensures the crawling of articles and post of your website. For SEO, I will recommend using Yoast or All in One SEO Pack.
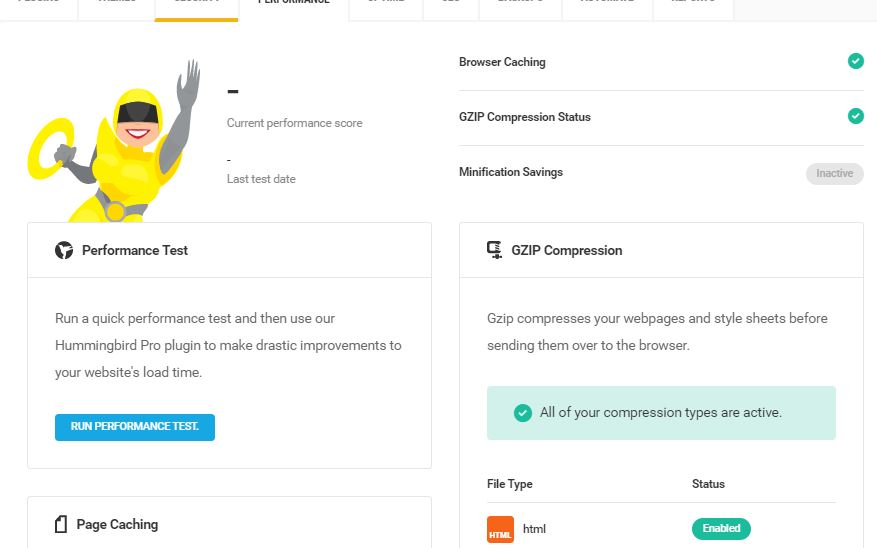
WPMU DEV Caching
Furthermore, under the performance part, you will find the Caching related job and optimization that means you don’t need to hit and try different plugin on your WordPress to make sure your website is at top speed. For that their hummingbird pro caching plugin comes installed by default.
So, this was the installation and setup of WordPress on WPMU DEV hosting service along with its service overview.
Hence, if you don’ have much knowledge of servers, coding and web development such kind of WordPress management hosting services make everything on your fingertips by full managing everything for. However, those want full control over each and everything they should go for cloud or regular VPS or dedicated server hosting, this is not their cup of tea.
Related Posts
How to Reopen Closed Windows or Tabs in Firefox
How to Install Django on Windows 11 or 10
How to set Gemini by Google as the default Android assistant
How to create data bars in Microsoft Excel for numeric values
How to open HEIC images on Windows for free
How to install Server Manager Windows 11 or 10