Learn the methods to install Git on Windows 11 or 10 using the command line and graphical user interface for the version control system.
GIT is a free version control software that allows you to split your project data into individual snippets. This makes it possible to work in a team and you can find your extensions or adjustments more easily.
It is an open-source tool that was developed for a Linux kernel project but later used by most of the developers. The key benefit is it allows multiple developers to work on the same project by having a local working copy of the complete repository. Further, the git allows track changes made to the code, lets developers undo them if something goes wrong, and also makes the code available for others. In addition to the local working copies of the developers, there are also remote repositories. The changes from your own repository can be made public via Git by “pushing” them to a remote repository. Because every developer has a copy of the complete project data, Git is a distributed version control system.
Using a “GIT server” (even if it is actually none) you have the following advantages:
- Working in a team
- Backup of the code
- Track changes
- Restore changes
- More performant than folder structures
- Clear if you work with it a little longer
- Fast and memory-saving
- Deploy project directly
Steps to install GIT on Windows 11 or 10
Estimated reading time: 10 minutes
There are two easy ways to install the GIT on Microsoft operating systems. One is using the command terminal and the other with the help of a regular graphical user interface. Here we show you both.
#1st way: Install using the command line
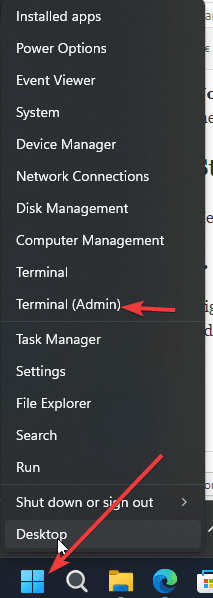
1. Open Windows Terminal
Right-click on the Windows 11 Start Menu and select Terminal (Admin). This will open the Windows Terminal app to access PowerShell or CMD. However, Windows 10 users will have PowerShell (Admin) option instead the Terminal one.
2. Check Winget Command line
In the next step, we will run the Winget command to check it’s available on the system. It is a Microsoft Package manager to install applications easily on Windows 11 or 10 operating systems using the command line.
Note: Windows 11 will have it by default, however, old Windows 10 users may need to install it manually. Project GitHub link.
winget

3. Install Git using command on Windows 11 or 10
Well, as we apprised that Winget is a Windows Package Manager Client, hence let users easily install the GIT on our system. It just takes one command only. No need to visit any website and download some setup.
winget install Git.Git

Once the installation is completed, you can check the version of the installed Git, using the given command:
git --version
Note: If you get the following error, close your command terminal and open it again then check the version.
git : The term 'git' is not recognized as the name of a cmdlet, function, script file, or operable program. Check the
spelling of the name, or if a path was included, verify that the path is correct and try again.
At line:1 char:1
#2nd method using GUI
4: Download GIT
Well, in this method we need to manually visit the Git website to download the setup and move further for the installation process. Visit the official Git website and download the 64-bit version.

5. Install Git on Windows 11 or 10
Once you have downloaded the setup, double-click and execute it to start the installation process. The first window will show you the license details, simply click the Next button.
Note: We will take you through the important steps (settings) of the installation, the rest you can leave to default, and can complete the installation process by clicking on the NEXT button on the Wizard.

6. Select Destination
Next, select the folder where you want to install Git. Here you can install it in some other drive or location if you want. However, it is recommended to leave it as default and just click the Next button.

7. Select components & Editor
Although all the essential components needed by Git are already selected, if you want to create a Desktop icon, Add a Git Bash profile to Windows Terminal, or let Git check daily updates then that can be selected here in this section. If you are not sure about all this, don’t worry, simply move forward and click on the Next button.

Soon, the installer wizard of Git will ask you to choose the default Editor, by default VIM will be selected but you can choose the one you prefer from its drop-down list. Here we are selecting the default Notepad of Windows.

8. Default Terminal
Git Bash by default will use MinTTY as a terminal emulator, which works great. However, for a more native feel, you can use the Windows Terminal. It’s all on you, what you prefer.

Followed the wizard further and complete the installation while leaving the settings as default.
Once the installation is completed, close and open your terminal again. Now you can access the Git command tool to check its version, type:
git --version
9. Update Git
In future, if you want to install the the update version of the Git then open the command terminal and just type the given commnad and it update the Git. It is applicable for both CLI and GUI installations.
git update-git-for-windows
10. Launch Git in Windows
Once you have this open source Version control system on your PC, to use it, we can use the our command prompt, Git Bash or Git GUI.
For Git Bash
Those who want to use the default bash of Git, go to start menu and there search for Git bash as it appears, click to run the same. This will give you the command line access.
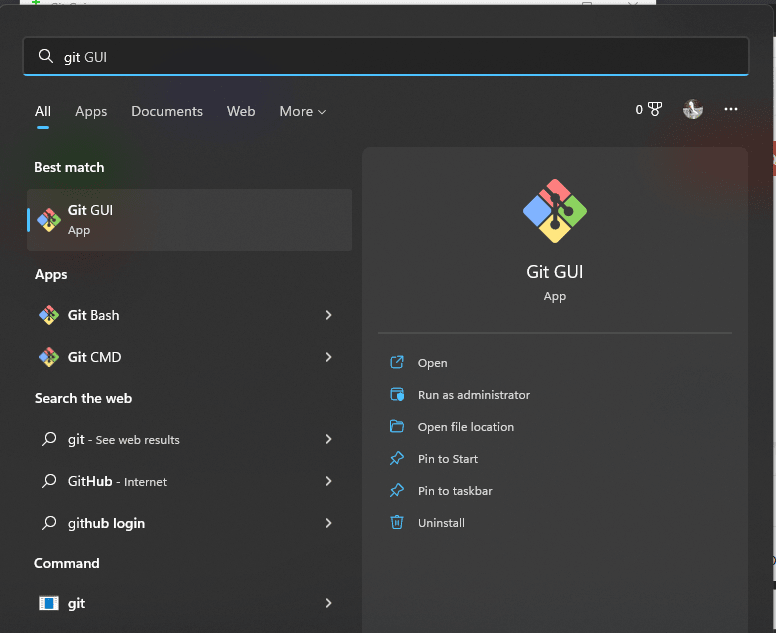
For Git GUI
Another way is to use the graphical user interface get installed automatically on your PC wiht the main installation. To access, on start menu run Git GUI.
11. Clone the remote Github repository
Let’s use the PowerShell to clone the remote repository.
git clone remote-repository-url
12. Add GitHub account
To push your project to GitHub, we first need to set our account details.
For that, on your terminal or command prompt use the given commands. Repalce the username and email address with you GitHub credentials.
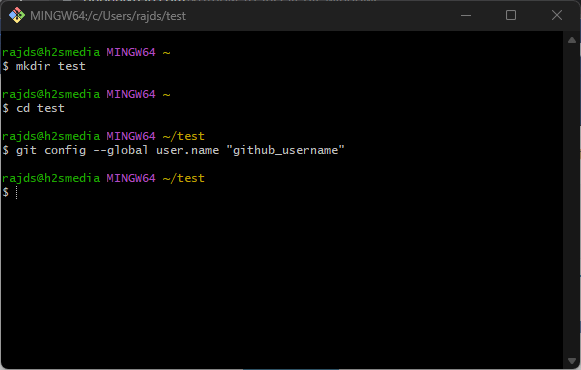
git config --global user.name "github_username"
git config --global user.email "email_address"
First of all create a folder where you want to clone the remote Github repository.
Create a directory
mkdir test
Switch to the folder
cd test
Intialize the Git
Now, intialize the git in the swtiched folder
git init
Add your files:
Let’s say you want to add some project files, for example create a text file.
notepad test.txt
Add the content and save the file.
Check the status, wether the Git knows about our added file or not.
git status
You can see Git is aware of file but has not been added to GitHub repository. For that we have to stage, commint push it.
Stage the file, it means you are preparing the file to commit
git add test.txt
If you have mutiple files and want add all of them, use:
git add --all
Commit keeps tracks of our progress and changes. Git consider it as a “save point”
git commint -m "my project"
13. Uninstall Git from Windows 11 or 10
There would be a time when you don’t require the Git installation on your Windows 10 or 11 any more, at that time use command terminal and run the following command.
winget uninstall Git.Git
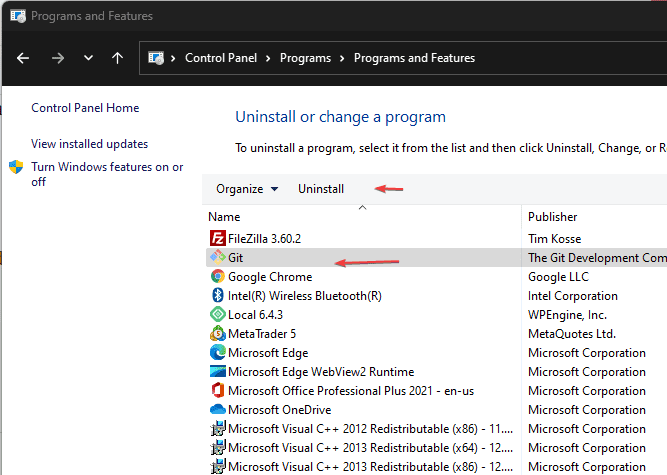
Alternatively, we can use the Windows Control panel to remove this software. Go to Start menu and type control panel, as its icon appears click to open it. Under the Control panel, click on “Uninstall a Program” -> select Git and hit the Uninstall button.
FAQ
We can install Git on Windows either using the command terminal package manager called “Winget” or using the GUI setup. For the second one we have to download latest Git for Windows installer from its official website.
Yes, we can install Git via the command line on Windows 11 or 10. Just open your Windows Termian (Admin) and run the given command:winget install Git.Git
To know Git is installed on your Windows, open the command terminal or prompt and check its verison using the following syntax:git --version
Yes, we can install git on Windows without adminsitrative rights and for it you just need to run its installation setup without Admin privileges.
Related Posts
How to create email groups in Gmail? Send one email to multiple recipients in a matter of seconds.
Getting the right dashcam for your needs. All that you need to know
How to Install 7-Zip on Windows 11 or 10 with Single Command
Install Google Earth on Windows 11 or 10 Using a Single Command
How to install Gaming Services on Windows 11
How to Install Telnet Client on Windows 11 Using PowerShell