Android is no longer just an operating system for mobiles, tablets, and TVs. With time, the Android platform has prepared itself a lot, and the kernel is well-suited now even for full-fledged computers. The Android x86 project is alive for a long time now, and you can install Android on an old computer that you might have trashed, or even on a virtual machine to play games and run some useful Android apps right on your computer. Besides that, you can even run some apps on Android on a virtual machine and test its performance before finally installing the same on your Android smartphone.
Even though there are a number of Android emulators available for PC, the bottom line of using Android x86 is that you can get the stock Android flavour of Android without any unnecessary modifications, and it is more stable than most Android emulators that you can find. Talking about installation on a dedicated PC, most people might not be that comfortable with Linux, and that’s when installing Android on an old PC can be a cherry on the pie. Even though the controls are not well-optimized for the keyboard and mouse setup, it is far better than spending time going through the tedious process of learning Linux, as most people think.
Install Android x86 on PC or Virtual machine
On Android x86, you can even access the Google Play Store, which means, your favourite apps are not going anywhere. So, now let’s start with how you can install Android x86 on a virtual machine or a dedicated computer.
Downloading the Android x86 OS ISO image
The first step is to download a disc image of Android x86. Just visit this link to find a list of available ISO images for Android x86.
Now download the appropriate one for your computer, and the 64-bit ISO file is the option that is suitable for most users.
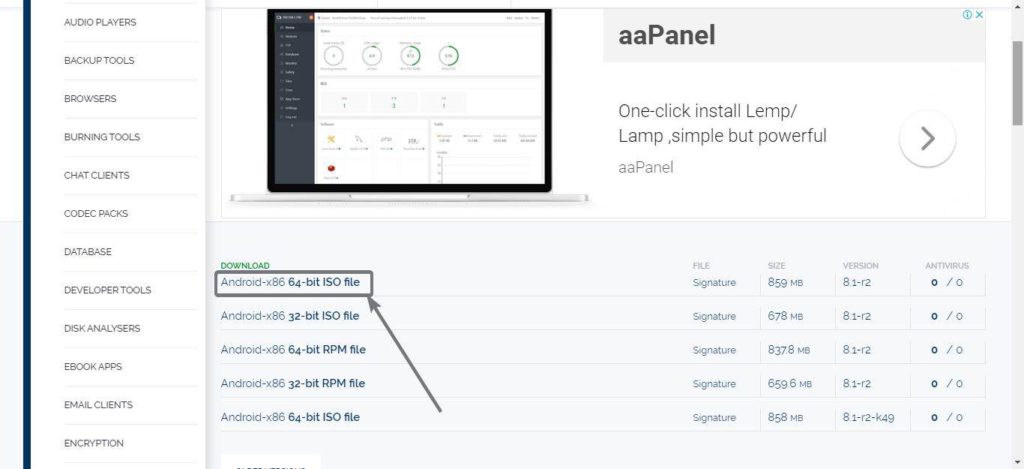
However, you can even go for the 32-bit version, if you have a really low-end system, but if you have more than 4 GB RAM on your computer, or want to assign more than 4 GB of RAM to your virtual machine, the 64-bit version is the only option for you. All the available Android x86 images are based on Android 8.1 Oreo.
If you are going to install Android on a virtual machine, I will recommend using VirtualBox, and here’s how you can configure the virtual machine. But if you want to install Android x86 on a dedicated system, you can skip this step.
Configuring the virtual machine
Open VirtualBox, and create a new virtual machine. Name it Android, Android 8, whichever suits your mood. Set the ‘Type’ of the operating system to ‘Linux’, and the ‘Version’ to ‘Other Linux (64-bit)’. Now click on ‘Next’.

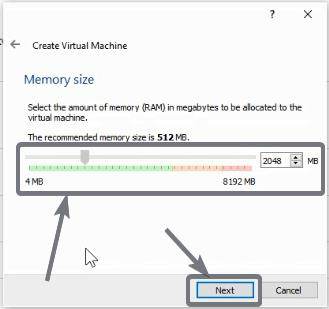
Assign RAM to Virtual Machine
In the next page, I will recommend you to assign 2048 MB or 2 GB of memory or RAM. You can assign more RAM if you can, or you will have to compromise with performance if you assign less. These things can be changed later on though. Click on ‘Next’ again.
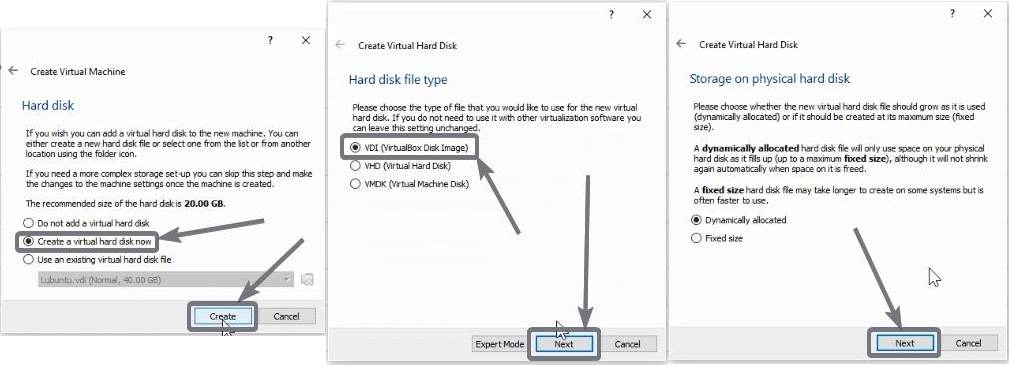
Create a virtual hard disk now
Now choose ‘Create a virtual hard disk now’ and click ‘Create’. Choose ‘VDI’ as the hard disk type, click ‘Next’, and set disk allocation to ‘Dynamically allocated’, and click on ‘Next’.
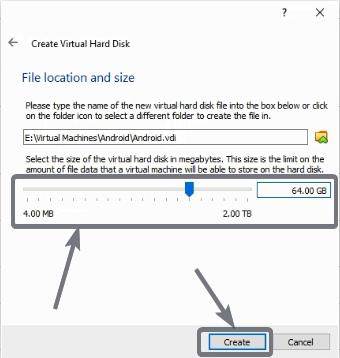
Create Virtual hard drive for Android X86
Now choose the virtual hard drive to any size, depending upon what purpose you will use the virtual machine for, and click on ‘Create’. I am choosing 64 GB.
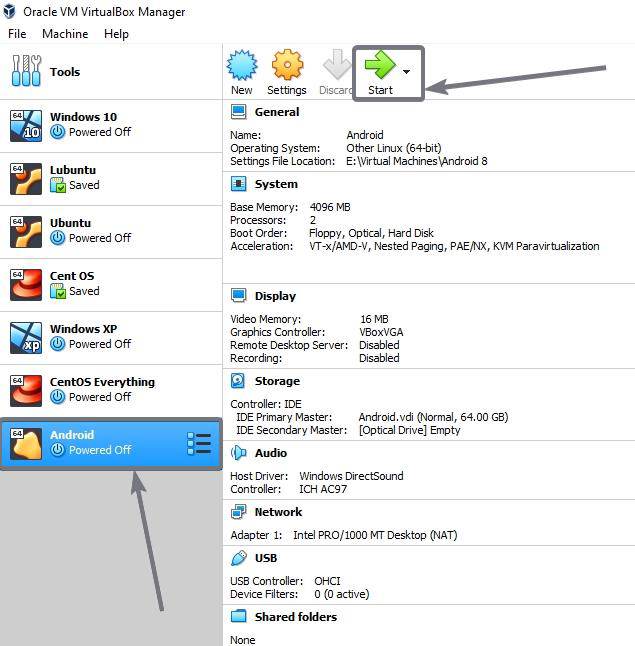
Start Android OS Virtual Machine
Your virtual machine is now ready to boot. Select the virtual machine, and click on ‘Start’ in the toolbar.
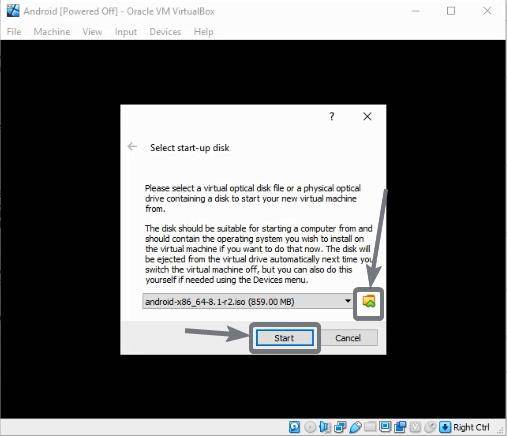
Now click on the small folder icon, choose the Android x86 disc image that you have downloaded, and click on ‘Start’.
Now you can carry on with the installation process, which will be the same for installing Android on a dedicated system, as well.
Installing on a dedicated system / virtual machine
Create a bootable media with the Android x86 image, either on a DVD or on a USB stick, insert the same on your computer, and start booting from the bootable media.
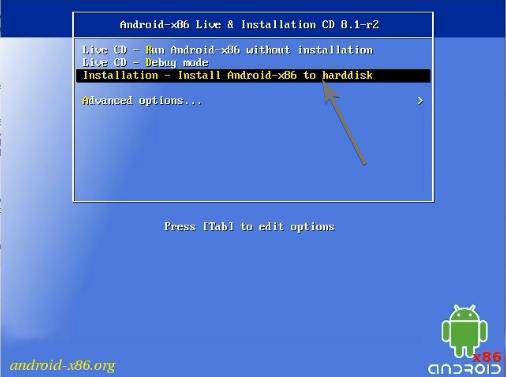
Android-x86 Live & Installation CD
After your computer boots up from the boot media, choose the option that says ‘Installation – Install Android-x86 to harddisk’, which should be the third option, using the up and down navigation keys, and hit the enter key.
Create/Modify partitions
Let the installer carry out some basic tasks, you will have to create partitions. After that is complete, select ‘Create/Modify partitions’, using the up and down navigation keys, and hit the enter key.
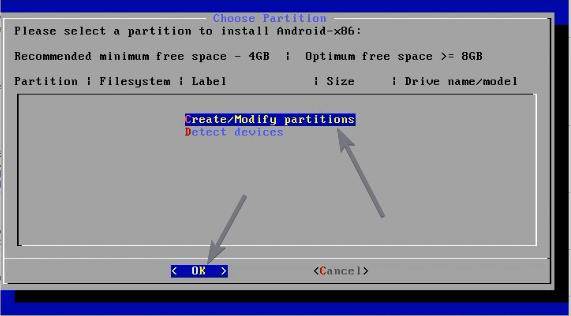
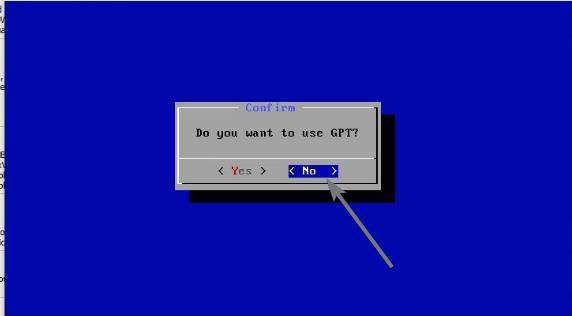
You can use GPT to configure the partition by selecting ‘Yes’, in the message that appears. GPT makes it easier to configure partitions. As I don’t need GPT, I am choosing ‘No’.
Here, you will find the 64 GB virtual hard drive that I have created while setting up the virtual machine. Use the left and right navigation keys to select ‘New’, and hit the enter key. On the next page, select the partition as ‘Primary’, using the left and right navigation keys, and hit enter.
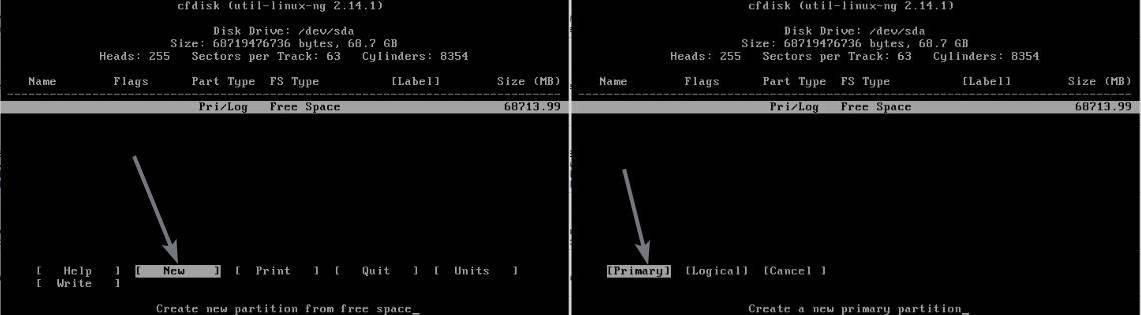
Now, you will have to allocate the size of the partition. As I am installing Android, I will not create multiple partitions as it is difficult to deal with multiple partitions on Android. So I will not change the value, as I am creating a single partition. However, you can create multiple partitions, if you want. After you enter the size of the partition in Megabytes or MB, hit the enter key.

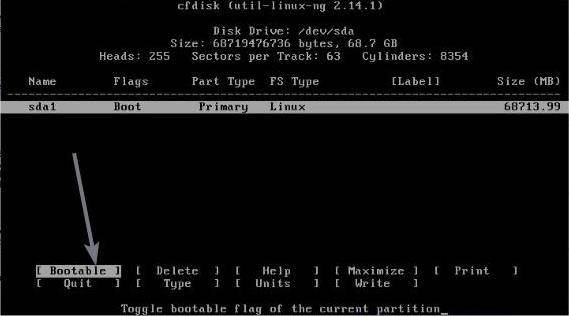
Next, mark the partition as ‘Bootable’ by selecting it, and hitting the enter key.
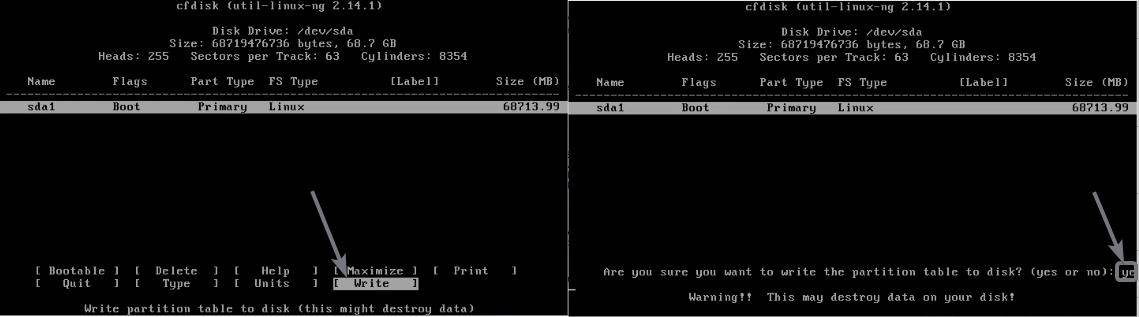
Now choose ‘Write’ using the navigation keys, and hit the enter key. Next, type ‘yes’ to confirm the operation, and hit the enter key.
Now select ‘Quit, and hit the enter key, to go to the partition selection page.
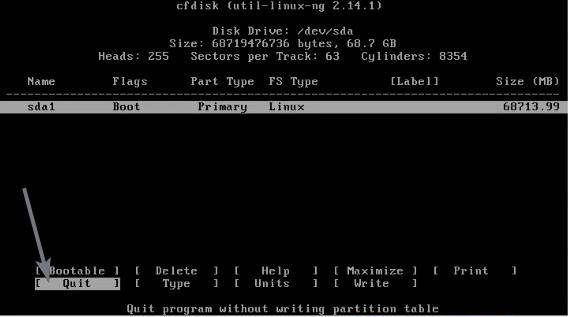
Now choose the first partition, and hit the enter key. Now you will have to select a suitable file system for the partition, and hit the enter key. The ‘ext4’ is the best format, which I will recommend you to use. Choose ‘Yes’ and hit enter, in the next confirmation message that appears to confirm the operation.

Install the boot loader GRUB
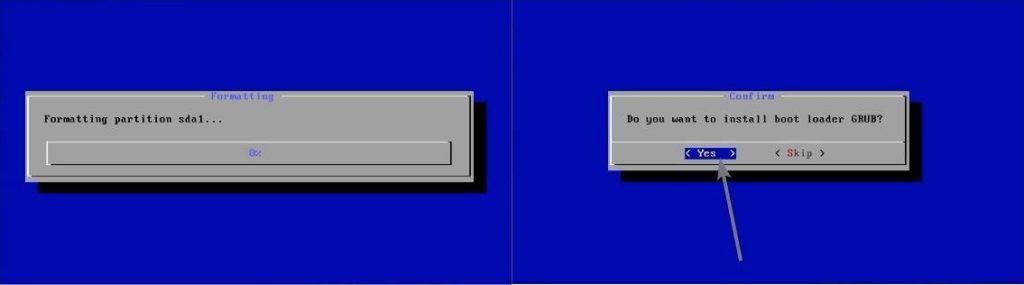
Now the formatting operation will start, and once it is completed, you can even install the boot loader GRUB. Just select ‘Yes’, and hit the enter key.
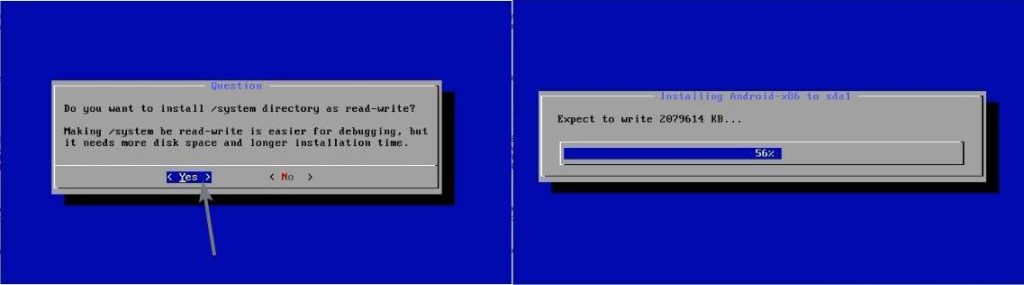
Now mark the partition as read-write, by selecting ‘Yes’, and hit the enter key. Now the installation will start and will take some time for completion.
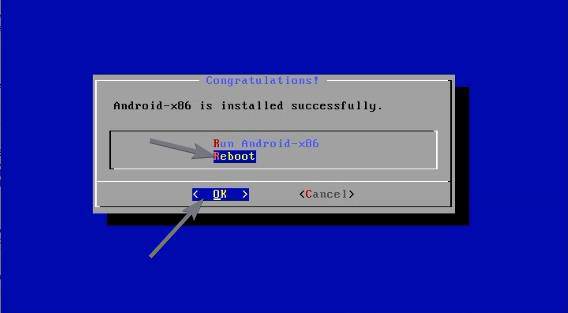
Reboot Computer
Now select ‘Reboot’, and hit the enter key to reboot the computer.
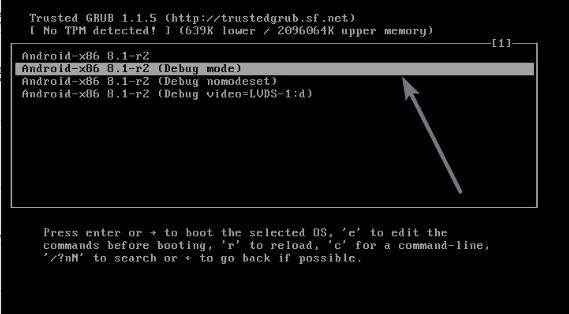
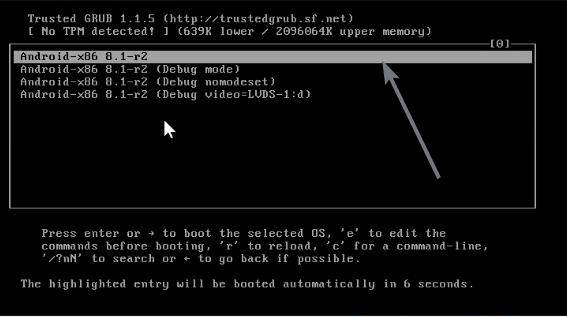
Choose the Android ‘Debug mode’
Now that the installation is complete, and you have restarted your computer, the boot menu will appear. The first option should land you to Android x86 GUI, and that should be the option, you should choose every time when you want to use your computer. However, there are some changes that you should make on the first boot.
Instead of choosing the first option, choose the ‘Debug mode’, using the navigation keys, and hit the enter key, which is the second option here.
Mount Partition
Once your computer or virtual machine boots into the debug mode of Android, type in the following command, and hit the enter key. If you can’t see the prompt even after a minute or two, simply hit the enter key to get the prompt, for entering the command.
mount -o remount,rw /mnt
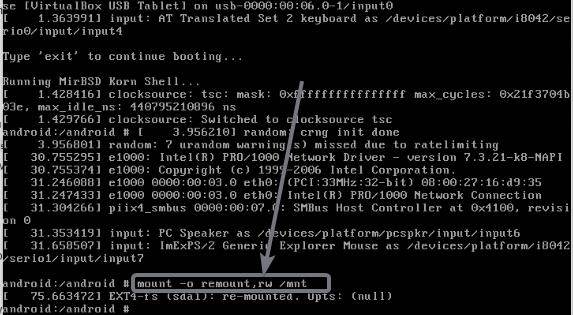
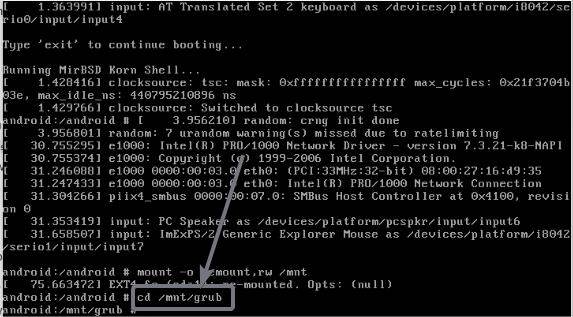
Now navigate to the ‘grub’ directory by entering the following command, followed by the enter key.
cd /mnt/grub
Now you will have to edit the menu.lst file. Just type in the following command to start the editing menu.lst file.
vi menu.lst
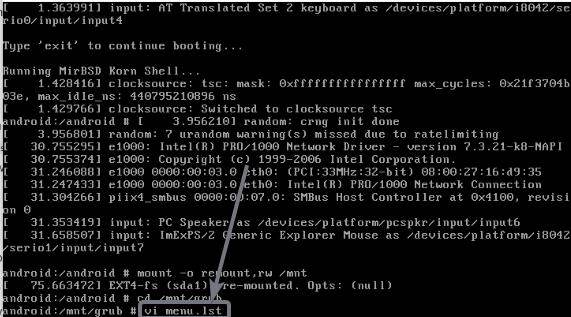
Now hit the ‘Shift+A’ key combination to be able to edit the menu.lst file.
Configuration of the different boot entries
Here you can find the configuration of the different boot entries. You will have to recognize the first entry, which I have marked for your reference, in the screenshot, and edit the first line of the configuration that starts with ‘kernel’.
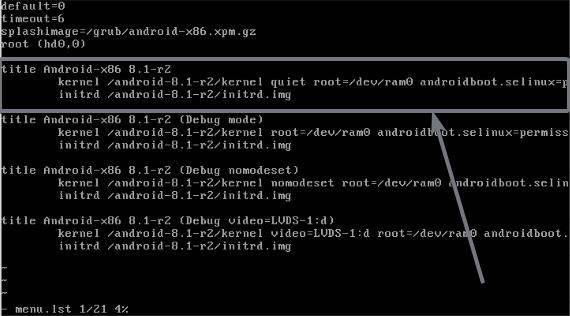
Just add the following phrase at the end of the line, that starts with ‘kernel’, after space, for the first boot entry.
vga=834 nomodeset xforcevesa
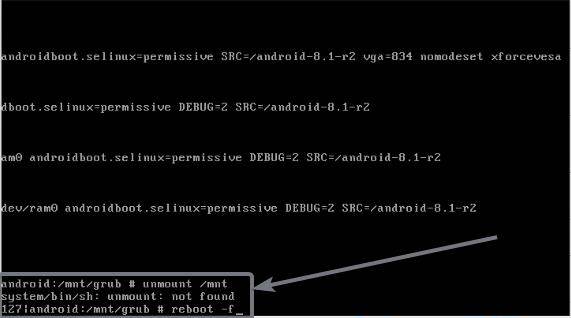
After you enter the phrase, the section will look something like the one I have shown in the screenshot below.

Now hit the ‘Esc’ key on your keyboard, and type ‘:wq’ to save menu.lst, and exit the vi editor.

Now, navigate to the home directory, unmount the /mnt directory, and reboot your computer, back-to-back with the following commands.
umount /mnt
reboot -f
Now that you have rebooted you Android, choose the first option after reboot to boot into the GUI mode of Android.
The basic setup of Android OS on PC
Now, you will have to go through the basic setup of Android, pretty similar to what you do after you get a new handset.

After the basic setup, Android x86 will be available to you now at its full glory.
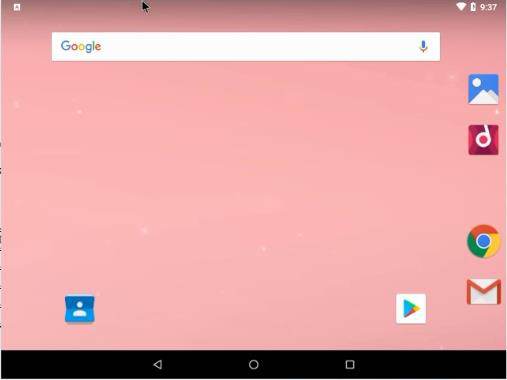
Now you can install new apps and games, including the ones that you need, from the Google Play Store, by logging in with your Google account. Android x86 comes rooted, which means, you will get the most out of Android with the following x86 version of Android. You can tweak the GUI as per your requirements, and you can even download a preferred launcher to make Android x86 suitable for the big screen.
Your old PC has now got a new life, with Android x86 on it. Do you have any questions now? Feel free to comment on the same below.
Related Posts
How to create email groups in Gmail? Send one email to multiple recipients in a matter of seconds.
Getting the right dashcam for your needs. All that you need to know
How to Install 7-Zip on Windows 11 or 10 with Single Command
How to Install ASK CLI on Windows 11 or 10
How do you install FlutterFire CLI on Windows 11 or 10?
How to create QR codes on Google Sheets for URLs or any other text elements