The process to install Java on Ubuntu, Linux Mint or other Debian based Linux distros, with Terminal window, or Linux Shell.
Java is one of the most popular open source platforms to write programs, and is thus, used extensively by developers. Java is also platform independent, which means a single program can run on multiple platforms with some minimal modifications. Java runs with the help of Java Development Kit or JDK, which contain Java Virtual Machine or JVM, which is dependent upon the platform, and you should have it on your operating system, such that all the programs, you write with the help of Java can be compiled and executed. The process of installing JDK or simply Java can be different on various platforms, and if you are using Ubuntu, the most popular distribution of Linux, you can use Linux Shell or Terminal to install JDK for your operating system. It is by far the easiest way to do so.
The process of installing Java on Linux platforms is almost similar in all the distributions, and you can even find Java pre-installed on numerous distributions of Linux, though it is not the same for Ubuntu. Thus, this tutorial is going to help you, if you are going to install Java on your Linux distribution, in case it is not present.
A note for other Linux distribution users
If you are on a different Linux distribution, it is important that you ensure Java is not pre-installed on your Linux platform, such that things do not get messed up. Let’s get started with the method of checking, whether Java is pre-installed on your Linux distribution. The process of installation of Java is almost same on different versions of Ubuntu such as on Ubuntu 12.04, 14.04, 15.04, 16.04.

Check, whether Java is preinstalled on your Linux
Step 1: Open Terminal, and in case of Ubuntu, go to “Search your Computer” on the top left corner of the screen, search for Terminal, and click on the Terminal icon.
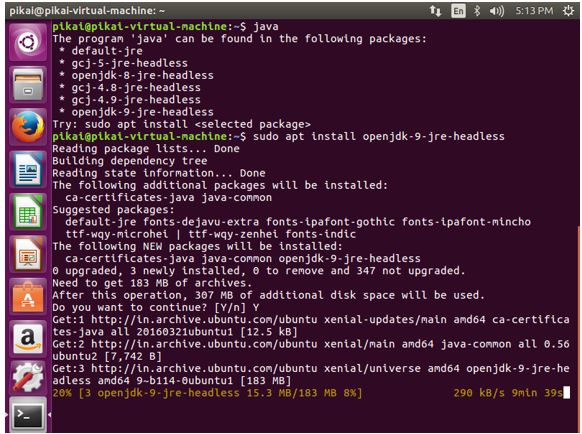
Step 2: After the prompt appears, write any Java command like Javac or Java and hit the Enter key.
If you find the following screen, Java Virtual Machine is not installed in your system.

If you are a geek, you can effortlessly find the instructions to install JDK or Java, but I am still elaborating the same to you for a hassle-free installation.
Installing Java Development Kit 9 (JAVA JDK/JRE) on your Ubuntu Linux with Terminal
I will be choosing Java development Kit 9 here, which is the latest JDK, which is available at the time of writing the tutorial. Let’s proceed with the process of installing JDK or simply Java on your Ubuntu Linux.
Step 1: Type “sudo apt install openjdk-9-jre-headless”, without the quotes, and hit the Enter key.
(You may also choose other JDK versions, and you can replace openjdk-9-jre-headless, with “default-jre”,”gcj-4.9-jre-headless”, etc. But, if you are not installing Java for any specific purposes, openjdk-9-jre-headless is recommended.)
Step 2: After that, you will have to enter the password, and hit the enter key. Don’t be afraid, if the text does not appear on the screen, as it is meant for security on Linux systems.
Step 3: A message will appear, mentioning, you will require around 310 MB of disk space, and whether you want to install. Just type “Y” from your keyboard and hit the Enter key.
Now, Linux will start downloading and installing Java, and the process may take several minutes depending upon the speed of your Internet connection. Have a cup of coffee till the process gets completed.
Your screen will look somewhat similar to this.
After the process is complete, you will find the following screen.

The final steps
JDK is installed on your system and is ready to use. If you still can’t use the “Javac” command, due to some problems on Ubuntu 16 LTS, retype “sudo apt install openjdk-9-jre-headless”, and hit the Enter key, and this time, it will take a few seconds. After that, JDK is installed, and you can start using Java from now on.
If you want to install the Java 8 in Ubuntu/ Linux Mint then use the command– sudo apt install openjdk-8-jre-headless
Restart the Terminal window and try out a simple Java program to ensure everything is working perfectly.
Related Posts
How to Install Java in Ubuntu / Linux mint using Terminal