In this tutorial will learn the steps to assign or change the hard disk drive partition identification letters on Windows 10/8/7 PC and laptop systems.
Being a Windows user, everybody is quite familiar with drive letters assigned to the partitions on the system. That makes it easier for us to recognize individual partitions and media devices like USB flash drives, external hard drives when they are connected to our PC or Laptop. The task of assigning drive letters to drives is taken care of by Windows so that you do not need to do it manually and every time you connect a new drive to the system; a drive letter is assigned after it is recognized by your system. But the task of automatically assigning a drive letter to the drives can go against you in several situations when you want better management of the drives on your system, or you want the external drive to be assigned a different set of letters to easily transfer files between them.
Keeping that in mind, it is really easy on Windows 10/8/7 computers to change or assign a new drive letter to the drive connected to your system and I will talk about, how you can do that, in this DIY article. It will hardly take a minute or two to change all the drive letters connect to your computer, just in case you need it.
You will have to use the disk management tool on Windows PC or laptops to change the drive letters or assign new drive letters, or you can also use any third-party program to do the same. However, as the Windows disk management tool is sufficient to change drive letters, it is not a smart idea to count on a third-party program for the same. This tutorial is going to be applicable for all computers running Windows XP / Vista or any other version of Windows newer than that.
Warning:
Before discussing any further, let’s talk about somethings that you should remember before you start changing the drive letters, or assign new ones to the drives connected to your system.
- The drive letter of the drive on which Windows is installed, i.e., the C drive on most computers cannot be changed. So in most computers, the C drive will remain as it is, and the drive letter cannot be changed.
- Certain programs might stop functioning after changing the drive letters. However, in most cases, the problem can be easily fixed by reinstalling the program, or by making some changes to the program installation settings if possible.
Changing the letters Windows 10/7 PC or laptop drives using the disk management tool
⇒ Now, let’s get started with how you can replace the drive letter of the drive on your computer or assign new drive letters to the drive connected to your Windows computer.
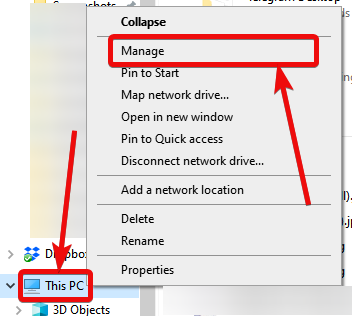
⇒ Right-click on ‘This PC’ or My Computer within Windows Explorer and click on ‘Manage’.

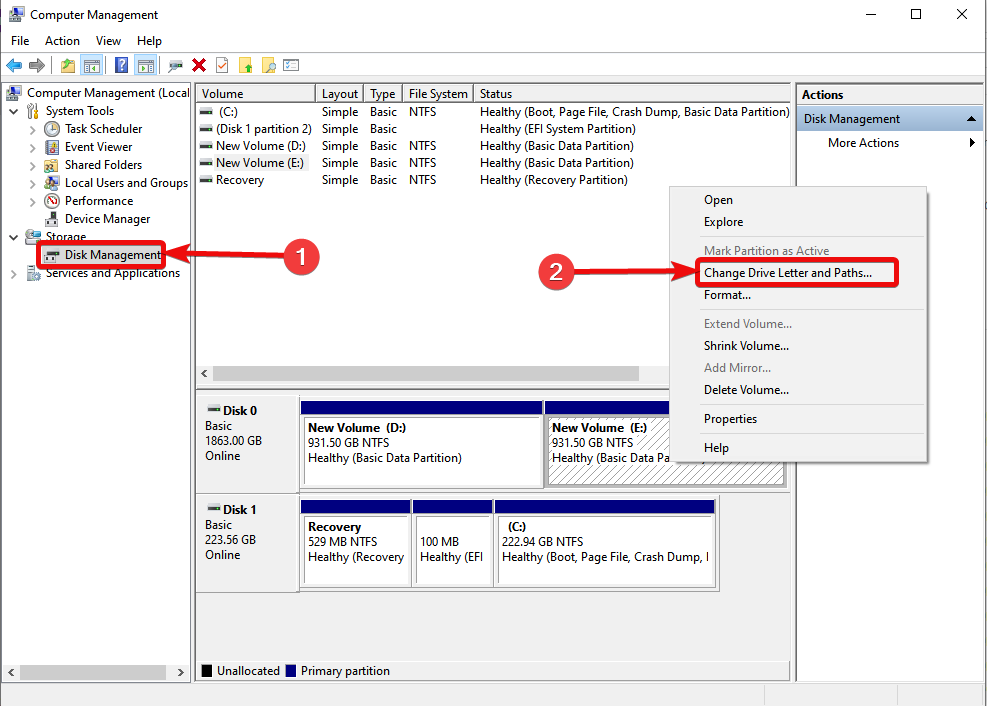
⇒ In the Computer Management window, click on ‘Disk Management’ under ‘Storage’. After the Disk Management section opens up, right-click on the drive to change the drive letter, and click on ‘Change Drive Letter and Paths…’.

⇒ Now, select the drive letter and then click on ‘Change…’.

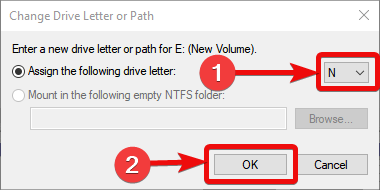
⇒ Now, click on the dropdown menu and then select the drive letter that you want to assign to that particular drive, and click on ‘OK’.

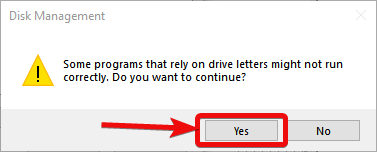
⇒ You will get a warning, that I just said in the beginning. Some programs might misbehave or not functional at all after the drive letter is changed. Just click on ‘Yes’ if you want to carry on, or ‘No’, if you have changed your mind.

⇒ The change in the drive letter will be visible immediately after it is done. You can see that within Windows Explorer.
One thing that you should note is that there is no way to switch drive letters directly. For example, if you want to change the drive letter between D and E drive on your system you cannot do that with just one click of a button. What you have to do is, use another drive letter in between. Let me explain how that works.
- Change the drive with the letter D, for example, to drive to X, or any other drive letter that doesn’t exist on your system.
- Now, change the drive with letter E to letter D.
- Finally, change the drive with the letter X to E.
Now the drives with letters D and E are interchanged.
If you are changing drive letters, I already talked about the problems that you might face with certain programs. However, it is mostly applicable to old programs, and most new programs of today are resistant to this. But if you have the habit of installing most programs in the C drive, which most people do, as that is more convenient, this is not going to break the functionality of the programs. But whatever may the scenario be, re-installing the program should fix all the problems.
As you cannot change the letter of the drive on which Windows is installed, the only option is to reinstall Windows on another drive. But that will involve a lot of time and effort, and it is not worth going through all the troubles, just to change the drive letter.
So, so that was all about how you can change the letters of the drive on your Windows computer. Do you have any questions or have anything to say? Feel free to comment on the same window.
Related Posts
How to create email groups in Gmail? Send one email to multiple recipients in a matter of seconds.
Getting the right dashcam for your needs. All that you need to know
How to Install 7-Zip on Windows 11 or 10 with Single Command
Install Google Earth on Windows 11 or 10 Using a Single Command
How to install Gaming Services on Windows 11
How to Install Telnet Client on Windows 11 Using PowerShell