
We all come across movies and TV shows, where the audio is available in multiple languages so that viewers from different regions across the globe can enjoy it. When it comes to streaming videos, it is quite easy to change the audio channel to change the language and the method to do it varies from one platform to the other. However, if you are watching some local shows or the shows from your local media library, there should be some option to change the audio channel and listen to the audio of the show in a different language as per what you need.
If you love enjoying the shows on your Amazon Fire TV Stick, VLC for Amazon fire TV stick is one of the best apps that can be used to watch videos that are available on your local media server. On VLC for Firestick, there is an option to change the audio channel and hence change the audio language, however, the option is a little bit hidden, and most users cannot find it quite easily. So, I am here to make it easy. I will talk about, how you can change the audio language for videos from the local server If you are using VLC for Firestick to stream them.
So, without any further delay, let’s get started with how you can change the audio channel for local videos on VLC for Amazon Fire TV Stick and change the audio language from one to the other.
Note: To use this feature the movie or video you are playing on VLC should have dual audio channels.
Changing the audio channel on VLC for Amazon Fire TV Stick
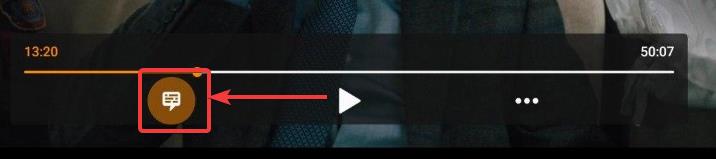
- Open VLC on your Amazon Fire TV Stick, and start playing the video you want, in the usual way. After the video starts, use the navigation keys on your Fire TV Stick remote to select the subtitle icon in the playback panel. You should be able to reach there by pressing the ‘left’ navigation key just once.
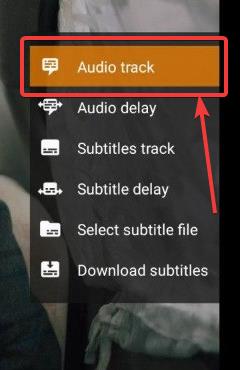
- In the menu that pops up, select and ‘Audio track’ and open the menu with the button at the center.
- Now, you can find all the audio channels that are available. You can use the up and down navigation keys to select the audio channel that you want to use corresponding to the language and select it with the center button on the remote. After you have selected it, the menu will automatically disappear and the selected audio channel will start playing corresponding to the video.
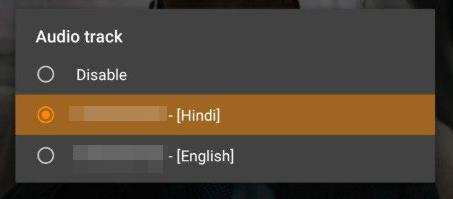
- Now the audio corresponding to the video will start playing in the language that you want.
- Additionally, if you want to change the subtitle track you can also do that by selecting ‘Subtitle track’ in the subtitle menu.
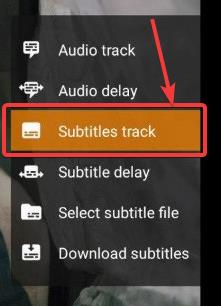
In the ‘Subtitle track’ list, you will have to select the subtitle track or the language that you want to display and the menu will automatically disappear and the selected subtitle track will be activated.
In both cases, you can find the ‘Disable’ option to disable the audio track and subtitle track respectively if you do not need them. There can be situations when you do not want the audio and subtitle track depending upon the individual requirements. The option is a little bit hidden, however, you can easily find it if you know where exactly it is located.
So, that was all about how you can change the audio track to change the language on VLC for Fire TV stick. Do you have any questions? Feel free to comment on the same below.
Related Posts
How to create email groups in Gmail? Send one email to multiple recipients in a matter of seconds.
Getting the right dashcam for your needs. All that you need to know
How to Install 7-Zip on Windows 11 or 10 with Single Command
How to Install ASK CLI on Windows 11 or 10
How do you install FlutterFire CLI on Windows 11 or 10?
How to create QR codes on Google Sheets for URLs or any other text elements