The Virtualization is not a new concept and already powered lots of organizations to increase the efficiency and reduce the hardware cost and maintenance. There are a couple of well know third-party virtual machine software available online to enable the virtualization on your Windows home desktop machine. But with the launch of Windows 8 client operating system, the Microsoft brings the native support of hardware virtualization which is known as Hyper-V. This tutorial will give you step-step guide– how to use the Hyper-V virtual machine on Windows 10
What is the Hyper-V on Windows 10 or 8?
The Hyper-V is the Microsoft proprietary technology to provide hardware virtualization. Previously it was only available on Windows server but now also on Windows 10 and Windows 8.
Hyper-V is a free inbuilt virtual software technology that lets developers or technology enthusiast run the multiple operating systems virtually on a single hardware machine instead of using a dedicated machine for every OS.
Hyper-V also supports the hardware virtualization which means you can assign different virtual hardware configuration to each virtual machines. The virtual hardware consists virtual drives, virtual networks, USB, CPU, RAM and more…
ALSO SEE: How To Use HyperV VHD Disk Image file in VMware Without Converting
What are the Requirements of Hyper-V?
- The Hyper-V is only available for Windows 10 or 8 Enterprise, Professional and Education editions.
- 64-bit Processor
- Minimum 4Gb RAM
- CPU should support Virtualization
Note: The Hyper-V role cannot be enabled on Windows 10 or 8 Home, Mobile or Mobile Enterprise editions.
How To Check or Verify the Hardware Compatibility for Hyper-V
Before enabling the Hyper-V role on your Windows 10 machine, please check the hardware compatibility.
To check it, run the command prompt and type the following command:
systeminfo
Scroll down to the command prompt and you will see these four lines and these should end with a word “YES”.
- VM Monitor Mode Extensions: Yes
- Virtualization Enabled In Firmware: Yes
- Second Level Address Translation: Yes
- Data Execution Prevention Available: Yes

Note: If the Virtualization in Firmware gives “NO” in return then the virtualization option is disabled in your motherboard. Boot your computer and with help of “Del” or “Esc” key (depends on the motherboard manufacturer) open the BIOS and enable the virtualization option.
How to enable Hyper-V on your Windows 10 or Windows 8 PC
Hyper-V on Windows 10 give you the option to hot-swap the memory and network adapters. It also has the ability to run Windows PowerShell commands inside the virtual machine.
Where is Hyper-V in Windows 10?
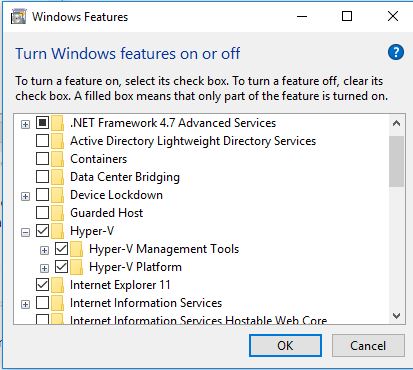
Step 1: To locate and turn on the Hyper-V feature in Windows 10 or 8, go to search box on the taskbar and type “turn windows features on or off ”

Step 2: From the turn windows on or off feature select and enable Hyper-V. After enabling the feature the system will reboot.
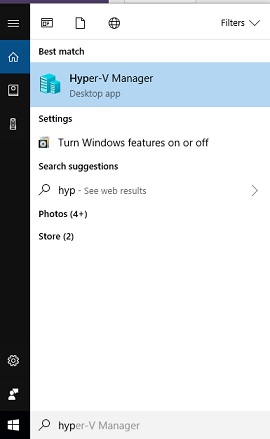
Step 3: Now again go to search and type Hyper-V Manager.
How do I use Hyper-V on Windows 10?

Now you have successfully installed the Hyper-V on Windows and its time use it. Click on the Hyper-V server which is usually represented by your desktop machine name under the Hyper-V virtual manager. When you click on that, you will find several options on the right side located Action pane.
To create a Virtual Machine you have two options here: Quick Create and New.

The Quick create option will automatically download the Windows 10 development environment Operating system which a universal Windows platform for developing the apps.

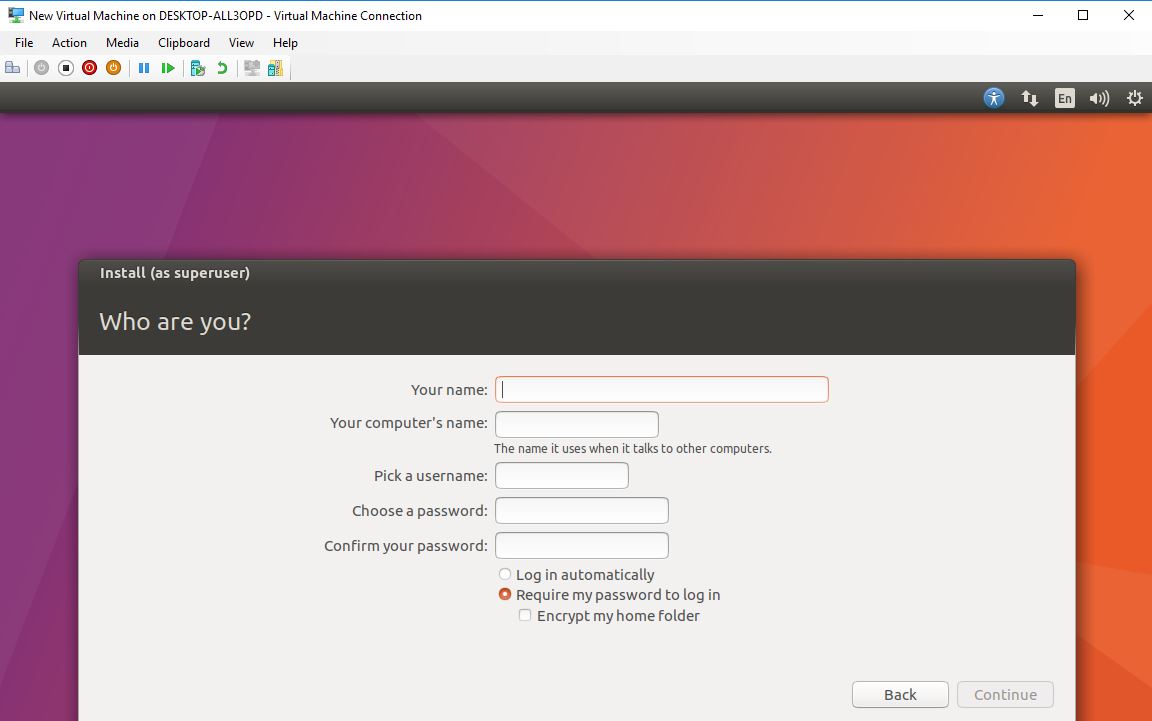
While the second option which is “NEW” allows you to create Virtual Machine using ISO file. Here in this tutorial, we will create an Ubuntu virtual machine on Hyper-V Windows 10.
Select-> New-> Virtual Machine
Step 1: Give some name to your virtual machine. By default Windows uses the C: drive but you can change it to some other location.

Step 2: The Hyper-V Windows 10 support two type of virtual machine generation setup. First is Generation 1 and other is Generation 2.
Generation 1: This generation will set up the virtual machine that supports both 32-bit and 64-bit guest operating system and provides virtual hardware which has been available in all previous versions of the Hyper-V.
Generation 2: Second generation machines provide support for newer virtualization features including UEFI based firmware and only uses the 64-bit guest operating system.
We use the default option which is Generation 1.

Step 3: In this step, we need to assign the amount of RAM to our virtual machine. Here, we are providing 2GB for proper function of the Ubuntu.

Step 4: Configure the network connection by selecting the Default Switch.

Step 5: Select the second option which is the installation of OS using the ISO file. And click on Next button and let the process finish.

Step 7: Go back to the Hyper-V manager and you will see your created virtual machine, click on the option settings.
From here you can change the amount of RAM, booting option, Network adapter configuration and more…

If you have done all your settings, now from the same Action pane click on the Connect option. The virtual machine will start and running.

Finally, the virtual machine on Hyper V Windows 10 is up and you can use it…

If you have any confusion or doubts let us know, we will try to solve them…
Related Posts
How to Install 7-Zip on Windows 11 or 10 with Single Command
Install Google Earth on Windows 11 or 10 Using a Single Command
How to install Gaming Services on Windows 11
How to Install Telnet Client on Windows 11 Using PowerShell
How to Install ASK CLI on Windows 11 or 10
How do you install FlutterFire CLI on Windows 11 or 10?