Writing down and editing documents is something that we all do on our computers. After we complete a document, we often need to make changes before finally submitting it or using it for some reason or the other. But, when we need to make a lot of changes within a document we might get lost and that is when we need to find out where we were in order to keep editing the document and keep it up to the mark. I am pretty sure, there are several people, who are often lost while editing documents, and that is why the latest update to Windows 10, i.e May 2020 is here with small change, which can make it a lot easier at the time of Editing documents.
With the new small improvement that is available on Windows 10, you will never be lost again, while making changes to a document. Among the several minor changes on Windows 10, this is one of them, and you should make the most use of this change to make your computing and typing experience better than ever. Microsoft has introduced a colorful text cursor indicator to visually make it easier to find the cursor, while you are typing. The indicator is colorful, and thus, something different from black and white will definitely catch your attention, when you are lost. I will talk about, how you can enable the colorful text cursor indicator on Windows 10.
So, without any further delay, let’s get started with, how you can make your typing easier on Windows 10 by enabling the help of a colorful text cursor indicator.
Enabling text cursor indicator on Windows 10
Step 1: Open Windows Settings either from the Start menu or by using the ‘Windows + I’ shortcut key. After Windows Settings open up, click on ‘Ease of Access’ to open it.

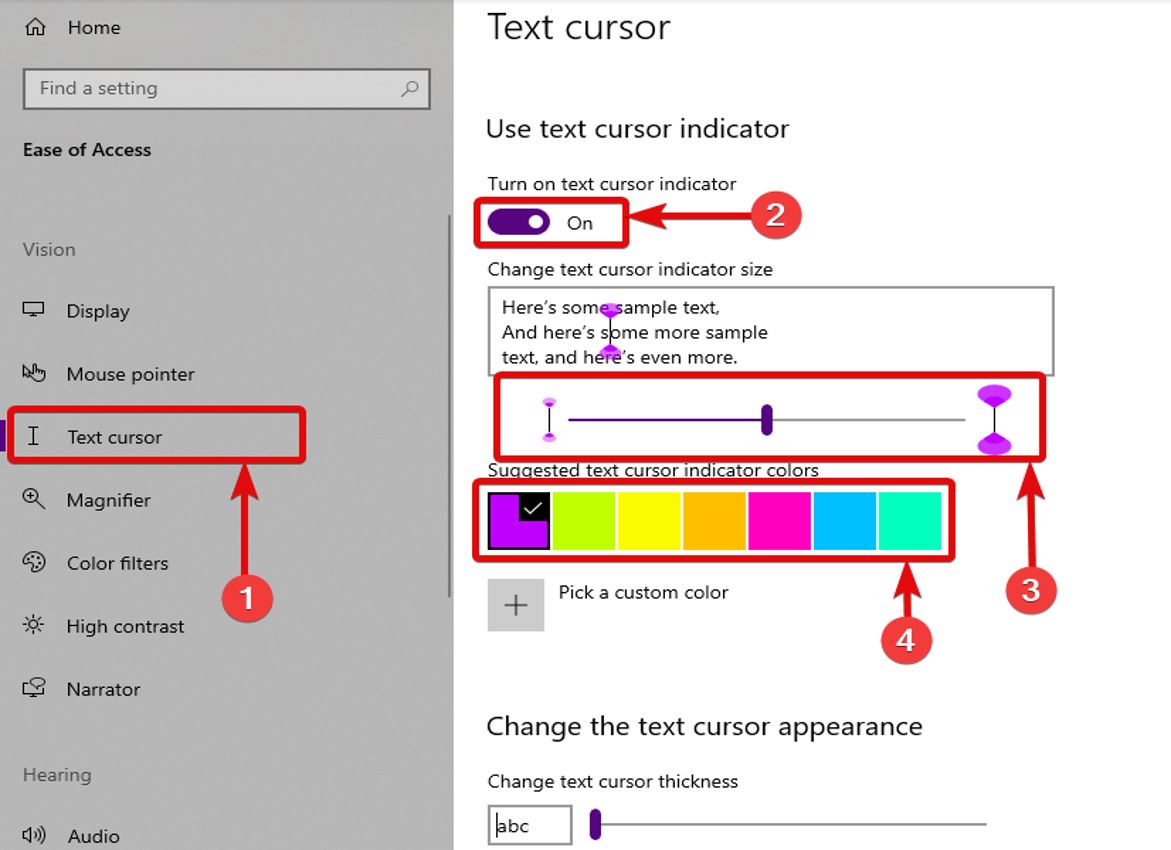
Step 2: In the ‘Ease of Access’ menu, click on ‘Text cursor’ on the left, and enable ‘Turn on text cursor indicator’, under ‘Use text cursor indicator’.
Step 3: Now, you can adjust the size of the indicator using the slider. Additionally, you can also change the indicator color or click on ‘Pick a custom color’ to choose a color, not on the list.

Step 4: After you are done with the changes, you can exit ‘Ease of Access’, and the text cursor indicator will be enabled now.
This is how it looks when the text cursor indicator is enabled.

Even though the text cursor indicator features have been rolled out, it still needs improvements. The first problem that I observed is, the text cursor indicator doesn’t work on Google Docs, which is something, I and most people use for all documenting needs. It worked on other websites, and also on Microsoft Word, but it didn’t work on LibreOffice. I don’t think, the absence of the indicator on certain websites and programs is intentional, and thus, more improvements are hopefully on the way.
Additionally, on certain websites, the text cursor indicator didn’t play nicely with vertical or horizontal scroll. As the location of the cursor changes relative to the screen while scrolling, the location of the indicator remains at the fixed position on the screen. That also needs some improvements. So, I would say, the feature is still half-boiled, and the problems should be resolved in the coming updates.
So, that was all about, how you can enable the text cursor indicator on Windows 10 running the latest version. Do you have any questions? Feel free to comment on the same below.
Related Posts
How to create email groups in Gmail? Send one email to multiple recipients in a matter of seconds.
Getting the right dashcam for your needs. All that you need to know
How to Install 7-Zip on Windows 11 or 10 with Single Command
Install Google Earth on Windows 11 or 10 Using a Single Command
How to install Gaming Services on Windows 11
How to Install Telnet Client on Windows 11 Using PowerShell