One of the most common things most Windows users do is, cut, copy and paste files and folders. These operations are carried out at the time of copying and moving files and folders on Windows computers and almost every users, whatever may be the type of work they do are familiar with and need to move and copy files and folders from one location to another location. Needless to say, copying and moving files on Windows is very convenient with the cut copy and paste options and obviously, the shortcut keys which are Ctrl + X, Ctrl + C, and at the end, Ctrl + V have its special position in our heats. But there is one small problem with the copying and moving functionality that is available on Windows. If you need to copy files and folders, you first need to cut or copy it for moving and copying respectively and then open another Windows Explorer window.
Otherwise, you can also use the current window Explorer window to navigate to the location, where you need to paste the files and folders. This can be a pain when you need to move or copy multiple files and folders from one location to different locations on your computer, external storage devices or mapped drives. As you frequently need to navigate from one folder to the other, you can easily get lost when you have a lot of workloads and everything is related to moving and copying files and folders. But if you are familiar with the Ubuntu and most Linux distributions, you might know about the ‘Copy To’ and ‘Move To’ options in the context menu that will open up a small dialogue to choose where you want to move or copy the files and folders. There is a way, you can get the same on Windows, and I will discuss how to do that here.
In order to get the ‘Copy To’ and ‘Move To’ in the right-click context menu on Windows, you need to do some registry tweaks. It isn’t tough, but you should follow all the steps that I will mention here exactly the way I write, and if you do something wrong, it might make your computer not boot win to Windows from the next time. So, without any further delay, let’s get started with how you can get the ‘Copy To’ and ‘Move To’ functionality in the Windows 10 context menu.
Due to the warning I just gave it will be a good idea to create a backup of your registry so that you can restore the registry at any time if you find something has gone wrong. Just open the following link to find out, how you can create a backup of the Windows 10 registry and restore it at any time.
You can also show create a system restore point so that you can roll back to the previous state or the current state of your Windows operating system if things don’t go exactly the way you want. You can follow this tutorial to find out, how you can create a restore point, and revert your system back to a restore point created by you.
Even though things shouldn’t go wrong, it is better safe than sorry. So, after you have taken the necessary precautions, let’s now find out how you can at the ‘Copy To’ and ‘Move To’ to the Windows 10 context menu to easily copy and move files on your Windows 10 computer.
Step 1: Open ‘Run’ with the ‘Windows + R’ hotkey, type in ‘regedit’, and hit the enter key.

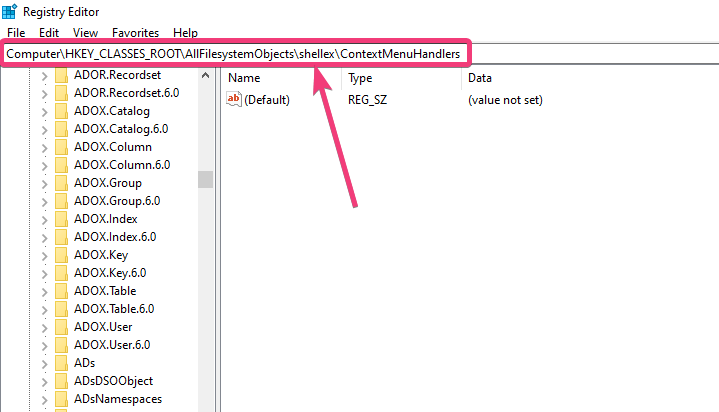
Step 2: Now, you will see an Explorer-like interface on the left. Just expand the one that says ‘HKEY_CLASSES_ROOT’. Then expand ‘AllFilesystemObjects’. Under that expand ‘shellex’, and finally, click on ‘ContextMenuHandlers’.
Here is how you can get there.
HKEY_CLASSES_ROOT\AllFilesystemObjects\shellex\ContextMenuHandlers
Step 3: Right-click on ‘ContextMenuHandlers’, click on ‘New’ and then click on ‘Key’.
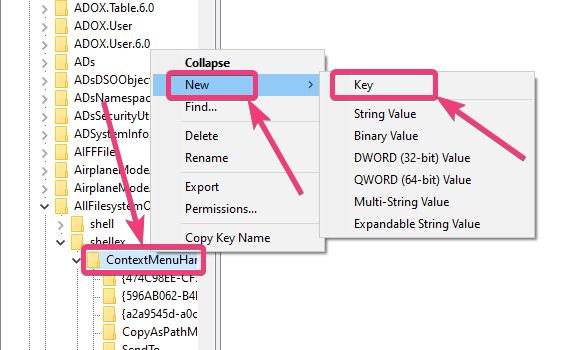
Step 4: Just name it ‘Copy to’, and hit the enter key.
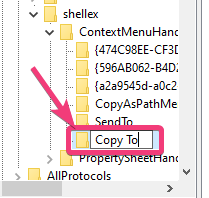
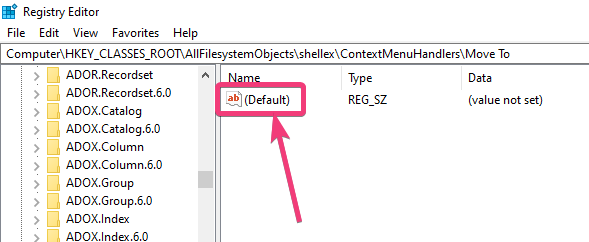
Step 5: Under ‘Copy to’ or whatever name that you have given, you can find a registry entry with the name ‘(Default)’. Double-click on it to open.

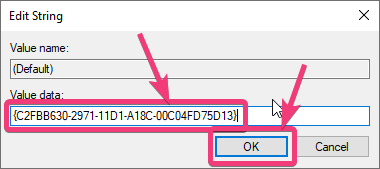
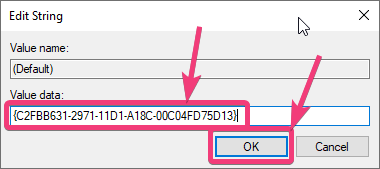
Step 6: Now, just copy and paste the following key, and hit the enter key.
{C2FBB630-2971-11D1-A18C-00C04FD75D13}
Don’t try to modify it.
Step 7: Right-click on ‘ContextMenuHandlers’ again, click on ‘New’ and then click on ‘Key’, just the way you did it last time.
This time, name it ‘Move to’, and hit the enter key.

Step 8: Under ‘Move to’, you will find another entry with the name ‘(Default)’. Double-click on it to open it.
This time, enter the following key and hit the enter key.
{C2FBB631-2971-11D1-A18C-00C04FD75D13}
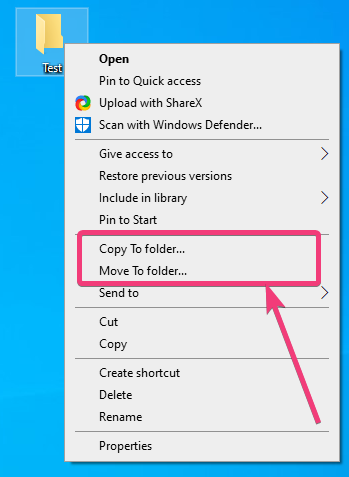
Step 9: You are now ready to go. Just right-click on any file or folder on your Windows 10 computer, and you can find ‘Copy to folder…’, and ‘Move to folder…’.
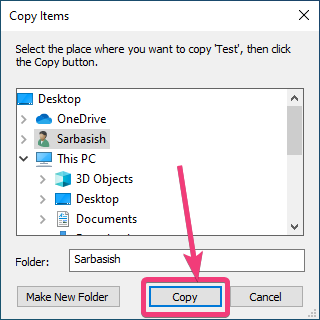
Step 10: After you click on any of the options, just choose the folder within the dialogue to copy or move the files to the chosen location, and click on ‘Move’ or ‘Copy’ as per your selection.
You can alternatively create a new folder, as well, to choose to put the files and folders within a folder in the desired location.
This is exactly the way you choose a folder at the time of installing a Windows program or game in the desired location.
If you don’t want to go through all the hassles, you can download the following registry keys for Copy to and Move to respectively. Just double-click on each of the files, and add them to the registry in the usual way. You can even open the keys on your computer using Notepad or any other text editor to edit anything or see the actual content of the files.
So, that was all about, how you can add the ‘Copy To’ and ‘Move To’ to the Windows 10 context menu. Did you face any problems? Feel free to comment on the same below.
Related Posts
How to create email groups in Gmail? Send one email to multiple recipients in a matter of seconds.
Getting the right dashcam for your needs. All that you need to know
How to Install 7-Zip on Windows 11 or 10 with Single Command
Install Google Earth on Windows 11 or 10 Using a Single Command
How to install Gaming Services on Windows 11
How to Install Telnet Client on Windows 11 Using PowerShell