Most of the WIndows 10 users who switched to Windows 11, upgraded looking for new features, for productivity and customization. Snap Layout is among one of the coolest features of Windows 11. Where it provides the user a visual aid that helps automatically resize & arrange the windows open on the screen. It makes it easier to navigate among multiple application windows, also doing this automatically saves time and effort.
To use the Snap Layout feature, you can simply hover your mouse pointer over the maximize button of any open window, and there you can see the available Snap Layout options for selection. Click on any of the given layouts and your window will be snap to the location according to your choice. You can also use the same feature using Windows + Z to act quicker.
There are various types of Snap options available and you can choose according to your screen size. With the update of build 22000.65, now can also choose to snap 3 windows on top of each other in place of 4.
Snap Layout feature comes enabled by default on Windows 11, but if you don’t like that feature, you can turn it off using a couple of methods. On change of mind, you can also enable the Snap Layout feature whenever you want.
To do enable or disable the Windows Snap feature you can either use the Settings app or the Registry Modifications app. Whichever you use according to your comfort, it’s ultimately going to do the job.
If the Snap layout feature is not working properly or crashing on your Windows 11 pc, then you should try using the Restoro Repair tool, which will scan and replace any corrupt file in the Windows 11 repositories.
Enable / Disable Snap Layout on Windows 11 using Settings App
- Press the “Windows button” and type in “Settings” and press Enter. Or you can also press “Windows + I” to open up the settings app directly.
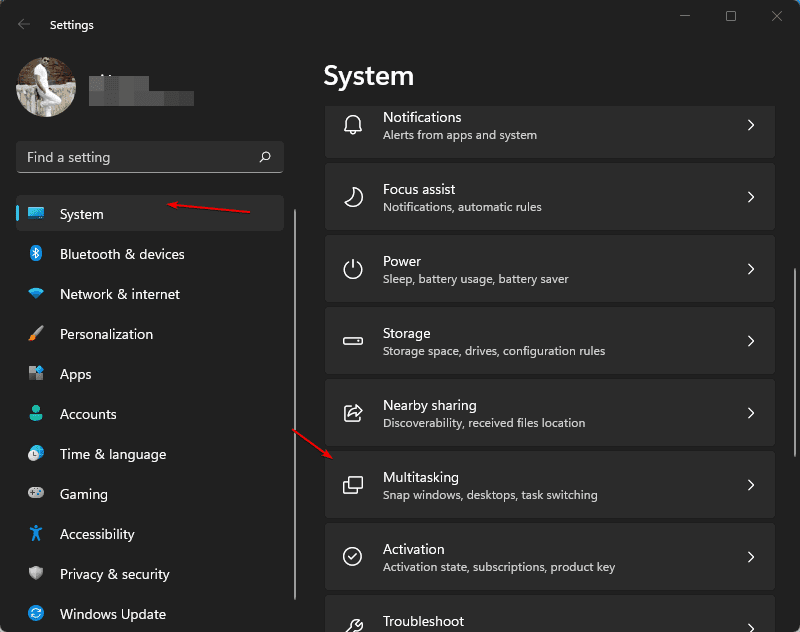
- Now click on the System on the left-hand vertical menu.
- Now on the right-hand menu scroll down and locate “Multitasking” and click on it.

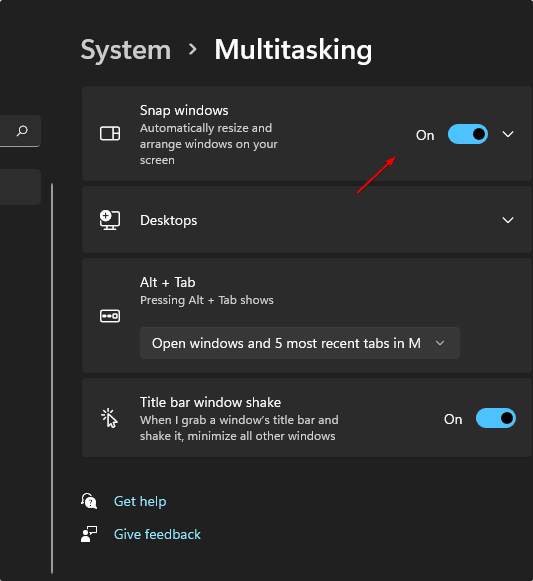
- From the Multitasking tab, you can enable/disable the Snap Windows option.
- If you disable the Snap Window feature, then upon hovering on the maximize button of a window, the Snap Layout tab will be grayed out.

Enable / Disable Snap Layout on Windows 11 using Registry Editor
- Press Windows + R to open the Run Window
- Type in “Regedit” and press Ctrl + Shift + Enter to open the registry editor with admin access
- Once you get asked about user account control, click on Yes.

- Once the Registry Editor window is opened, copy-paste the below location address to the address line and press enter.
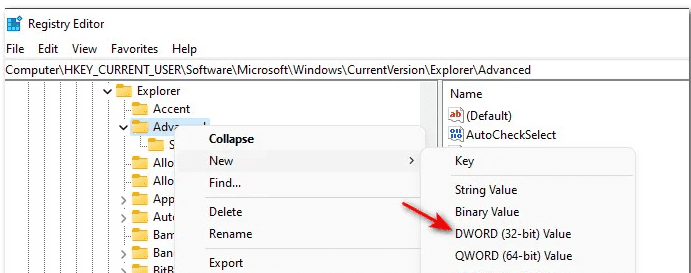
HKEY_CURRENT_USER\Software\Microsoft\Windows\CurrentVersion\Explorer\Advanced
- Now right-click on the “Advanced” folder on the left pane and select New and then select Dword (32-bit) Value from the dropdown menu.
- Now locate the newly created Dword file on the right-hand section and rename the file as EnableSnapAssistFlyout.
- Now double click on the EnableSnapAssistFlyout which is on the right-side menu
- Now set the Base to Hexadecimal and change the value as 0 Disable the Snap Layout.
- You can set the Base Hexadecimal value to 1 if you want to Enable the Snap Layout.
- Once you have done it, just reboot the system to take the effect properly.

There is a small chance where none of the above methods might work, in that case, you should check your pc using the Repair Tool. As Windows 11 is still not completely stable, so there might be some errors in files inside repositories. Using Repair Tool you can detect such corrupted files and replace them.
Related Posts
How to Install 7-Zip on Windows 11 or 10 with Single Command
Install Google Earth on Windows 11 or 10 Using a Single Command
How to install Gaming Services on Windows 11
How to Install Telnet Client on Windows 11 Using PowerShell
How to Install ASK CLI on Windows 11 or 10
How do you install FlutterFire CLI on Windows 11 or 10?