Install BalenaEtcher on Linux using simple methods. For those don’t know about Etcher, it is an open-source USB bootable tool that can be used on Windows, Linux or MAC OS platform to help users quickly burn image files to USB devices or flashcards. Etcher is for beginners who need to make their own bootable U disk.
To create a bootable USB Drive using BalenaEtcher on Linux such as Ubuntu, Linux Mint, Debian, CentOS, and more… Just need to select an image file to be flashed like .iso and .img. After that select the USB device you want to burn. BalenaEtcher automatically recognizes the connected drive. Finally, click the “Flash!” button to make a bootable Pen drive.
Install balenaEtcher on Linux using AppImage
1: Download Etcher AppImage
To install BalenaEtcher on Linux operating system, we can use two methods- AppImage and via Repository.
First method via portable AppImage.
First is downloading a portable download a balenaEtcher AppImage. One can keep it on a pen drive or USB HHD to use it on almost all popular Linux operating systems. No need to install anything.
It has support for Ubuntu 19.04/18.04/16.0/14.04, Arch Linux, CentOS 6/7, Debian, Fedora, OpenSUSE, Red Hat, and other same stream operating systems. The benefit of AppImage it can be used on a wide range of Linux Distros regardless of their type.
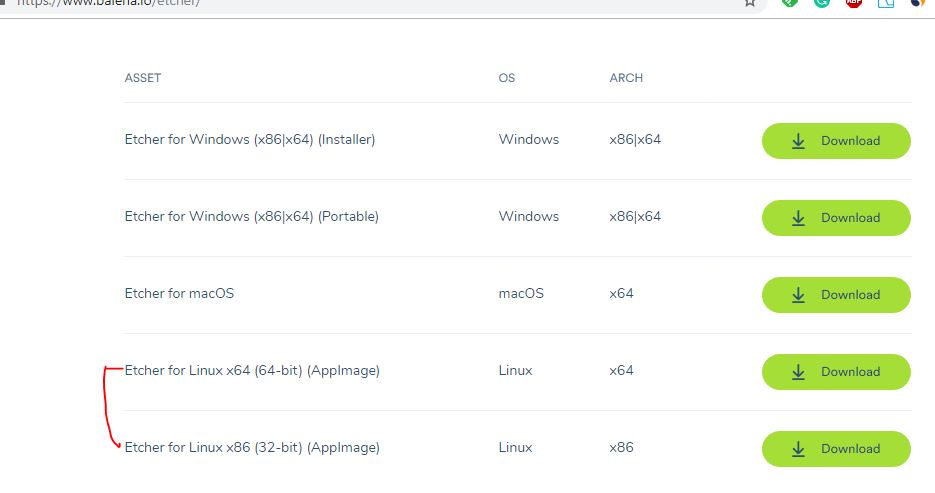
Go to the Balena Etcher Download page and if your system is 64-bit then download the respective Etcher AppImage and for those that have 32-bit, get the Etcher for Linux x86 (32-bit) (AppImage).
2: Run balenaEtcher AppImage
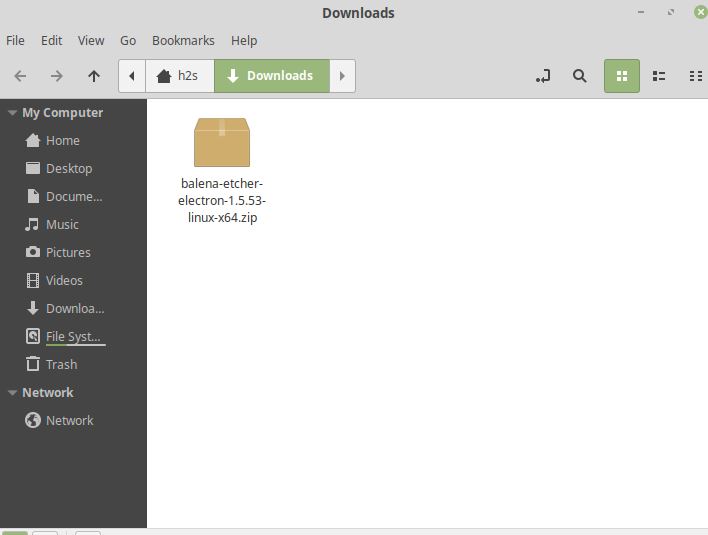
The downloaded balenaEtcher Appimage will be in the form of a zip file. Right-click on it and extract it.
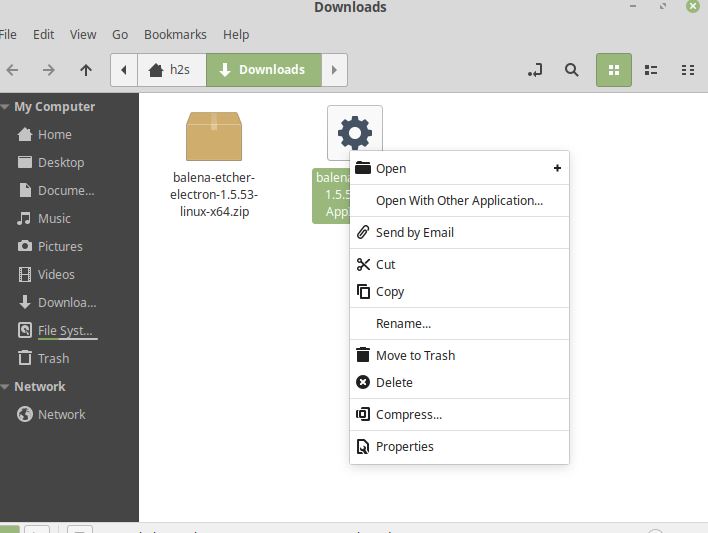
After extracting you will find an AppImage of balenaEtcher, again right-click on it and select the Open option to run this USB bootable maker tool.
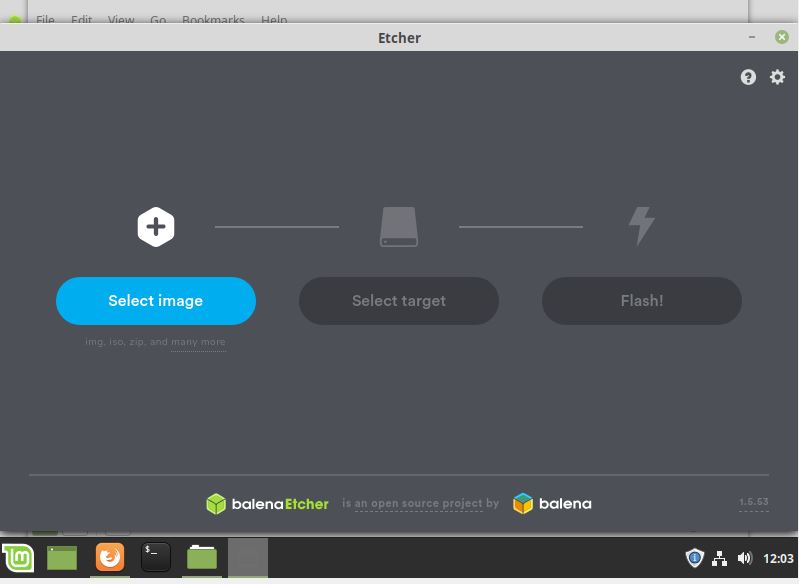
So, here is the Linux portable Baleno Etcher, ready to flash ISO or IMG bootable Images to your USB or Pen drives.
Note: This will not install the Etcher on your Linux system rather you have to run the AppImage every time to use it, a portable Etcher.
Method to install balenaEtcher on Linux using Repository
So, if you don’t want to use AppImage and want to install balenaEtcher on your Ubuntu or CentOS operating system like any other regular program, then here are the commands:
#For Ubuntu, Linux Mint, Debian, ElementaryOS, and other same derivatives…
1. Add Etcher Debian repository:
In the command terminal paste the whole block of the below command to add the Etcher repository:
curl -1sLf \
   'https://dl.cloudsmith.io/public/balena/etcher/setup.deb.sh' \
   | sudo -E bash
2. Update System
sudo apt-get update
4. Install balenaEtcher on Ubuntu Linux
sudo apt-get install balena-etcher-electron
5. Uninstall balenaEtcher (optional)
sudo apt-get remove balena-etcher-electron
sudo rm /etc/apt/sources.list.d/balena-etcher.list
sudo apt-get update
#For Redhat (RHEL), CentOS, and other same derivatives
1. Add Etcher rpm repository:
Paste the whole given block of command and hit the Enter key.
curl -1sLf \
   'https://dl.cloudsmith.io/public/balena/etcher/setup.rpm.sh' \
   | sudo -E bash
2. Update System
sudo yum update
3. Install Etcher on RedHat or CentOS Linux
sudo dnf install -y balena-etcher-electron
4. Uninstall balenaEtcher from RedHat/CentOS Linux (optional)
sudo yum remove -y balena-etcher-electron
sudo rm /etc/yum.repos.d/etcher-rpm.repo
sudo yum clean all
sudo yum makecache fast
#For Fedora and its based Linux OS
1. Get balenaEtcher rpm repository:
curl -1sLf \
  'https://dl.cloudsmith.io/public/balena/etcher/setup.rpm.sh' \
  | sudo -E bash
2. Update System
sudo dnf update
3. Install balenaEtcher on Fedora Linux
sudo dnf install -y balena-etcher-electron
4. Uninstall balenaEtcher from Fedora (optional)
sudo dnf remove -y balena-etcher-electron
sudo rm /etc/yum.repos.d/etcher-rpm.repo
sudo dnf clean all
sudo dnf makecache
Install Etcher on Solus (GNU/Linux x64)
sudo eopkg it etcher
Uninstall
sudo eopkg rm etcher
In this way, we can install balenaEtcher on Linux to create a bootable USB drive.


I installed Etcher on Linux Mint using the repository method. When I try to launch it I get a message:
You don’t have access to this resource
Please ensure you have necessary permissions to access this resource.
What do I do?
Please install it again using the App image method, sometimes the version in repository could cause this problem…
is there a way to copy the txt in the balck windows ?
(to get it easy into my terminal window)
Yes, you can copy it as we normally do…
Hi,
I try to install Etcher (on Ubuntu 20.04) using he repository method. But the step 2 (Import GPG Key) give an error :
$ sudo apt-key adv –keyserver keyserver.ubuntu.com –recv-keys 379CE192D401AB61
Executing: /tmp/apt-key-gpghome.QOngWLHOfP/gpg.1.sh –keyserver keyserver.ubuntu.com –recv-keys 379CE192D401AB61
gpg: keyserver receive failed: Server indicated a failure.
I try also with this fix: linux.org/threads/problems-with-balena-etchers-ppa.34395/ but I got always à GPG key error.
Do you know how to avoid AppImage?
Best regards,
—
Francis Gernet
PS: Good post and very interesting website
We have updated the article, now please follow it again.
First I tried the AppImage way for etcher, after extracting and right click “open” nothing happens. Checked permissions and “allow executing file as program” is ticked.
So, then I tried using repository. Installation process goes well, I even get the pretty icon and everything for BalenaEtcher. Yet, when I try to run it again nothing happens.
Great explanation. Once I downloaded the .iso, and placed it in /downloads folder, ( not on Dropbox or pCloud)
and loaded it in Etcher, it loaded fine.
Thanks again