Nextcloud is an Open source cloud server application for homes and businesses to host their files to access them from anywhere in the world using the internet. Here we will see the tutorial on how to install NextCloud on Ubuntu 20.04 LTS Focal fossa.
What is Next Cloud?
NextCloud is a fork of another open-source software called OwnCloud, however, it is now much popular. As I apprised above it is a server application that has the power to convert your small server such as Raspberry Pi into online storage; if you are so apprehended about your sensitive data to store them on services like Dropbox or Google Drive then you should try the Nextcloud.
Furthermore, you can use Nextcloud for video calls and edit documents with Collabora, which is based on LibreOffice.; along with support to recognize Microsoft Office formats such as DOC, DOCX, PPT, PPTX, and the Open Document Format (ODF).
Those are concerned about security, the Nextcloud provides industry compliance security features such as access control to files, protection against Bruteforce attacks, two-factor authentication, encrypted storage, and transfer of data.
requirements
The system requirements of NextCloud are not much high even we can run it on Raspberry pi 2.
- Linux WSL App on WIndows- Ubuntu 20.04 LTS or later version such as Ubuntu 18.04 LTS
- WSL should be enabled on your Windows 10 system.
- Nextcloud needs a minimum of 128MB RAM or recommended 512MB on your Server or Desktop,
For this tutorial, we will install the following things needed by the personal cloud server application.
- Database: MySQL 5.7+ or MariaDB 10.2 or PostgreSQL 9.5+
- Webserver: Apache with mod_php or php-fpm or nginx with php-fpm
- Php: 7.3+
Steps to install Nextcloud on WSL Ubuntu 20.04 LTS
The steps given below will also work on the full-fledged Ubuntu 20.04 LTS focal fossa Linux system including other versions.
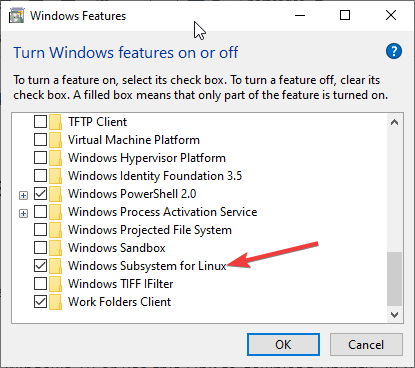
1. Enable WSL and install Ubuntu 20.04 App
Go to Windows 10 search and type “Turn Windows features on or off“, as it appears, click on it to run. There scroll down and check the box given for “Windows subsystem for Linux” option and click the OK button. After enabling, the setup will ask to restart the system do it.
Now, go to open Microsoft Store on Windows 10 or use this Link to download Ubuntu 20.04 LTS Linux App.
2. Install Apache web server on WSL
Now, in the Windows 10 search box, type Ubuntu and run it.
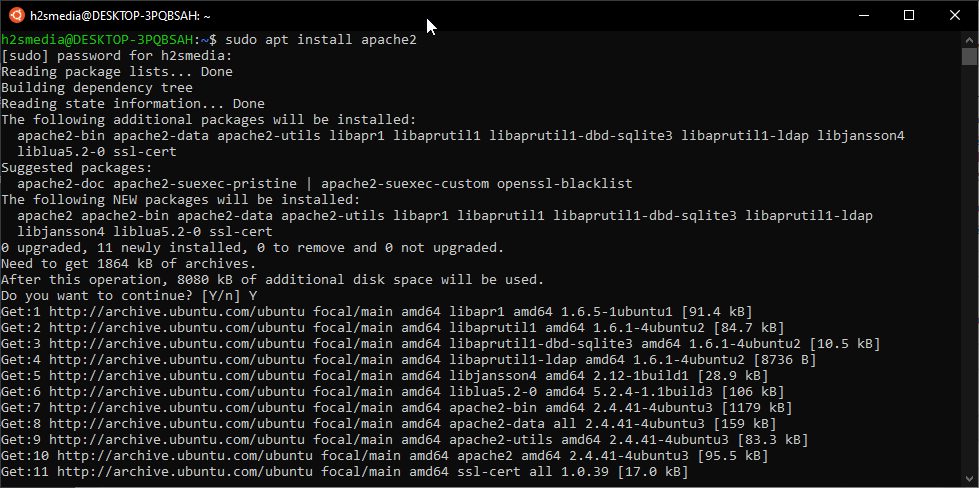
As we know installing Apache is not a Sisyphean task on Ubuntu and the same goes for Ubuntu 20.04 Linux app running on Windows subsystem for Linux. Just run the single Linux command given below:
sudo apt install apache2
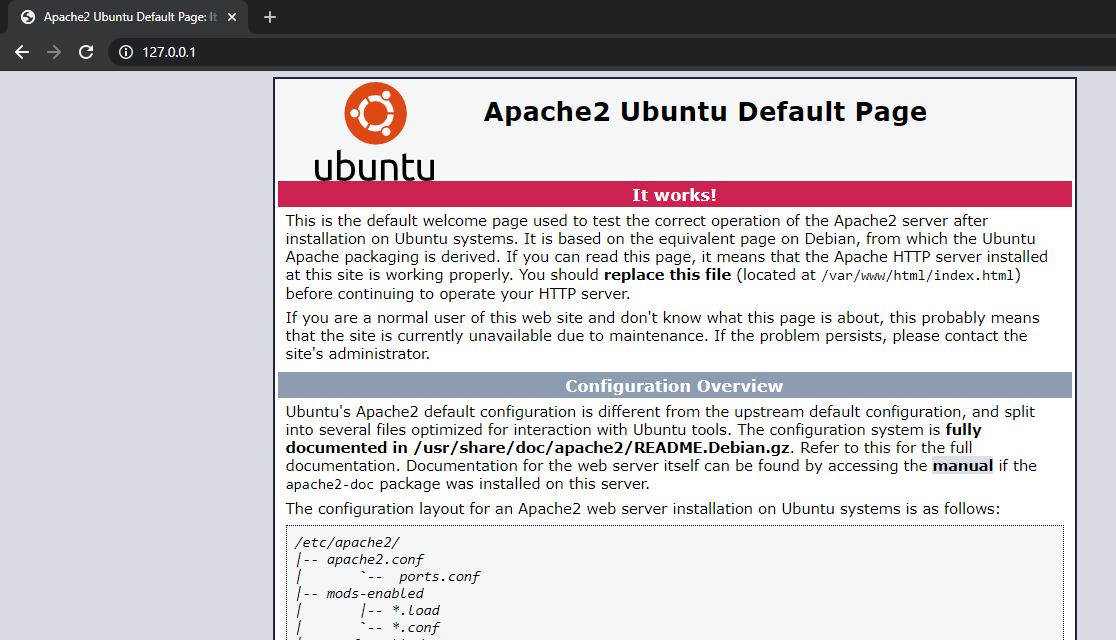
Once the installation is completed, enable and check the Apache web server status. When it asks you to allow the Apache access through Windows 10 firewall, give it.
sudo service apache2 start
sudo service apache2 status
To check whether you can access the static page of Apache on Windows 10, open your browser and type: http://127.0.0.1
2. Install PHP on WSL (Windows 10)
The NextCloud is a PHP-based application, thus we also need to set up it along with some extensions which are required for the proper working server-side application.
By default, the PHP version available to install on via the official repository on Ubuntu 20.04 LTS is the latest stable version i.e PHP 7.4. Thus, here is the command which you need to execute.
sudo apt-get install -y php-{curl,gd,fpm,cli,opcache,mbstring,xml,zip,fileinfo,ldap,intl,bz2,json,imagick,redis,mysql,common}
sudo apt install libapache2-mod-php
Some other Extensions for server performance including LDAP integration and external user authentication
sudo apt install php-imap php-apcu php-memcached
If you are planning to use MySQL like we are going to do here then install its supported PHP extension:
sudo apt install php-mysql
In the same way, those who are planning to use the PostgreSQL database need this extension:
sudo apt install php-pgsql
3. Install MySQL for NextCloud on Ubuntu 20.04
Although you can use PostgreSQL, here we are about to install the popular MYSQL database for Nextcloud, thus the command for the same will be:
sudo apt install mysql-server
By default, the Ubuntu 20.04 LTS repository contains MySQL 8.0.
Enable MySQL Service
Once the installation is done, start the MySQL service:
sudo service mysql start
sudo service mysql status
If everything is ok! you will get something like this:
h2smedia@DESKTOP-3PQBSAH:~$ sudo service mysql status
* /usr/bin/mysqladmin Ver 8.0.19-0ubuntu5 for Linux on x86_64 ((Ubuntu))
Copyright (c) 2000, 2020, Oracle and/or its affiliates. All rights reserved.

Oracle is a registered trademark of Oracle Corporation and/or its
affiliates. Other names may be trademarks of their respective
owners.

Server version 8.0.19-0ubuntu5
Protocol version 10
Connection Localhost via UNIX socket
UNIX socket /var/run/mysqld/mysqld.sock
Uptime: 1 min 49 sec

Threads: 2 Questions: 5 Slow queries: 0 Opens: 411 Flush tables: 3 Open tables: 27 Queries per second avg: 0.045
h2smedia@DESKTOP-3PQBSAH:~$
Secure MySQL Installation
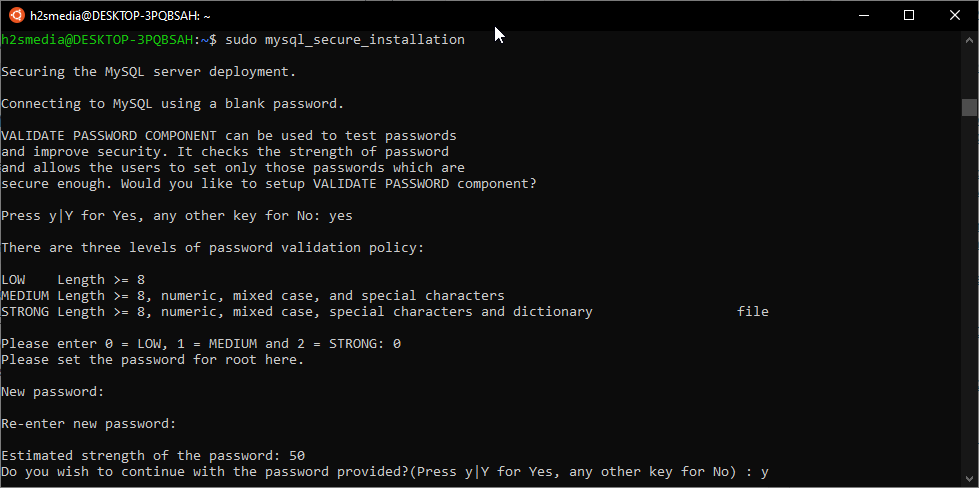
If you are planning to access and use it via a public network, then it is a good idea to secure the MySQL installation, first before creating users. Type:
sudo mysql_secure_installation
The above command will run a script to secure MySQL installation in which it gives you series of options such as enabling password validation component; removing anonymous users; disable remote root login; set a root password (blank by default); deleting demo database table and more…
You can know more about this on our detailed guide of MySQL installation on the Ubuntu 20.04 server.
Create a Database and user for NextCloud
“If you have secure and set a password for MySQL then use that one here”
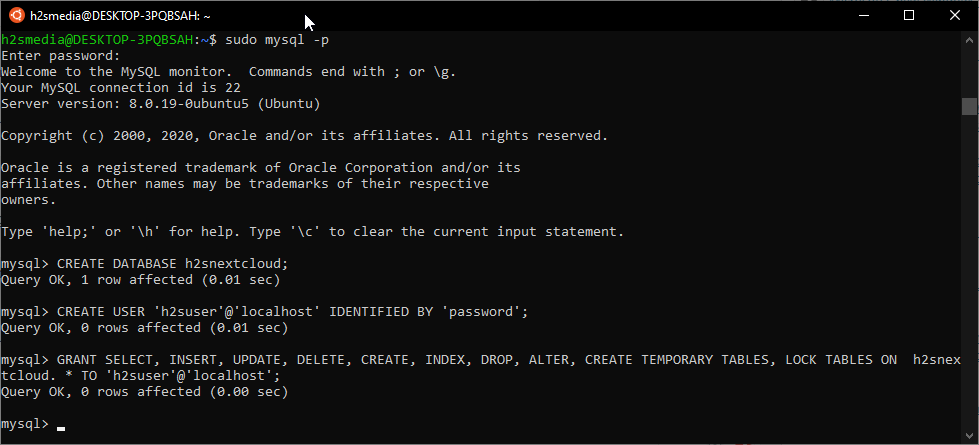
sudo mysql -p
The command to create a database and user.
CREATE DATABASE db_name_here;
Note: Replace db_name_here with the database name you want to give it.
CREATE USER 'h2suser'@'localhost' IDENTIFIED BY 'pass';
Grant rights to manage database activities to the user you have.
GRANT SELECT, INSERT, UPDATE, DELETE, CREATE, INDEX, DROP, ALTER, CREATE TEMPORARY TABLES, LOCK TABLES ON db_name_here. * TO 'h2suser'@'localhost';
Note: Replace the h2suser with the username and pass with the password you want to assign.
exit
4. Download NextCloud
By the time, we are writing this article the latest version of the Nextcloud server edition available to download was 18.04, thus we get the same for installation.
Visit the Download page, right-click on the Download button and copy the link.
Now, on your Ubuntu terminal type wget give space and paste the copied link. After hitting the enter button to download the NexxtCloud latest server version.
For example:
wget https://download.nextcloud.com/server/releases/nextcloud-x.x.xzip
Extract Downloaded zipped file
The downloaded file of our was in zipped format thus, we also need a small program for that:
sudo apt install unzip
Now,
sudo unzip nextcloud*.zip
After inflating, move the file to Apache public folder
sudo mv nextcloud /var/www/html/nextcloud/
Create a data folder inside the copied folder
sudo mkdir /var/www/html/nextcloud/data
Set the permissions for the copied Nextcloud directory
sudo chown -R www-data:www-data /var/www/html/nextcloud/
sudo chmod -R 755 /var/www/html/nextcloud/
5. Create nextCloud configuration file for Apache
By default, Apache has the configuration file that points it to use the files available under /var/www/html folder, we can edit that file to point it to our nextcloud directory inside the HTML folder. However, it is a better idea to create a separate configuration file, in case you are planning to host multiple websites.
sudo nano /etc/apache2/sites-available/nextcloud.conf
Copy-paste the following lines in that file.
Note: If you are want to use a custom domain then replaced your.server.com in the following with your domain name and update the DNS record for the same.
<VirtualHost *:80>
ServerAdmin localhost
DocumentRoot /var/www/html/nextcloud/

ServerName example.com
ServerAlias www.example.com
<Directory /var/www/html/nextcloud/>
Options +FollowSymlinks
AllowOverride All
Require all granted
</Directory>
ErrorLog ${APACHE_LOG_DIR}/error.log
CustomLog ${APACHE_LOG_DIR}/access.log combined
</VirtualHost>
To save and exit the above nano editor, first press CTRL+O and then CTRL+X.

Enable the newly created site:
sudo service apache2 reload
sudo a2ensite nextcloud.conf
Enable Apache Modules for Nextcloud
However, in most of the cases the following modules will automatically get enabled, yet to confirm run the below command:
sudo a2enmod rewrite headers env dir setenvif mime
Also, enable FPM support:
sudo a2enconf php*-fpm
Restart Apache
sudo service apache2 stop
sudo service apache2 start
6. Configuring NextCloud server on Ubuntu 20.04 WSL App (Windows 10)
Finally, we are at the final stage of the NextCloud setup using GUI. Open the browser on Windows 10 and type http:127.0.01/nextcloud
Note: If you get a message “Your data directory and files are probably accessible from the internet because the .htaccess file does not work. For information on how to properly configure your server, please see the documentation.”

To remove that follow the below steps. This appears because the .htaccess file of the Nextcloud would not be able to override the default Apache configuration thus we directly edit that.
sudo nano /etc/apache2/apache2.conf
Scroll down and find these lines:
<Directory /var/www/>
Options Indexes FollowSymLinks
AllowOverride None
Require all granted
</Directory>
Now, replace the AllowOverride None to AllowOverride All
<Directory /var/www/>
Options Indexes FollowSymLinks
AllowOverride All
Require all granted
</Directory>
Finally, you will have an error-free NextCloud login screen.
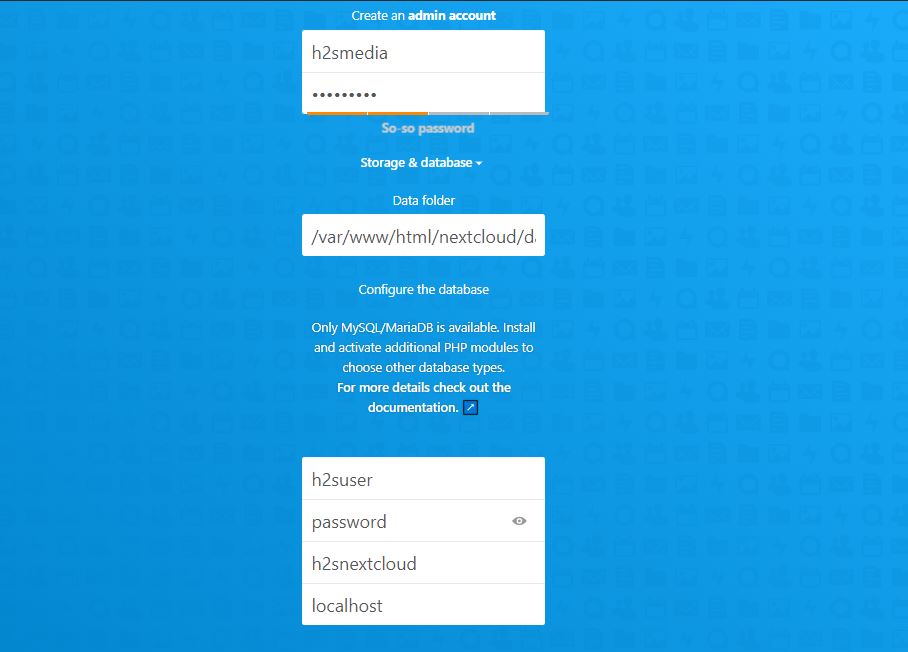
7. Login Nextcloud
Finally, enter the username and password you want to register as an ADMIN account for NextCloud and then furnish the Database details. Last, click on the Finish Setup.
Finally, you will have the Dashboard:

Change Data Folder (Optional step)
By Default, whatever data we upload to NextCloud will go to its data folder that is at /var/www/html/nextcloud/data, it is in the root directory; so, Ubuntu WSL is in the C drive of Windows 10, therefore NextCloud will consume your C: Drive to store all the uploaded files. However, we can change that.
Here, I am going to move the data folder from my C: Drive to G: Drive of the system, so that, all the uploaded files will consume my G: Drive Space, and C: drive will remain free.
sudo cp -r /var/www/html/nextcloud/ /mnt/drive-name
Replace the drive-name with the one where you want to save your all files.
For example, I want it on G drive thus the command in my case was like this:
sudo cp -r /var/www/html/nextcloud/ /mnt/g
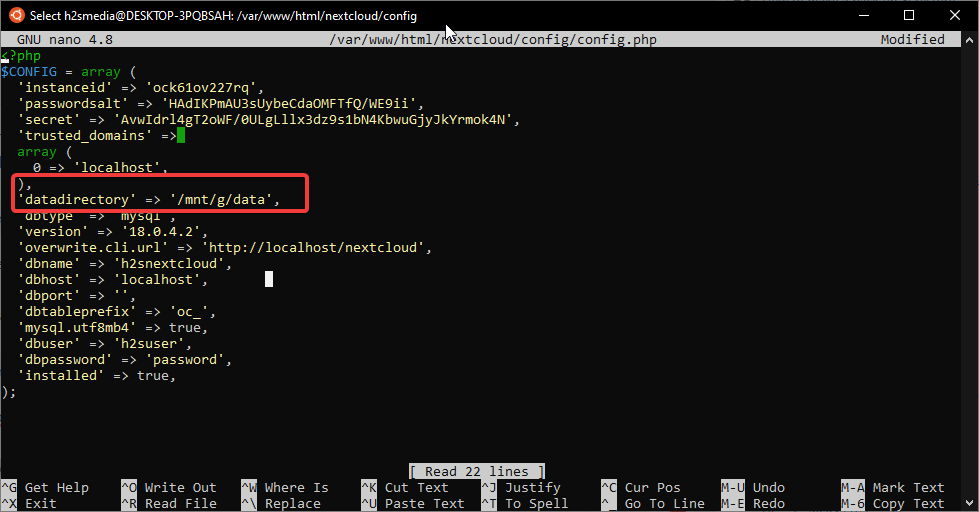
Now, edit the NextCloud Config file:
sudo nano /var/www/html/nextcloud/config/config.php
Find the line:
'datadirectory' ='/var/www/html/nextcloud/data'.
Replace the current directory location with the one where you have copied the data folder.
For example, I have copied it at /mnt/g/data. Thus, I use the same. You can see that in the below screenshot.
After that save it: CTRL+O and exit using CTRL+X.
Change the permission of your new data location:
sudo chmod 0770 /mnt/g/data
sudo chown -R www-data:www-data /mnt/g/data
Note: Replace /mnt/g/data with the location of your folder.
So, this was a quick tutorial on installing NextCloud on Ubuntu 20.04 WSL Linux app on Windows 10.


Hi thank you so much for this guide!! I have followed the entire guide step by step and everything works like a charm. Now I would like to move the “data” folder on a different hard drive (ntfs) as suggested at the end of the article. I tried the steps but every time I reboot the WSL machine I get the error: “Your data directory is readable by other users
Please change the permissions to 0770 so that the directory cannot be listed by other users.”
Do you know how to fix this problem? Thank you so much
I found solution googling a bit… just add ‘check_data_directory_permissions’ => false, into “config.php”. This solved the problem.
Hi Thanks for this post!!
I’m having problems with step 5. Create nextCloud configuration file for Apache.
I made the config file but when I try to reload I get the following message:
* Reloading Apache httpd web server apache2 *
* The apache2 configtest failed. Not doing anything.
Output of config test was:
AH00526: Syntax error on line 10 of /etc/apache2/sites-enabled/nextcloud.conf:
Illegal override option Require
Action ‘configtest’ failed.
The Apache error log may have more information.
I don’t know what to do with this.. I’ve tried looking it up, but alas.
Could you please help?
Same here
Domenico, try this:
AllowOverride All
Require all granted
Any tips on how to access this from another computer on LAN?
Can’t seem to connect via IP on this setup.. unless maybe wiser to opt a different route for that? (VM etc)
Just make sure the port number of OwnCloud has been opened in the windows firewall and if you also have enabled the firewall on Ubuntu WSL, then allow the port their as well.
Thanks a lot for this tutorial. But idk how to sync with my android phone and put a static IP because it’s using localhost and 127….
You need to set the static IP address to your Windows 10 PC where WSL has been installed. WSL will automatically start using the IP address.
This guide fails on
sudo service apache2 reload
I have this output.
AH00526: Syntax error on line 10 of /etc/apache2/sites-enabled/nextcloud.conf:
Illegal override option Require
Action ‘configtest’ failed.
The Apache error log may have more information.
Make sure the configuration file syntax structure for NextCloud given in Step 5 of this article for Apache must look exactly as shown. If it is in a single line then this error will appear…
On step 5 I get an error on line 4 of the .conf file
The apache2 configtest failed. Not doing anything.
Output of config test was:
AH00526: Syntax error on line 4 of /etc/apache2/sites-enabled/nextcloud.conf:
ServerName takes one argument, The hostname and port of the server
Action ‘configtest’ failed.
To remove the error, make sure all the line in the configuration file looks exactly the way they are given in the Steps 5.
This error still exists copying the text directly as its typed.
Try it now, I have updated it…
Thank you for this tutorial. I have followed this tutorial step by step and it worked. But then i reboot the pc and now i can’t access nextcloud. It looks like it doesn’t autostart. How do i fix this?
Follow this tutorial, this will automatically start Apache and Mysql as you log in to the system.
https://www.how2shout.com/linux/how-to-start-wsl-services-automatically-on-ubuntu-with-windows-10-startup/
sudo chown -R www-data:www-data /mnt/d/nextcloud/data
chown: cannot read directory ‘/mnt/d/nextcloud/data’: Input/output error
Fails at the end. How do i fix it?
Is your D drive is accessible through WSL? If yes then mount it and navigate to your data folder on the WSL command line to ensure there is no problem in accessing the same.
Yes i can access it with cd command, the drive is a NTFS drivepool made with Stablebit Drivepool software, not sure if that matters.
D:\Nextcloud\data is the Windows directory path.
cd /mnt/d/Nextcloud/data works.
ls -R /mnt/d/Nextcloud/data list
list
/mnt/d/Nextcloud/data:
ls: reading directory ‘/mnt/d/Nextcloud/data’: Input/output error
Maybe it doesn’t like Stablebit software..
Im not an experienced Linux user, never had the reason to use it.
Greetings, after following the last instructions to change data folder, im getting the following error and cannot access nextcloud.
” Your data directory is invalid
Ensure there is a file called “.ocdata” in the root of the data directory.”
Appreciate any help.
well, i created .ocdata in the data directory and that error went away, now im getting this error
” Your data directory is readable by other users
Please change the permissions to 0770 so that the directory cannot be listed by other users.”
i did run commands with no luck.
sudo chmod 0770 /mnt/e/nextclouddata
sudo chown -R www-data:www-data /mnt/e/nextclouddata
write -a
sudo cp -a /var/www/nextcloud/data/. /mnt/g/data/
working fint with me 🙂
Where is Ubuntu in any folder? Can I open it from File Explorer?
Yes, you can open it. Just open Windows Explorer and from the left side click on the Linux icon.
Thanks for this, I have followed all your steps up to Login Nextcloud. When I go to create my admin etc and link my database, I get the error message: MySQL username and/or password not valid You need to enter details of an existing account.
I have tried everything I can find to address this, but have not been able to get passed this. I was wondering if you are able to help?
This means NextCloud can communicate but there would be some problem with the username and password. I recommend you, create another database or change the password of your existing database that you have created earlier. After that use the same in NextCloud.
Stuck at Step 6:
I followed every step but when I go to https://127.0.0.1/nextcloud I get an error message saying “problem loading page”
I’ve tried on different browsers but the problem remains. Any advice?
Just want to add that the localhost page still brings me to the apache2 default page
Please check the nextCloud configuration file for Apache
How do I access this file, and what should I be checking for?
Hi, I followed yout tutorial and successfully run nextcloud. But after some time, I restart apache and mysql, now nextcloud can’t be accessed. I checked apache error log (/var/log/apache2/error.log) and got this
Segmentation fault (11), possible coredump in etc/apache2
What should I do?
Stuck at Step 6:
I followed every step but when I go to https://127.0.0.1/nextcloud I didn’t get the page in the tutorial and got the following text.
<?php
/**
* @copyright Copyright (c) 2016, ownCloud, Inc.
*
* @author Christoph Wurst
* @author Joas Schilling
* @author J枚rn Friedrich Dreyer
* @author Lukas Reschke
* @author Morris Jobke
* @author Robin Appelman
* @author Roeland Jago Douma
* @author Sergio Bertol铆n
* @author Thomas M眉ller
* @author Vincent Petry
*
* @license AGPL-3.0
*
* This code is free software: you can redistribute it and/or modify
* it under the terms of the GNU Affero General Public License, version 3,
* as published by the Free Software Foundation.
*
* This program is distributed in the hope that it will be useful,
* but WITHOUT ANY WARRANTY; without even the implied warranty of
* MERCHANTABILITY or FITNESS FOR A PARTICULAR PURPOSE. See the
* GNU Affero General Public License for more details.
*
* You should have received a copy of the GNU Affero General Public License, version 3,
* along with this program. If not, see
*
*/
require_once __DIR__ . ‘/lib/versioncheck.php’;
try {
require_once __DIR__ . ‘/lib/base.php’;
OC::handleRequest();
} catch (\OC\ServiceUnavailableException $ex) {
\OC::$server->getLogger()->logException($ex, [‘app’ => ‘index’]);
//show the user a detailed error page
OC_Template::printExceptionErrorPage($ex, 503);
} catch (\OC\HintException $ex) {
try {
OC_Template::printErrorPage($ex->getMessage(), $ex->getHint(), 503);
} catch (Exception $ex2) {
try {
\OC::$server->getLogger()->logException($ex, [‘app’ => ‘index’]);
\OC::$server->getLogger()->logException($ex2, [‘app’ => ‘index’]);
} catch (Throwable $e) {
// no way to log it properly – but to avoid a white page of death we try harder and ignore this one here
}
//show the user a detailed error page
OC_Template::printExceptionErrorPage($ex, 500);
}
} catch (\OC\User\LoginException $ex) {
$request = \OC::$server->getRequest();
/**
* Routes with the @CORS annotation and other API endpoints should
* not return a webpage, so we only print the error page when html is accepted,
* otherwise we reply with a JSON array like the SecurityMiddleware would do.
*/
if (stripos($request->getHeader(‘Accept’),’html’) === false) {
http_response_code(401);
header(‘Content-Type: application/json; charset=utf-8’);
echo json_encode([‘message’ => $ex->getMessage()]);
exit();
}
OC_Template::printErrorPage($ex->getMessage(), $ex->getMessage(), 401);
} catch (Exception $ex) {
\OC::$server->getLogger()->logException($ex, [‘app’ => ‘index’]);
//show the user a detailed error page
OC_Template::printExceptionErrorPage($ex, 500);
} catch (Error $ex) {
try {
\OC::$server->getLogger()->logException($ex, [‘app’ => ‘index’]);
} catch (Error $e) {
http_response_code(500);
header(‘Content-Type: text/plain; charset=utf-8’);
print(“Internal Server Error\n\n”);
print(“The server encountered an internal error and was unable to complete your request.\n”);
print(“Please contact the server administrator if this error reappears multiple times, please include the technical details below in your report.\n”);
print(“More details can be found in the webserver log.\n”);
throw $ex;
}
OC_Template::printExceptionErrorPage($ex, 500);
}
Use these commands:
sudo apt install -y php-{curl,gd,fpm,cli,opcache,mbstring,xml,zip,fileinfo,ldap,intl,bz2,json,imagick,redis,mysql,common}sudo apt install libapache2-mod-phpsudo a2enconf php*-fpmsudo systemctl reload apache2Thank you, but still does not work after this steps. Same error message.
Same problem solved by using:
http:///localhost/nextcloud
Hi! Thanks for the tuto, works very well ! I was wondering how to connect to my Nextcloud from the iOS app. I know it’s using localhost with my PC but I’d like to access it from my phone. Do you know how I could do that ? Is it even possible ?
For that you have to forward your Ip-address in Router to access it through your Public Ip-address, however, the Ip-address must be static. Otherwise use some Dynamic DNS service.
FYI I got the last part working with mysql Ver 8.0.27 Ubuntu 20.04.1, since ERROR 1064 (42000) appeared with the grant privileges code in the guide;
mysql> CREATE USER ‘root’@’%’ IDENTIFIED BY ‘PASSWORD’;
mysql> GRANT ALL PRIVILEGES ON *.* TO ‘root’@’%’ WITH GRANT OPTION;
mysql> FLUSH PRIVILEGES;
Error while trying to create admin user: Failed to connect to the database: An exception occurred in the driver: SQLSTATE[HY000] [1045] Access denied for user ‘nextcloudubuntu’@’localhost’ (using password: YES)
How to fix it?
Just make sure the password you have used for your database is the same for the database you are adding in nextcloud
Error while trying to create admin user: Failed to connect to the database: An exception occurred in the driver: SQLSTATE[HY000] [2002] Permission denied
Same! Have you found the solution to this problem?
Idk what I did, but I don’t get the error anymore, however now I get “MySQL username and/or password not valid You need to enter details of an existing account.” even though I created a new mysql db user.