Unetbootin is an open-source tool also known as “Universal Netboot Installer” which is a cross-platform software. This means we can use to create a bootable USB drives on Windows 10/8/7, macOS and Linux operating systems. With this tool, one can start and run Linux directly from the USB stick or install the OS from the USB stick on the hard drive.
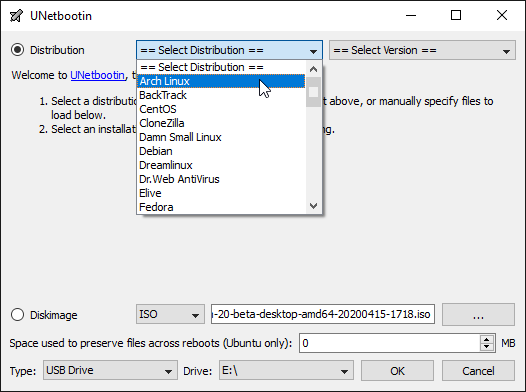
Furthermore, if you don’t have the ISO images of some common Linux distro, then it is possible to download the one directly from the Unetbootin interface to create the bootable USB stick for the same. Just run the software and in the dropdown menu under »Distribution you will find a whole list of available tools and distributions.
And if you have the ISO image for example of Windows 10, Ubuntu or any other OS, then without wasting time, just select the DiskImage option, select the ISO file and start flashing the plugged USB drive.
You don’t need to install it, Univeral Netboot Installer will work as portable software.
However on the previous version of Ubuntu 19.04, 18.04, 16.04 and current Debian, Linux Mint and other same Linux operating system we can also use the repository. Here are the commands to do that:
sudo add-apt-repository ppa:gezakovacs/ppa
sudo apt-get update
sudo apt-get install unetbootin
But unfortunately on Ubuntu 20.04 using the repository to install and run Unetbootin, it gives dependencies error, thus we will use directly the binaries available for both 32-bit and 64 bit systems on its official website.
Step 1: Open your browser on Ubuntu 20.04
Step 2: Go to Unetbootin official page and download the Linux binaries(bin file) or simply use this link.
Step 3: After that open command terminal from Activities or just use the keyboard shortcut CTRL+ALT+T.
Step 4: On Terminal, switch the directory to Downloads, as by default all the browser downloaded files go in that.
cd Downloads
Step 5: Now, see the available files in it.
ls
Step 6: You will see the Unetbootin Bin file, change its access permission by using the command
sudo chmod +x ./filename
Change the filename with yours. In our case, it is, Unetbootin-linux64-677.bin and might be different in ours, thus use that filename with the above command. If you talk about ours, the command was like this:
sudo chmod +x ./unetbootin-linux64-677
Step 7: Finally, run the UnetBootin on Ubuntu to create a bootable USB drive, for that
sudo ./filename
Replace the filename again with yours… In our case it was:
sudo chmod ./unetbootin-linux64-677
You will get the Universal Netboot Installer screen.
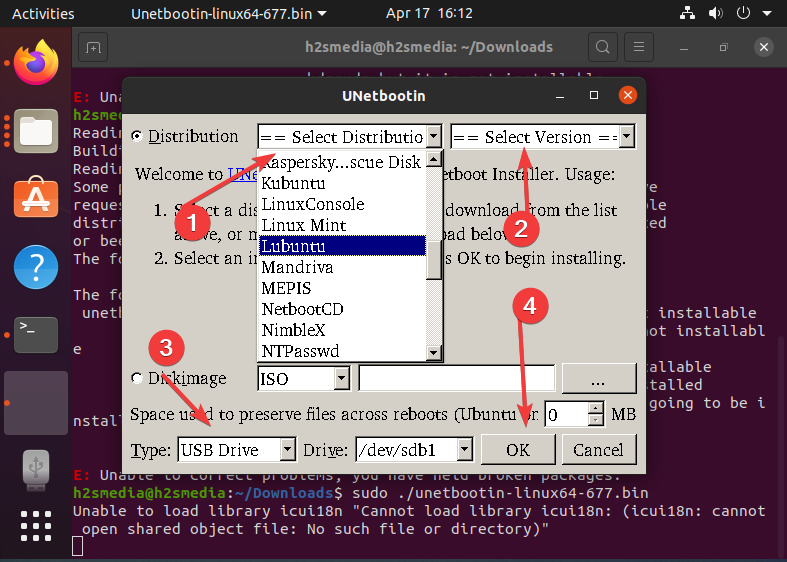
Step 8: How to use the Unetbootin on Ubuntu
If you want to download some common Linux or FreeBSD distribution to create a bootable USB directly from the interface of Unetbootin, simply select the distribution, version, Select the USB drive attached to your computer and press the OK button.
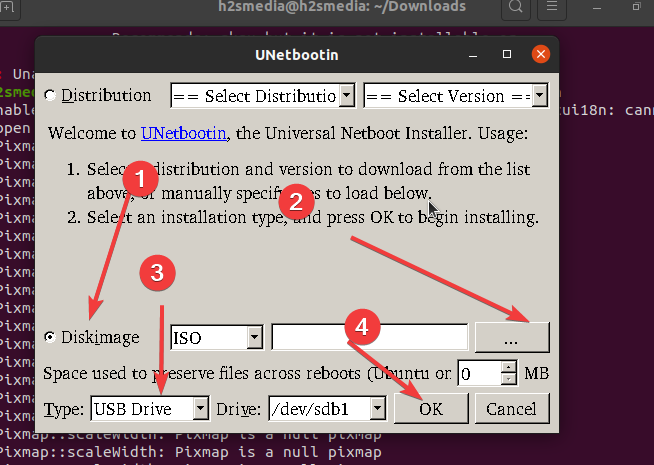
However, if you already have the ISO file of some Linux distro or Windows OS, then simply Select the DIskImage, then three dots given in from of it, navigate and select the ISO file, select the Pendrive attached to PC; and finally click on the OK button to start the flashing process.


Hi,
This is an alternative debian package to install on focal fossa:
https://github.com/winunix/unetbootin-focal
Thanks a lot ailtonbsj to heal my headache, almost abandonning focal, omg! Your fork is great, it works fine
On chromebook deb package not instalatted. I dont know why… All other deb packages i installed correctly