
Since the beginning of Linux systems whether Desktop or servers they used the inbuilt package manager to install packages, however, on Windows, it was not possible. But with the development of Winget, a package manager from Microsoft, the installation of packages is now more convenient and easy. Yet, while writing this article, the facility of Winget was present only in Windows 10 and 11 systems, and Windows servers were still deprived of it. However, there is a way to install Winget manually on Windows servers by satisfying its requirements and dependencies and here we learn how to do that on Windows server 2022.
What is Winget?
Winget (open source) is an official package manager developed by Microsoft for its Windows 10 and 11 operating systems. It is a command line tool that can be used via PowerShell or Terminal for managing software applications.
Here are some core features and uses of Winget:
- Winget offers an easy method to install, update, uninstall, and configure Windows applications using the command line.
- It used a Command line interface hence no need to visit the Microsoft Store or third-party application websites to install software.
- Winget uses a repository of software packages containing metadata about the software, ensuring the correct version of the application is installed and configured.
- Since Winget is a command-line tool, it can be scripted and integrated into larger automation workflows, which is highly beneficial for system administrators and DevOps.
- Winget is an open-source tool that not only EXE but can handle MSI and MSIX packages. Its code is available on Git Hub.
- Using it Windows users will have an experience similar to package managers in Linux distors or Homebrew on macOS.
- It simplifies the process of managing software on Windows, especially in bulk or across numerous.
Prerequisites
- To follow this tutorial we need Windows Server 2022 or 2019. We have not tried it on other older versions but you can.
- Dependencies – Microsoft.ui.xaml.2.7.x and Microsoft.VCLibs.x64
- Administrator access to the server.
- Internet access
The following is the error we get without installing the Winget on the Windows server if we try to use it using PowerShell or Command prompt.
winget : The term 'winget' is not recognized as the name of a cmdlet, function, script file, or operable program.
Check the spelling of the name, or if a path was included, verify that the path is correct and try again.
At line:1 char:1
+ winget
+ ~~~~~~
+ CategoryInfo : ObjectNotFound: (winget:String) [], CommandNotFoundException
+ FullyQualifiedErrorId : CommandNotFoundException
Or if its license is not added to the system.
Program 'winget.exe' failed to run: No applicable app licenses foundAt line:1 char:1Install Microsoft UI XAML & VCLibs
As Winget is not a part of Windows Server 2022 and doesn’t come with it by default, hence we need to install the dependencies required by Winget manually. Let’s download Microsoft UI XAML and then Microsoft VCLibs.
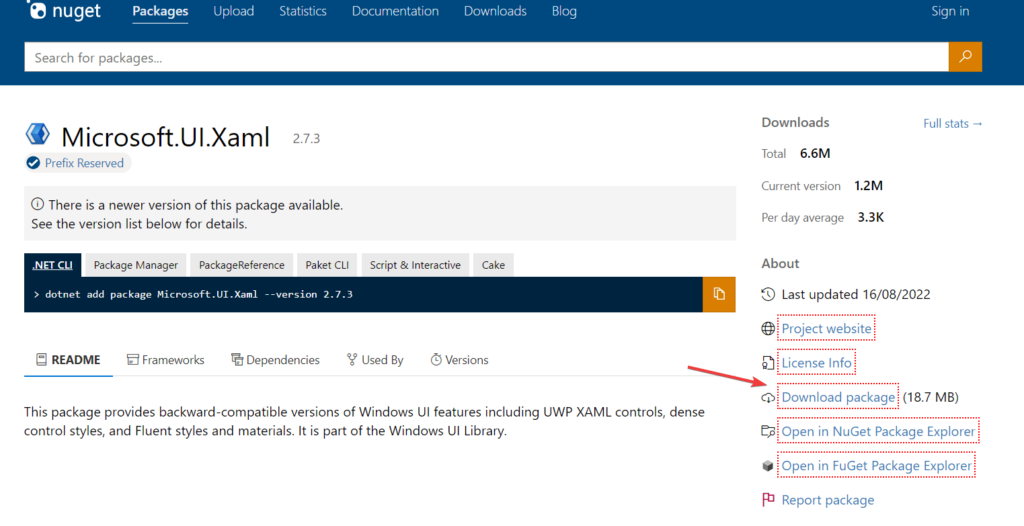
Microsoft.UI.Xaml
Microsoft.UI.Xaml refers to the NuGet package for the Windows UI Library (WinUI). It provides a suite of UI controls and other user interface elements developers use to create modern Windows applications. For getting Microsoft UI XAML 2.7 version visit this Nuget Web page and click on the Download link. To get an idea refer to the given screenshot..
After downloading Microsoft UI XAML on your Windows 2022 server, select the downloaded file and press the F2 key or right-click to select “Rename” to edit its extension.
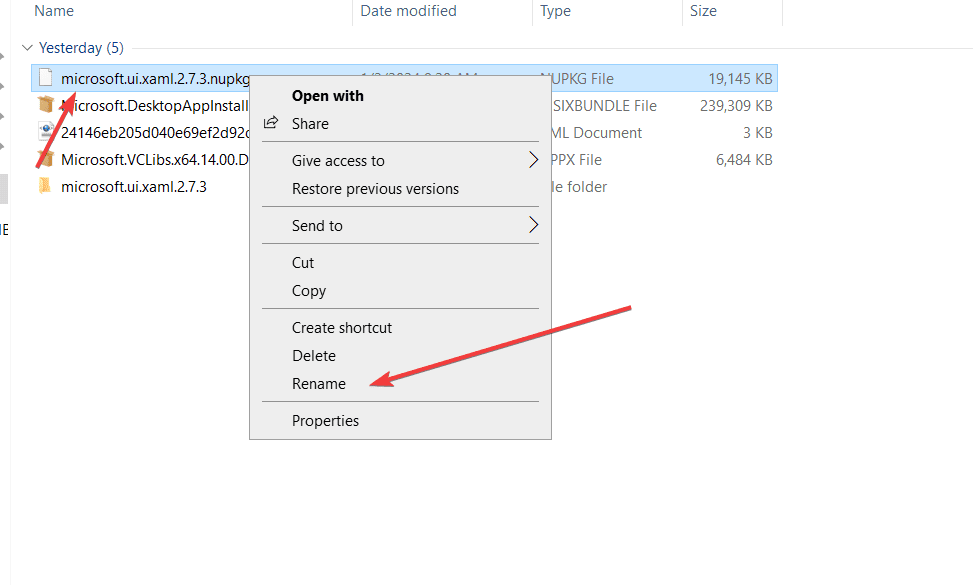
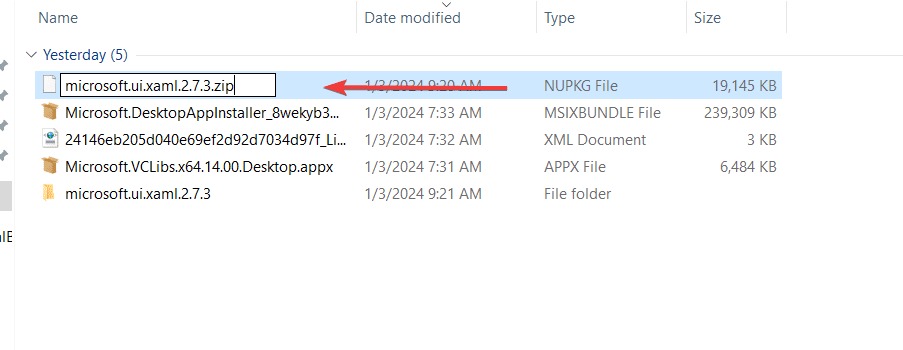
Change nupkg extension to zip. Once done, we need to right-click on the file to extract it.
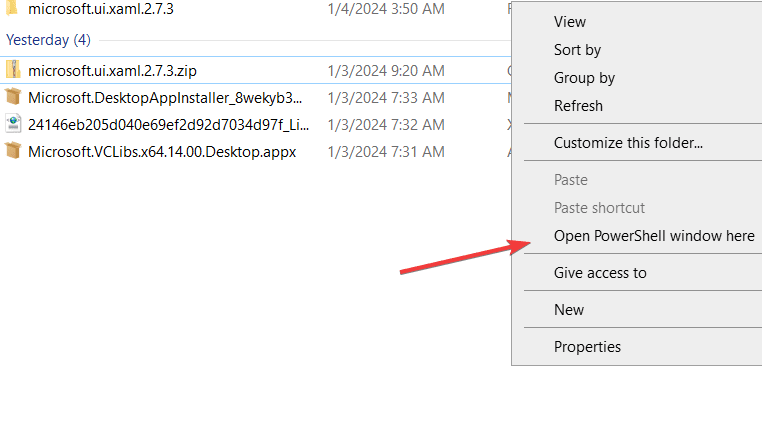
Now, press the Shift key and right-click anywhere on the blank area where you have extracted the file to select the “Open PowerShell Windows here” option.
Use the Add-Appxpackages command in your PowerShell to install the UI XML on the Windows server. Here is the command:
Switch to the extracted folder:
cd .\microsoft.ui.xaml.2.7.3\Install the UI XML’s APPX package
Add-AppxPackage -Path .\tools\AppX\x64\Release\Microsoft.UI.Xaml.2.7.3.appx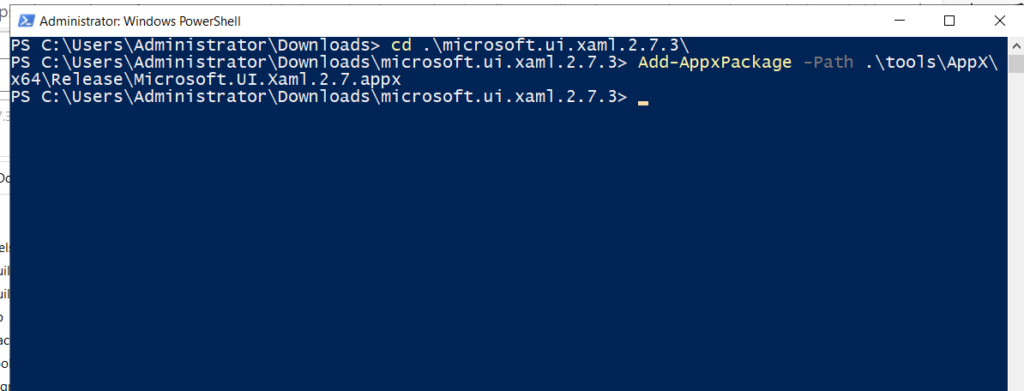
Microsoft.VCLibs Appx
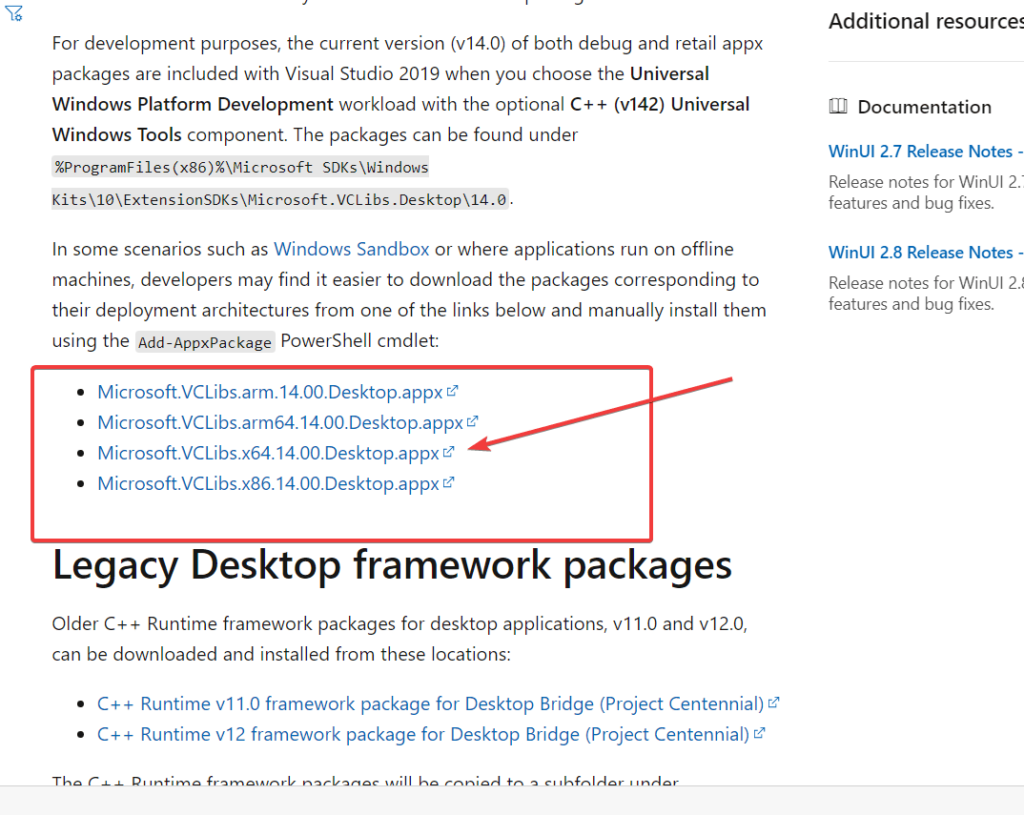
Microsoft.VCLibs stands for Microsoft Visual C++ Libraries. These libraries are necessary for running applications on Windows that are developed using the Visual C++ framework. To download it visit the Microsoft web page and download it as per your system architecture, for example, we are using Intel 64-bit so we have downloaded the x64 edition.
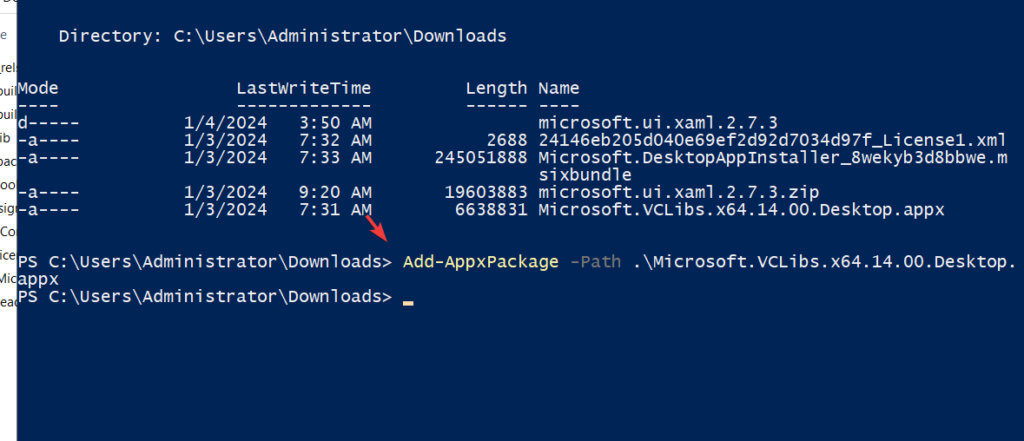
Now, again open PowerShell where you have saved the Microsoft VCLibs Appx file, and add it to your system.
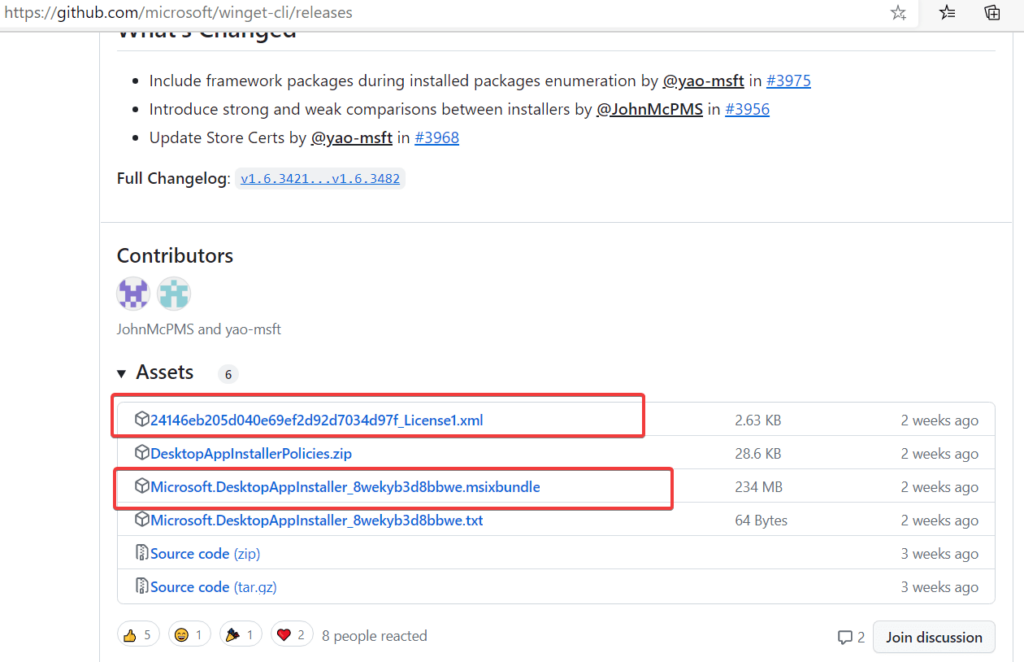
Download Microsoft.DesktopAppInstaller and
Once we have satisfied the requirements of Winget on our Windows server 2022, the next thing is to download the Msixbundle that enables the App installation – Winget on our system. For that visit the GitHub page of Winget and download two files one is Microsoft Desktop App Installer and the other is the License file available for it.
Install Winget on Windows 2022 server
Once you have both files on your system then again open the PowerShell inside the directory where the files are saved.
Run the given command to install the MSIXBundle you have downloaded
syntax:
Add-AppxPackage package-name
Note: As per our downloaded filename, we have used it in the command. If it is different in your case so use it accordingly.
Add-AppxPackage .\Microsoft.DesktopAppInstaller_8wekyb3d8bbwe.msixbundleAfter installing the Desktop installer also assign the downloaded License file to it:
Syntax:
Add-AppxProvisionedPackage -Online -Package name-of-the-package -LicensePath name-of-the-License–file
The command used in our case:
Add-AppxProvisionedPackage -Online -Package .\Microsoft.DesktopAppInstaller_8wekyb3d8bbwe.msixbundle -LicensePath .\24146eb205d040e69ef2d92d7034d97f_License1.xml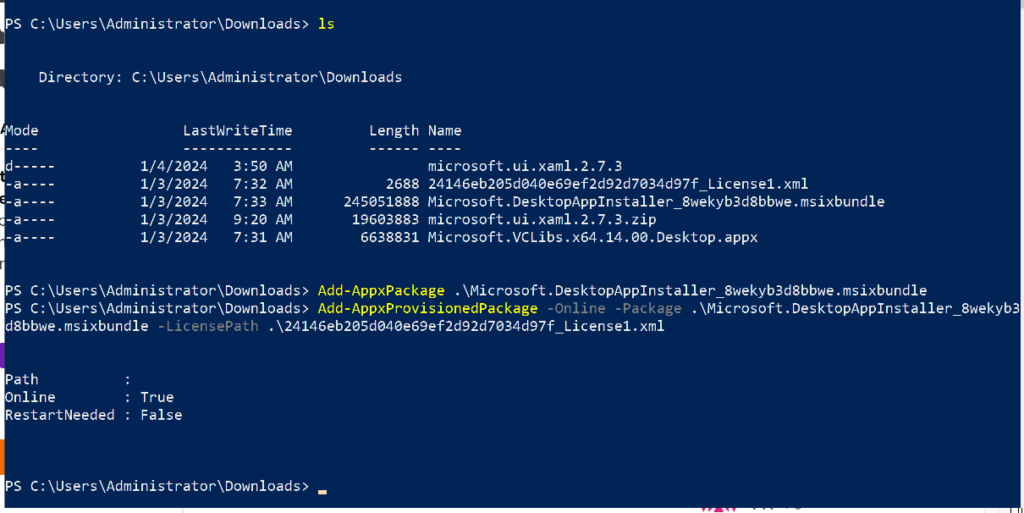
Verify Winget on the Windows server
Once all the steps given above are completed successfully, close all the current PowerShell windows and open PowerShell again with Admin rights.
Type – winget and you will see all the options available to use with it:

Start Using Winget:
With Winget installed on Windows 2022 server, we can start installing, updating, and managing software packages with the help of a command prompt or Powershell. For example, to install Git, you would run:
winget install Git.Git
To search for packages, use:
winget search package-name
Updating and Uninstalling with Winget:
Winget also makes it easy to update and uninstall packages. For updates:
winget upgrade package-name
And for uninstalling:
winget uninstall package-name
Conclusion
Although Winget is not available on Windows servers out of the box, maybe in the future Microsoft will add it. Nevertheless, Winget is a quite powerful addition to any Windows server environment to download and install applications like a pro. It not only saves the user’s time but also lets them manage apps more efficiently.


Thanks for this post.
It got me closer than anyone else. A couple things I had to do for Windows Package Manager 1.7.10582 into a Windows Server 2022 build
On PowerShell I had to run Import-Module Appx -UseWindowsPowerShell to install the packages.
when I tried to install the Windows Package Manager 1.7.10582 it needed a newer version of Microsoft.UI.Xaml, 2.8.6. I used the same process as before.
The following command:
Add-AppxProvisionedPackage -Online -Package .\Microsoft.DesktopAppInstaller_8wekyb3d8bbwe.msixbundle -LicensePath .\24146eb205d040e69ef2d92d7034d97f_License1.xml
Does not work for me –I had to change -Package to -PackagePath. I believe this is a syntax error in the article.