Windows 11 is out there and it is blowing many users’ minds with its new looks. It does not offer lots of new features, but some of them are impressive. One of the frequently discussed Windows 11 features is the support of Android apps natively. Yes with Windows 11 it is possible to sideload Android apps natively without any third-party application. But of course, there is a catch. Windows 11 supported android apps are only available on the Amazon app store. If you are looking for another process to custom sideload android apps on Windows 11, then you should go through this article in full.
But before you jump into the process, remember that loading Android apps on Windows 11 is not as easy as loading the same on an Android device. To sideload Android apps on Windows 11, you need to use the ADB (Android Debug Bridge) and you also have to run some commands in the terminal.
Get Windows 11 22000.xxx Build
Before you start the main process, you need to be sure whether your PC has Amazon Appstore configured and running or not. If yes, then you can skip this section and go to the next one. Also, if you are using the Amazon Appstore already, and you just need more apps that are not present in the library, then you can also skip this step and go to the next one.
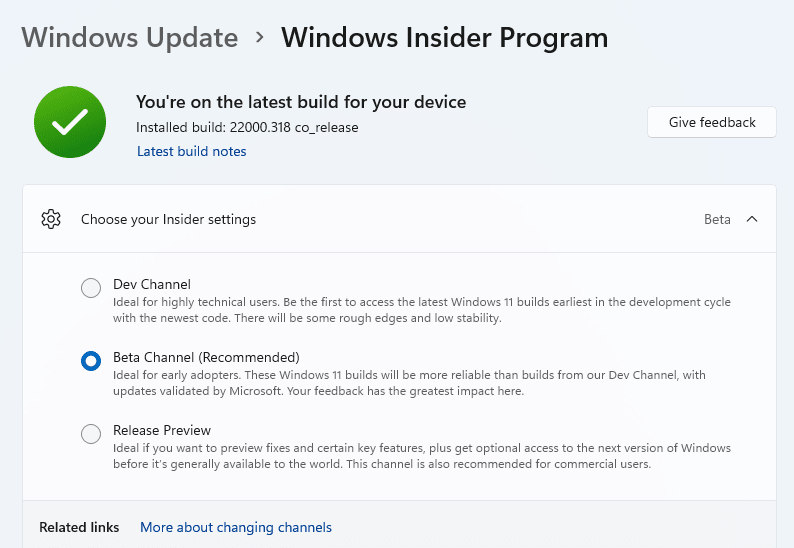
You have to make sure you are using Windows Insider Beta Channel, build 22000.282, or a higher version. If you want to know how to switch to Windows Insider Beta Channel just follow the process below.
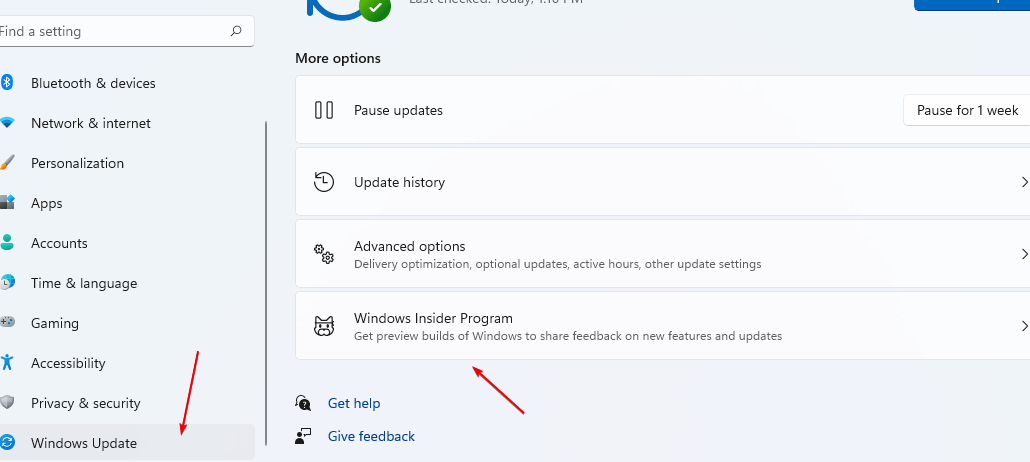
Step 1: Press Windows+i to open the Settings app
Step 2: In the Settings menu, select “Windows Update” from the left sidebar
Step 3: In the Windows Update window, click on the “Windows Insider Program”
Step 4: Inside the “Windows Insider Program” settings, click on “Choose your Insider Settings”
Step 5: In the dropdown menu check the button “Beta Channel (Recommended)” to select it
Step 6: Close the settings app directly and your selection would be saved automatically.
Remember one thing, the Beta Channel is not as stable as the DEv channel, so, your PC may perform a little weirdly, and you may encounter bugs & glitches.
Now another prerequisite is to enable the virtualization mode of your PC. You might know that Windows 11 runs Android in a virtual machine setup, which is why enabling virtualization is so needed. To check if it is enabled or not, just press the Ctrl+Shift+Del to open Task Manager and go to the Performance Tab, and check it as shown in the image below.
If the virtualization is disabled then you need to enable it from your PC’s UEFI firmware (Formerly BIOS). If you want to learn how to enable virtualization on your UEFI firmware then follow the process below.
- Restart your pc, and start pressing the del button.
- Once the UEFI is opened, locate the Intel VT-X on the menu, if you are using Intel CPU.
- If you are an AMD CPU user, locate and enable the AMD-V in the UEFI firmware.
- Then press F10 to save and exit, and let the PC start again.
- Then check again in the Task Manager, if the Virtualization is enabled now or not.
Now you are ready to go, but you should double-check everything before preceding further to avoid any complications later.
Enable Virtual Machine Platform
- In the Windows Search box
- Type- Turn Windows Features on or off, when it appears click on it to access the same.
- Select the “Virtual Machine Platform” box and hit the OK button.
- Now, Restart your system.

Download Windows Subsystem for Android
There are two ways for getting “Windows Subsystem for Android” one is via Microsoft Store and another using Adguard.net’s Store app downloader.
Ist Method:
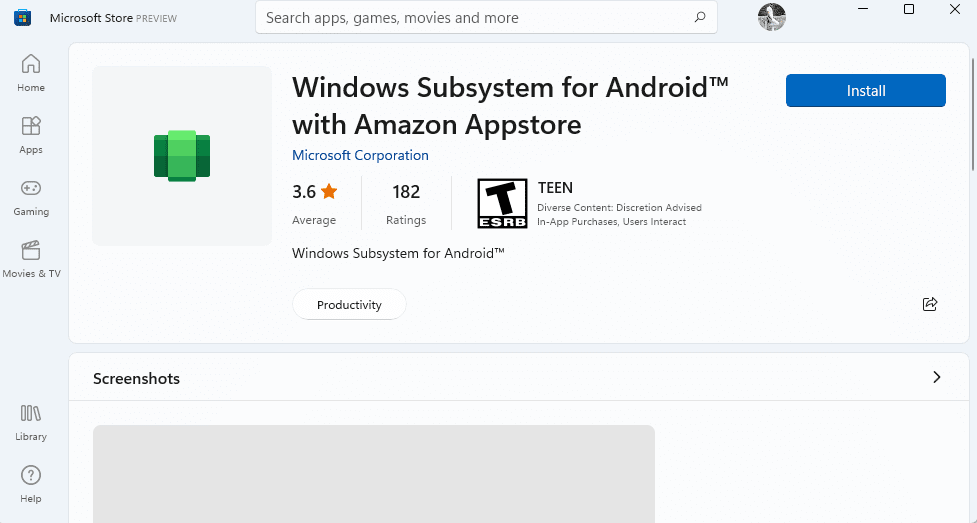
The users who are living in the U.S while writing this tutorial will only be able to download the Windows Subsystem for Android from the Microsoft Store. Click on the link and hit the Install button this will ask you to open Windows 11 Microsoft Store to download and install Subsystem for Android. Note: Your system must have at least 8GB of RAM to install this platform.
Note: Well, those who are not in the USA and still want to try out Windows Subsystem for Android with Amazon Appstore then change your Windows 11 Default location, first.
2nd Method:
Step 1: Go to Adguard.net‘s Store app downloader.
Step 2: In the Search Box, enter the following: https://www.microsoft.com/en-us/p/windows-subsystem-for-android/9p3395vx91nr
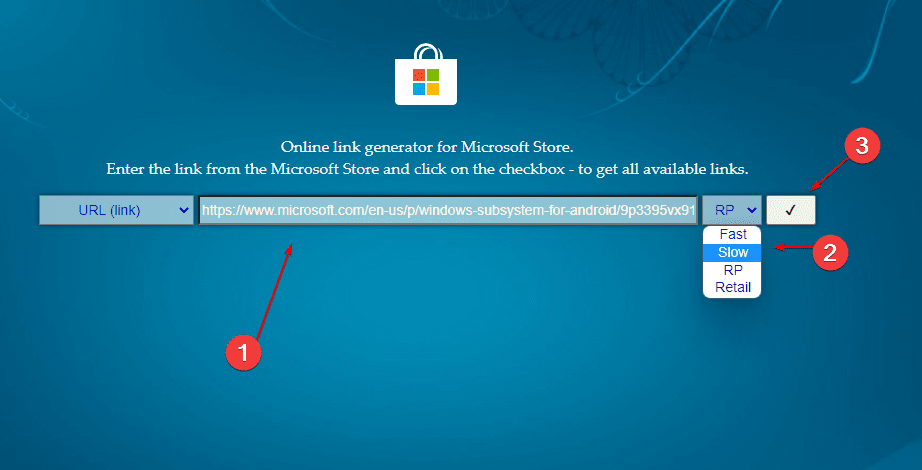
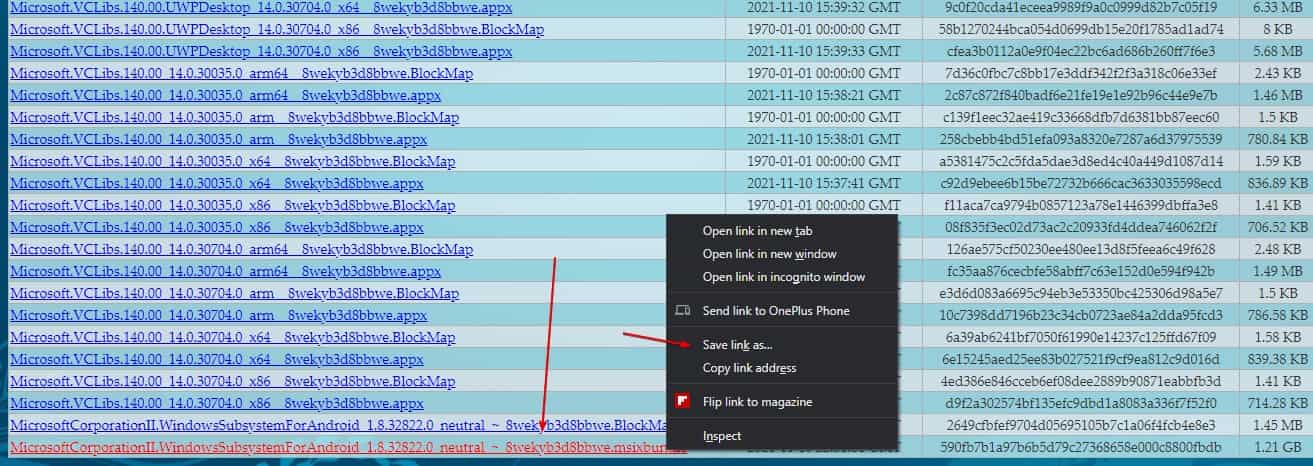
Step 3: In the search result, go to the end of the list, right-click on the xxxxx..msixbundle file name, and select “Save link as…” to download the file on your system.
Step 4: Right-click on the Windows 11 Start button and run Windows Terminal (Admin).
Switch to the directory where you have saved the downloaded file.
Add-AppxPackage path-to-the-downloaded-file
Example:
Add-AppxPackage .\MicrosoftCorporationII.WindowsSubsystemForAndroid_1.8.32822.0_neutral_~_8wekyb3d8bbwe.Msixbundle

Configuring ADB (Android Debug Bridge) on Windows 11
Now you have to understand and configure the ADB to proceed. Without the ADB (Android Debug Bridge) the Android filesystem can not talk to the Windows file system. In simple words, there is no way of getting APK files into the Android filesystem without the ADB (Android Debug Bridge). If you want to learn how to set up ABD (Android Debug Bridge) in Windows 11 follow the process outlined below.
- Download the Android SDK Platform Tools for Windows.
- Extract the ZIP contents into the folder “C:\platform-tools”
- Now Go to “Control Panel > System and Security > System”. You can also use the following key combination: “Win+Pause/Break” and then go to “Advanced system settings”.
- Go to “Environment variables”.
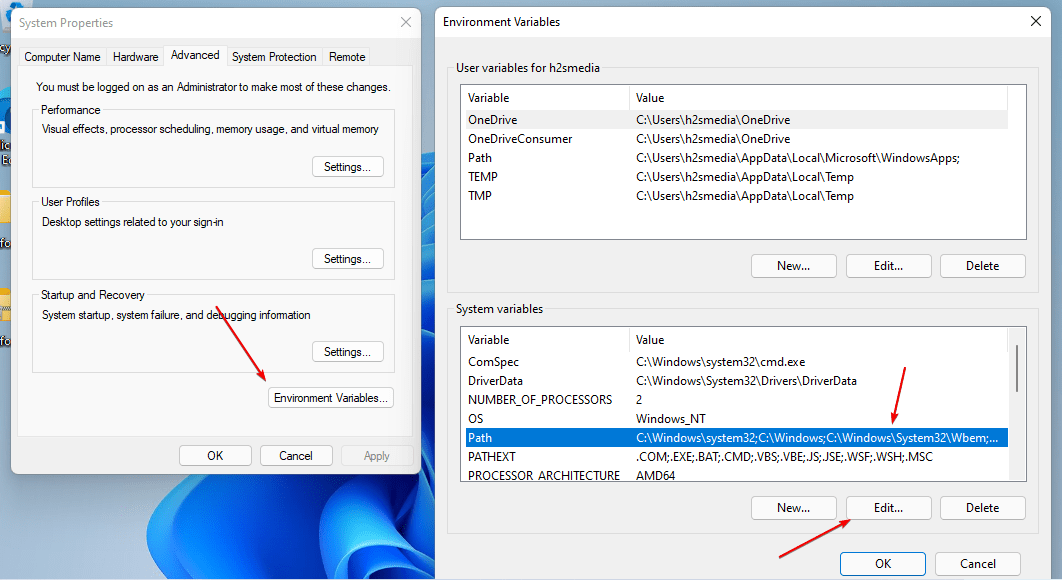
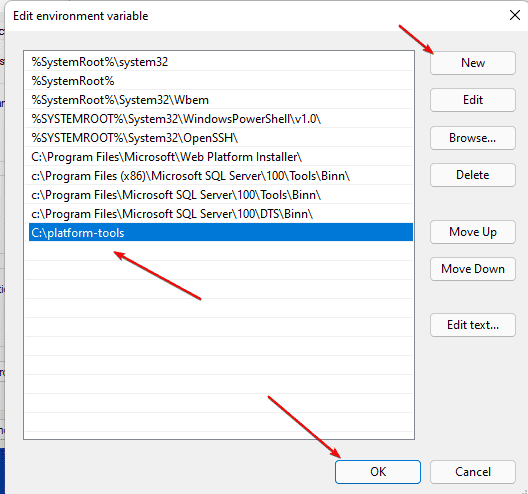
- In “System variables”, you have to select “Path” and click on “Change.”
- Write the path to “platforms-tools with ADB files”.
- Open the command prompt once the PC is on again.
- Enter the “ADB version” You will now see info about the ADB version. This means the installation was completed properly and it is ready for use.
The above method is described for Windows 10 and Windows 11 PC. But ADB is a universal program that can be used on Linux, macOS, and Android platforms also. Once you have set up the ADB in your Windows 11 system along with the Virtualization enabled and switched to Windows Insider Beta Channel, you are all set to install Android APK files from third-party sources like APKMirror.com
How to Sideload Android Apps on Windows 11
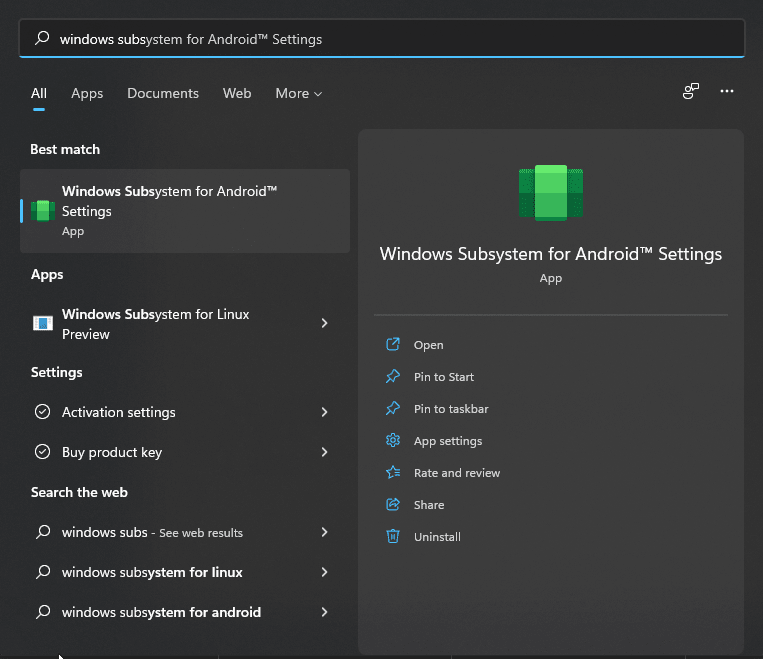
Step 1: Now open the “Windows Subsystem for Android” from the Start Menu. Tap the Search icon and type “Windows Subsystem for Android”, you will find the icon easily.
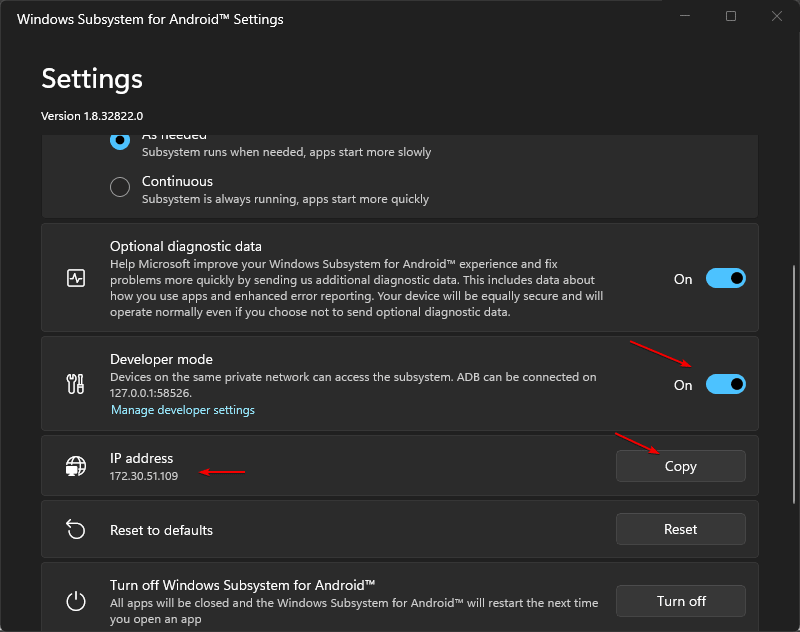
Step 2: From the Windows Subsystem for Android, switch on the “Developer Mode”.
Step 3: Now you have to find the IP address of the Android instance.
Step 4: Now click on the “Refresh” button beside “IP Address”. After that click on the “Copy” button. Don’t close the app immediately once done.
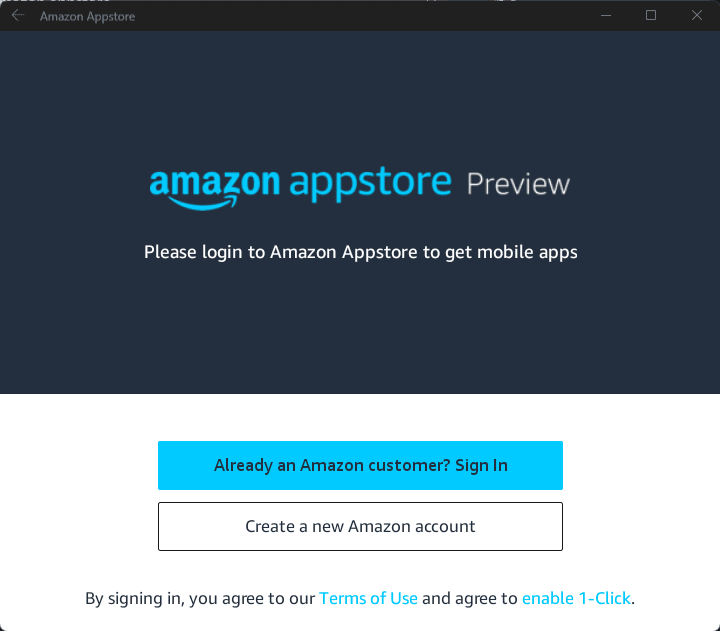
Step 5: After getting the Ip-address, sign in to the Amazon App store that will automatically get installed after installing the Window subsystem for Android. Go to the Search box of Windows 11 and search for Amazon Appstore. Once its icon appears, click to run.

Step 4: Sign in to your Amazon account. If you don’t have one then create the one.
Use ADB (Android Debug Bridge) and begin Android App sideloading.
Step 1: Launch “Command Prompt” from the Start Menu. Or you right-click on the Windows 11 start button, then select “Windows Terminal”.
Step 2: Then connect to the Android instance. To that enter the command with the IP address flashing on the “Subsystem for Android Settings” that we asked to copy. The command is “ADB connect [IP address]”

Step 3: Now you have to browse the internet for trusted APK files that you can download and install. APKMirror.com is one of the most well-known and trusted APK file repositories. You have to download the APK files only, not the app bundle, so pay attention while downloading. Also remember where you downloaded the file, as it would be needed later. Here we are downloading an APK of an Android App called MX Player from Apkmirror.com.
Step 4: Once you have the APK file on your Windows 11 that you want to install. Go to Windows Terminal or Command prompt and type adb install path-to-your-andriod.apk
If everything goes perfectly, you’ll get a “Success” message and the app will be available in the Start Menu automatically.

Step 5: In a few seconds the Android App Apk will be installed on your Windows 11 system and get integrated into the App launcher.
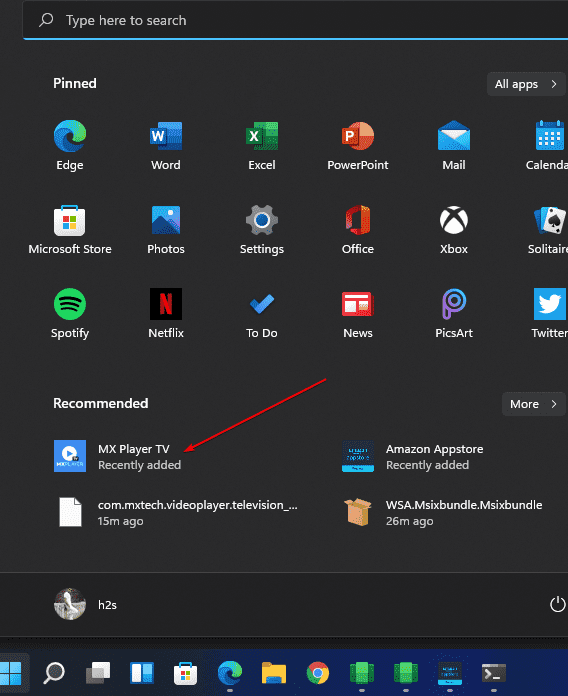
The same process is to be repeated for each app that you can not find in the Amazon Appstore. In many cases, Google Apps do not work properly if sideloaded on Windows PC, as those apps require additional services and inputs, which are only available with a phone or tab. But for most of the apps, the above method is a foolproof and tested method for sideloading android apps on Windows PC.
Related Posts
How to Install 7-Zip on Windows 11 or 10 with Single Command
Install Google Earth on Windows 11 or 10 Using a Single Command
How to install Gaming Services on Windows 11
How to Install Telnet Client on Windows 11 Using PowerShell
How to Install ASK CLI on Windows 11 or 10
How do you install FlutterFire CLI on Windows 11 or 10?