On Microsoft Excel, you can find a plethora of formulas, which can not only be useful to streamline your workflow but also to automate your task of different calculations, which would otherwise take a lot of time to complete. Among the different useful formulas that are available for Microsoft Excel, one of them is the ‘IF’ formula or command, which can be very useful to put conditional values or take conditional decisions depending upon the value within one or multiple cells. The ‘IF’ command is also available in other spreadsheet programs like LibreOffice and Google Sheets, But, unless you know exactly you should use ‘IF’, you will face several issues working with it on any spreadsheet program.
Apart from using ‘IF’ for one single condition, you can even use nested ‘IF’ formula in Excel with multiple conditions, which can help you make a decision or put values within a cell depending upon multiple conditions at the same time. However, depending upon the number of nested conditions that you are using, the complexity will also increase, which is something that you should carefully look at, to prevent any kind of errors or garbage values within the cells. The ‘IF’ statement on Microsoft Excel is, after all, something that you should definitely master to get the most out of the program and make your work easy.
So, without any further delay, let’s get started with how exactly you can use the ‘IF’ statement or condition on Microsoft Excel.
Dealing with conditions with IF on Microsoft Excel
To make it easier for you to understand, I will create a simple if statement which checks, whether an entered number is great than 500 or not.
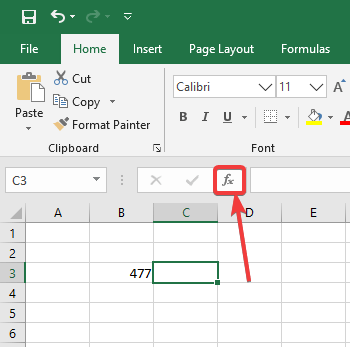
We will have a number in the cell B3, depending upon the number within the cell B3, we will get either or ‘Greater’, or ‘Smaller’ in the cell C3, if the number of greater than, and less than 500 respectively.
So, we will select the cell C3 and will click on the formula button, on the left side of the formula bar.
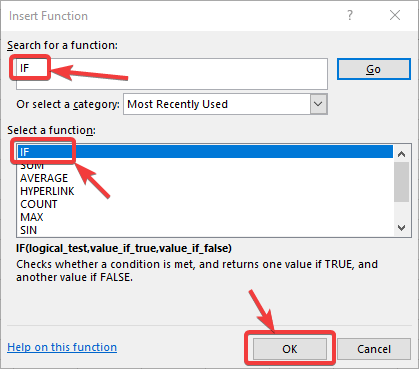
Now, in the ‘Search for a function:’ box, type ‘IF’, and hit the enter key, or click ‘Go’.
Now, select ‘IF’ and hit the enter key, or click on the ‘OK’ button.
The general process of writing ‘IF’ command on Microsoft Excel is very simple.
=IF(<condition>,<value_if_true>,<value_if_false>)
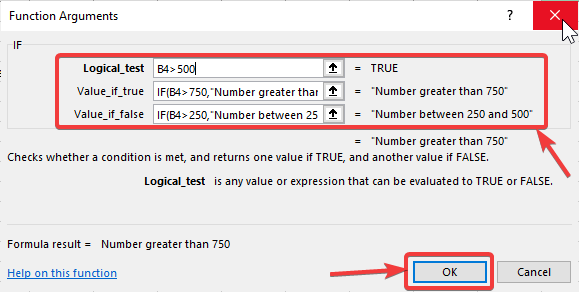
But, that will be useful, if you write the formula directly in the cell. If you are using the ‘IF’ formula from the formula bar, each segment will be broken down for you to enter the condition and the values, to make things easier, as shown below.

Now, in ‘Logical_test’, enter the condition, which will be ‘B3>500’. In the ‘Value_if_true’ box, enter ‘Greater than 500’, and in the ‘Value_if_false’ box, it will be ‘Smaller than 500’. I think it is self-explanatory, why I am doing so. Now, click on ‘OK’.

Now, the output in C3 will be changed depending upon the value of the number within B3. Just change the number to find out whether the formula is working perfectly.

So, that way, you can use the ‘IF’ formula.
Using the nested IF formula
But, what about the nested IF? Having more than two conditions? In such a case, you can use the nested IF technique. We will find that shorty here.
Multiple IF statements or conditions in excel with text example
What we will do now is, check whether a number of bigger than 500 or not. If it is bigger than 500, we will check, whether it is greater than 750 or less than that. If the number is less than 500, we will check, whether the number is less than 250, as well or not.
So, depending upon the values, the outputs that we will get are:
Number < 250: Number less than 250.

250 < Number < 500: Number between 250 and 500.

500 < Number < 750: Number between 500 and 750.

Number > 750: Number greater than 750
So our conditions go that way. While writing the IF statement for cell C3, the rough flowchart goes as follows.
Thus, in the ‘True’ and ‘False’ condition, we will again have to put new conditions for this to work.
Here our IF statement will go as follows, in cell C3.
=IF(B3>500,IF(B3>750,"Number greater than 750","Number between 500 and 750"),IF(B3>250,
"Number between 250 and 500","Number less than 250"))
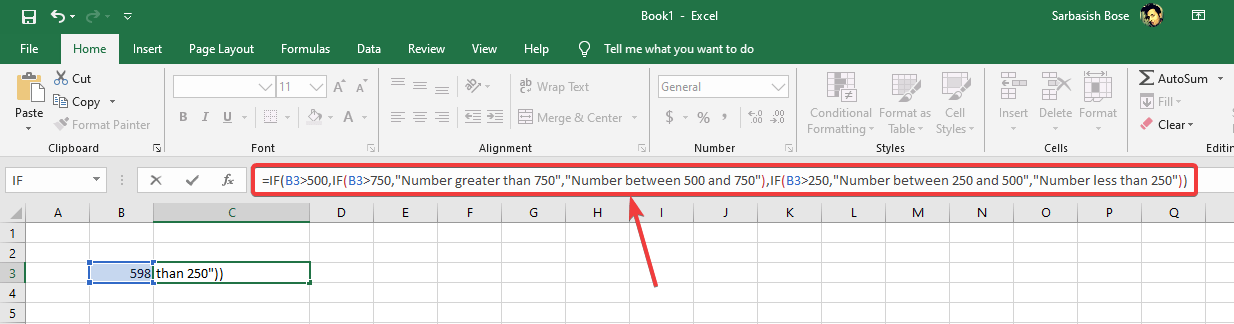
That should be the complete formula, but let me break it down for you to understand it better. I just removed the parenthesis for helping you to understand it better.
IF B3>500, [Condition]

IF B3>750, [Condition if true]

"Number greater than 750",

"Number between 500 and 750",

IF B3>250, [Condition if false]

"Number between 250 and 500",

"Number less than 250"
Here are the outputs in the 4 possible conditions as per the above formula was written.
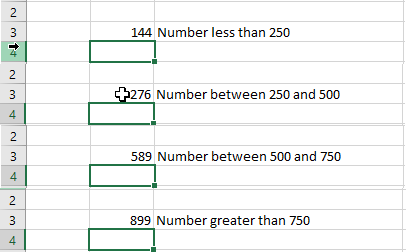
There is no doubt, the complexity increases significantly with nested IF. You can stack it more conditions, but get ready for the complexities that you are going to face. Well, the above formula is not 100% correct, as I have ignored the conditions when the numbers are equal to 250, 500 or 700. It was after all for the purpose of explanation.
So, that was all about, how you can use the IF on Microsoft Excel. Do you have any questions? Feel free to comment on the same below.
Related Posts
How to create data bars in Microsoft Excel for numeric values
How to dynamically adjust column width in Microsoft Excel based on cell contents
How to combine first name and last name or split a name in Google Sheets
How to calculate age with Google Sheets, Microsoft Excel, or any other spreadsheet program
How to use the SUMIF and SUMIFS functions in Microsoft Excel and Google Sheets? A brief guide to conditional summing in spreadsheet programs
How to Group Continuous Records Based on Criteria in Google Sheets