
Koha is an open-source Library software used worldwide by different educational institutes and communities to manage their books. Here we will see the tutorial to know the steps involve in the installation of Koha on Ubuntu 20.04 LTS/Ubuntu 18.04 LTS.
It is a browser-based system that provides:
- Koha is built using library standards and protocols such as MARC 21, UNIMARC, z39.50, SRU/SW, SIP2, SIP/NCIP.
- Multilingual and translatable
- It has a powerful search system and catalogue display that can use content from Amazon, Google, LibraryThing, Open Library, and Syndetics, among others.
- Enterprise-class integrated library system (ILS) with comprehensive functionality including basic and advanced options.
- Magazine management
- Borrowing and user management
- Lists and reports
- OPAC / Discovery system
- Course reservations and local area support
requirements
- Ubuntu 20.04/18.04 or any other Debian based Linux server to execute the steps given here.
- Apache, MySQL or MariaDB, Perl (Will install)
- Root access to the server
Steps to install Koha Library Software on Ubuntu 20.04
Here we will use the Koha official repository to download and install its packages on Ubuntu 20.04, however, the commands are same for Ubuntu 18.04 LTS, Linux or Debian.
1. Add GPG Key
The packages we download have not been tempered, to ensure that, first, we will add the GPG key signed for Koha.
wget -q -O- https://debian.koha-community.org/koha/gpg.asc | sudo apt-key add -
2. Add Koha repository on Ubuntu 20.04
Once the key added successfully, create a separate Koha repo list file and add the repo destination address in that. This will ensure that there wouldn’t be any mess with the official Ubuntu repo while adding a new one.
echo 'deb http://debian.koha-community.org/koha stable main' | sudo tee /etc/apt/sources.list.d/koha.list
To rebuild the APT cache, run the system update command:
sudo apt update
3. Command to Install Koha on Ubuntu 20.04
Once you added the Koha repo, we just need to execute a single command to download and install. Also, it automatically installs the Apache web server, so if you already have it then it is good otherwise leave that on Koha.
sudo apt install koha-common
4. Install MySQL Server and configure a database
By default, on Ubuntu 20.04, the MySQL 8.0 version is available to install, use the below command.
sudo apt install mysql-server

sudo systemctl start mysql
Now, secure your MySQL installation using the command:
sudo mysql_secure_installation
When it will ask for enabling Password Validation component which is the first step in securing MySQL, either you can ignore it or simply select the degree of password complexity you want to set for passwords.
Apart from it simply press Y key or as per your requirements for all coming options.
6. Create a Koha Instance on Ubuntu 20.04
Now, let’s create an instance for Koha:
sudo koha-create --create-db library
You can replace the library with the name of your library or whatever you would like to have. The name which you choose here will configure for apache, MySQL. username and other related components of Koha.
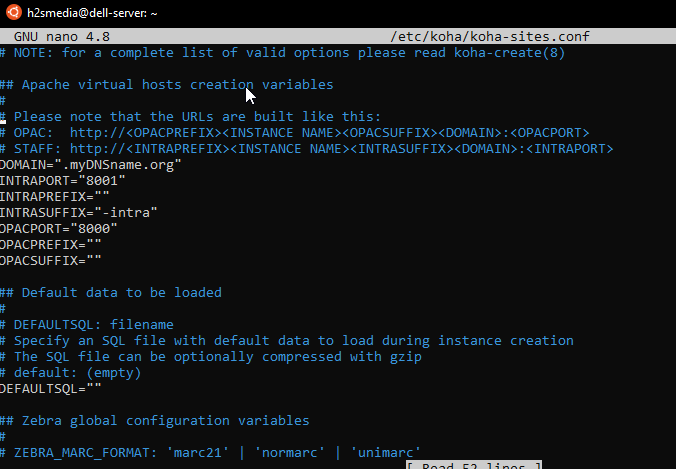
7. Configure koha sites ports
By default, it will use the port 80, however, I want that to be free for other future services on my web server, thus first I will change the default port in Koha sites configuration file.
sudo nano /etc/koha/koha-sites.conf
Here, we change the Intraport to 8001 that will be used by Koha staff client. While leaving the OPAC (catalogue) to 8000.
INTRAPORT=”8001″
OPACPORT=”8000″
To save the file press CTRL+O followed by the Enter key and then CTRL+X.
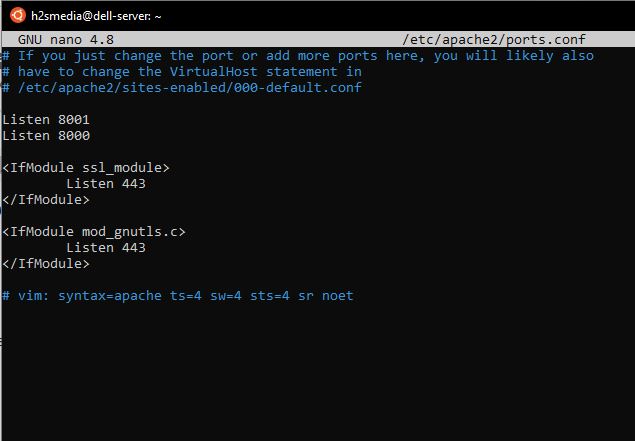
8. Add Koha ports to Apache
Now, tell the Apache on what ports the Koha service is accessible, as in above steps we have used the 8001 for Koha staff client and 8000 for OPAC. Thus, mention the same in the Apache ports configuration file.
sudo nano /etc/apache2/ports.conf
Replace the line Listen 80 to following given one.
Listen 8001
Listen 8000
Save and Close – Ctrl+O and Ctrl +X.
8. Create Apache configuration files.
sudo a2enmod rewrite
sudo a2enmod cgi
sudo a2dissite 000-default
sudo a2enmod deflate
sudo a2ensite library

Note: Replace the library with the Koha instace you have created in step 6
Restart Apache
sudo service apache2 restart
9. Zebra rebuild command
koha-rebuild-zebra -v -f library
10. Set password for the DB created by Koha
sudo mysql -u root -p
use mysql;
ALTER USER 'koha_library'@'localhost' IDENTIFIED WITH mysql_native_password BY 'h2smedia';
Note: Change h2smedia with the password you want to use. Remember this password will also use as administrator password to login Koho.
flush privileges;

SET GLOBAL sql_mode='';
quit;
11. Change the password of the koha library database
To see the login password, you can use the command:
sudo koha-passwd library
To manually change the default password created by the Koha, you can use the command:
sudo nano /etc/koha/sites/library/koha-conf.xml
Scroll down to the last and inside configuration change password.
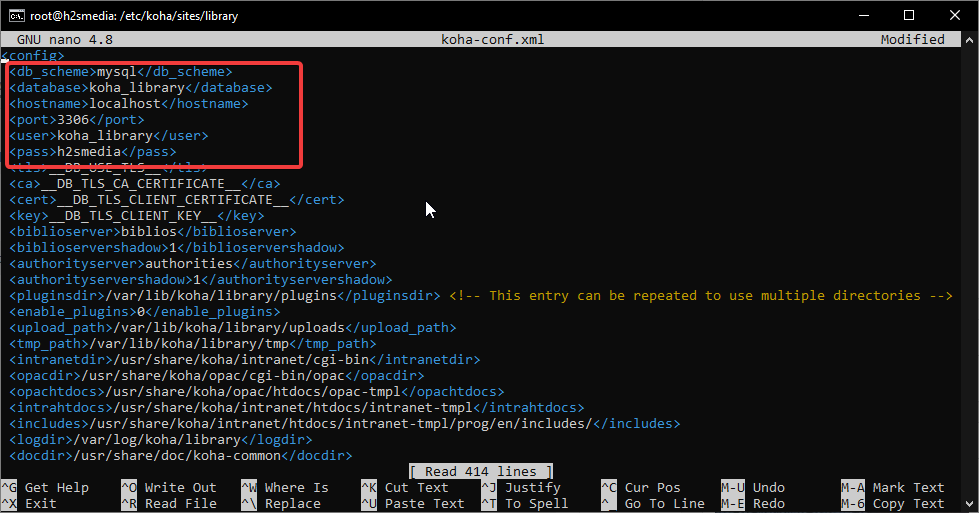
Note: Change the library with your library name.
12. Restart memcached
sudo service memcached restart
13. Login to Web installer of Koha
http://localhost:8001 (Staff client)
http://localhost:8000 (Online catalogue)


Hi! Thanks for sharing. I installed koha just as shown but i could not get to the koha web installer page. I landed on Apache2 Ubuntu Default Page. I will really appreciate your help. Thanks
Hi, I am installing KOHA on Ubunti 20.04 and I followed your installation instructions here very closely. Everything went find up until
koha-rebuild-zebra -v -f library
where I got lots of errors of the following kind:
DBD::mysql::db do failed: Table ‘koha4_koha4_lib.systempreferences’ doesn’t exist for statement…
My library instance is called “koha4_lib”. I notice that it references “koha4_koha4_lib.systempreferences”
and I don’t know where this extra koha4_ prefix comes from. I suspect that’s the reason… but what can I do now?
Thanks in advance!
Hey Andre,
I ran into the same issue. It seems it is not meant to be called before running the webinstaller. Try creating a new instance. (No need to install the packages again.) Before doing the zebra go to the webinstaller. I didn’t try running it afterwards. I hope it will work if I need to do it later on. It’s supposed to be called regulary by a crontab.
Regards
Hi… I successfully install KOHA with your instruction, but Step 13 This site can’t be reached X.X.X.X took too long to respond. Any suggestion.
sudo koha-rebuild-zebra -v -f library
is taking a long time without giving any feedback