Virtual drives are nothing new in the world of technology, and if you often deal with virtual machines, you surely know about, what virtual drives are. Even if you are not dealing with virtual machines, virtual drives can still be useful in a number of circumstances, like if you want to encrypt certain files, but not the complete drive, or if you are looking for more flexibility for the files, which are stored within a virtual drive. Depending upon the given set of circumstances that you are dealing with there are unlimited possibilities with a virtual hard drive. There is another advantage of virtual drives, as well.
If you are dealing with multiple virtual machines, and you need a certain set of files for access, on all the virtual machines, you can better keep everything within a virtual drive, and connect them from time to time, on multiple virtual machines, for easy access. Now, depending upon which virtual machine platform that you are using, the process to mount a virtual drive will vary slightly on VMware Workstation Pro and Oracle VirtualBox. But there aren’t any major differences. Most people, on their virtual machines, just keep only a single virtual drive, as virtual machines are virtual machines, and you don’t need to organize files in multiple partitions as you do on your physical machine.
So, without any further delay, let’s get started with how you can mount individual virtual drives on guest operating systems, running on VMware Workstation Pro and Oracle VirtualBox.
If you do not know how to create a virtual drive on Windows, you can find my tutorial here.
Mount Virtual drive On Oracle VirtualBox
Let’s first start with VirtualBox tutorial to know the steps which we need to follow to mount already existing virtual drives on any guest operating system running on it.
1. Go to Settings
Considering now, that the virtual drive is ready, and the guest operating system is powered off, right-click on the virtual machine, and click on ‘Settings…’. You can also click on ‘Settings’ in the toolbar after you select the target virtual machine.

2. Select Virtual Box Storage
Now, in the ‘Settings’ window, click on the small ‘+’ icon under the ‘Storage’ tab.

3. Choose existing Virtual disk
Next, click on ‘Choose existing disk’ to open choose the virtual hard drive that is located on one of your local drives.

A list of recently used virtual hard drives will be displayed. Odds are, you will be using one of the recent drives. To add a new drive, click on ‘Add’ to locate the virtual hard drive, and click on ‘Open’.

4. Select Virtual Drive to Mount
Next, the selected virtual hard drive will be selected for you. Just click on ‘Choose’ and proceed.

Lastly, click on ‘OK’, and exit the window.

Next time, you boot into the or guest OS, you can find the virtual hard drive mounted on the virtual machine.
On VMware Workstation Pro
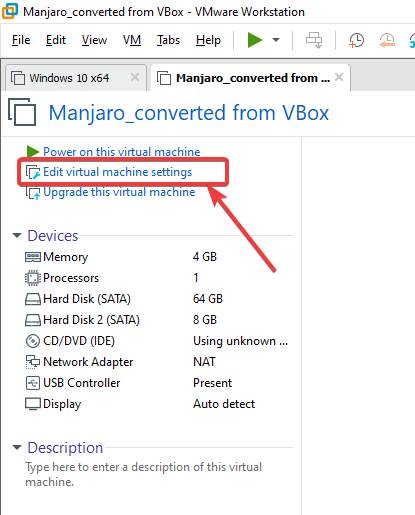
1. Edit virtual machine settings
Open VMware Workstation Pro, select the virtual machine, where you want to mount the virtual hard drive. After that, click on ‘Edit virtual machine settings’.
2. Hardware- Hard disk
Under the ‘Hardware’ tab, click on ‘Hard Disk’ to select it, and then click on ‘Add…’.

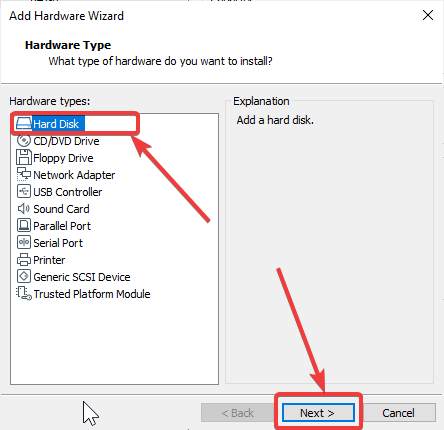
Among the Hardware types, you will have to click on ‘Hard Disk’ and then click on ‘Next’.
Next, you will have to choose the disk type. Change the selection to ‘SATA’, and then again click on ‘Next’.

Now, you can either create a new virtual hard drive or choose an existing virtual drive. Just select ‘Use an existing virtual disk’, and click on ‘Next’.

Click on the ‘Browse’ button to choose the virtual hard drive that you want to mount. Under type, change it to ‘All Files (*.*)’for selecting the virtual hard drive in VDI or other formats, and click on ‘Open’. After that, click on ‘Finish’.

VMware will give you an option to change the virtual disk to a newer format. If you want to use the same virtual disk in other older virtual machines, just click on ‘Keep Existing Format’.

In the ‘Virtual Machine Settings’ window, you can see the new virtual hard drive added. Just click on ‘OK’ to exit the window, and proceed with booting into the virtual machine.

So, that way, you can mount virtual hard drives on your virtual machines. Depending upon, which guest machine you are running, you will get to see the virtual hard drive within ‘My Computer’ in case of Windows, and in case of Linux, you can get it within the default file manager. You can repeat the same steps to mount multiple virtual hard drives, and that should work perfectly fine.
But one thing that you should note is that the virtual hard drive can be used only by a single virtual machine at a time. If you try mounting one virtual hard drive on multiple guests operating systems, either in one or multiple virtual machine platforms, it will successfully be mounted only on the first guest OS.
So that was all about, how you can mount virtual hard drives on guest operating systems hosted on Oracle VirtualBox and VMware Workstation Pro. Do you have any questions? Feel free to comment on the same below.
Related Posts
How to create email groups in Gmail? Send one email to multiple recipients in a matter of seconds.
Getting the right dashcam for your needs. All that you need to know
How to Install 7-Zip on Windows 11 or 10 with Single Command
How to Install ASK CLI on Windows 11 or 10
How do you install FlutterFire CLI on Windows 11 or 10?
How to create QR codes on Google Sheets for URLs or any other text elements