What is OneinStack? It is an active project that uses to set up an environment for the development of PHP/JAVA applications in just one-click on Linux operating systems such as CentOS (including Redhat), Debian, Ubuntu, Fedora, Deepin, Amazon Linux and other same family Distros.
Just like WAMP or XAMPP server for Windows, OneinStack allows creating different Linux web server environment such as:
- Lnmp(Linux + Nginx+ MySQL/MongoDB+ PHP)
- Lamp(Linux + Apache+ MySQL/MongoDB+ PHP)
- Lnmpa (Linux + Nginx+ MySQL/MongoDB+ PHP+ Apache): Nginx handles static, Apache handles dynamic PHP
- Lnmt (Linux + Nginx+ MySQL/MongoDB+ Tomcat): Nginx handles static, Tomcat (JDK) handles JAVA
- Lnpp(Linux + Nginx+ PostgreSQL+ PHP)
- Lapp(Linux + Apache+ PostgreSQL+ PHP)
- Lnmh(Linux + Nginx+ MySQL+ HHVM)
All the above-mentioned web servers combination can be installed using pre-given OneinStack script.
OneinStack updates are timely which makes it very reliable to use. The script of OneinStack provides a wide range of features such as:
- All the command and auto installation will be done in Terminal only using the command line. Good for server usage.
- Most of the time up to date.
- Some security optimization
- Wide range of database versions (MySQL-8.0, 5.7, 5.6, 5.5; MariaDB-10.4, 10.3, 10.2, 5.5, Percona-8.0, 5.7, 5.6, 5.5, AliSQL-5.6, PostgreSQL, MongoDB)
- Multiple PHP versions (PHP-7.3, 7.2, 7.1, 7.0, 5.6, 5.5, 5.4, 5.3)
- Provide Nginx, Tengine, OpenResty and ngx_lua_waf
- Tomcat version (Tomcat-9, Tomcat-8, Tomcat-7, Tomcat-6)
- JDK version (JDK-11.0, JDK-1.8, JDK-1.7, JDK-1.6)
- Apache version (Apache-2.4, Apache-2.2)
- OneinStack provides option to install PHP Cache Accelerator provides ZendOPcache, xcache, apcu, eAccelerator. And php extensions, include ZendGuardLoader, ionCube and more… can be installed with one click.
- Installation of Pureftpd, phpMyAdmin, memcached, redis
- Provide upgrade script for above-mentioned tools
- Virtual host script
- Support local, remote(rsync between servers), Aliyun OSS, Qcloud COS, UPYUN, QINIU, Amazon S3, Google Drive and Dropbox backup script
- And more…
It also comes with the Let’s Encrypt certificate that means those want to use the SSL certificate for their project; just only need to enter the domain name with you want to use SSL. After that, it automatically configures the SSL certificate for the domain name. Moreover, OneinStack will also set the auto-renewal of Let’s Encrypt certificate.
The OneinStack project is available on GitHub and free to download, install and use.
Install OneinStack on Ubuntu/Debian/CentOS Linux OS
The below given steps will work on Ubuntu 19.04/18.04, 16.04 up to 12.04; Debian, Linux Mint, Elementary OS and other Debian based OS including CentOS / Redhat.
Step 1: Open Command Terminal
If you are on command line server then simply move to the next step and for those using GUI desktop, go to Applications and search for Terminal, when appears, click to open. Alternatively, you can use keyboard shortcut CTRL+ALT+T, however, this shortcut only works mostly on Ubuntu or its counterpart.
Step 2: Install Wget on Ubuntu/CetnOS
Although wget comes installed by default, however, if you don’t have it on your system then first install it. The command for that:
For Ubuntu/Debian
sudo apt-get -y install wget screen
For Centos/RedHat
sudo yum -y install wget screen
Step 3: Download OneinStack file containing source code
Now, with the help of wget we download the Tarball compressed file of the OneinStack that contains script we need to install it. It also contains the source code of this tool.
You can use any one of the given commands to download it.
wget http://mirrors.linuxeye.com/oneinstack-full.tar.gz

or

wget http://mirrors.linuxeye.com/oneinstack.tar.gz

or

wget http://downloads.sourceforge.net/project/oneinstack/oneinstack-full.tar.gz

or

wget https://www.dropbox.com/s/iampc7prd9y7cqf/oneinstack-full.tar.gz
Step 4: Extract OneinStack Tarball file to install
After downloading it in the above step; use a command:
ls
It will show all the available files under your home directory including the OneinStack downloaded one.
Now extract the file’s content:
tar xzf (filename)
so that command will be:
tar xzf oneinstack-full.tar.gz
Step 5: Enter into the directory
Now get into the directory above the extracted file using the command:
cd oneinstack
Step 6 Run OneinStack installation script
Now here is the deal, every time you want to set up some web server or any other thing like Database, PHP, PhpMyAdmin, etc. You just have to run OneinStack script. The command is:
sudo ./install.sh
Here we are just giving you a glimpse all the things which we can setup using OneinStack:
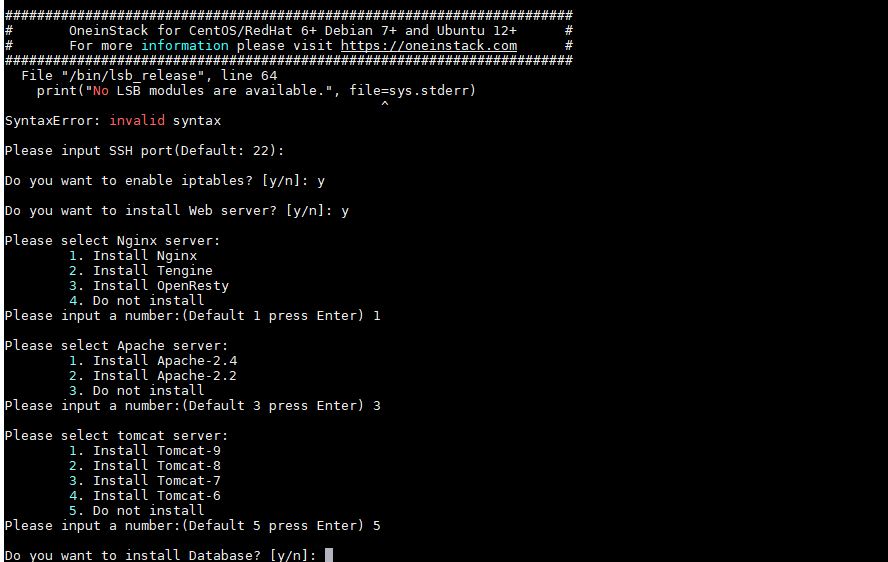
The moment you run it, it will start giving a command line wizard to configure different elements:
The script will let you choose whether to install Nginx, Apache, etc. Choose things to install according to your own needs.
Nginx, Apache and Tomcat server
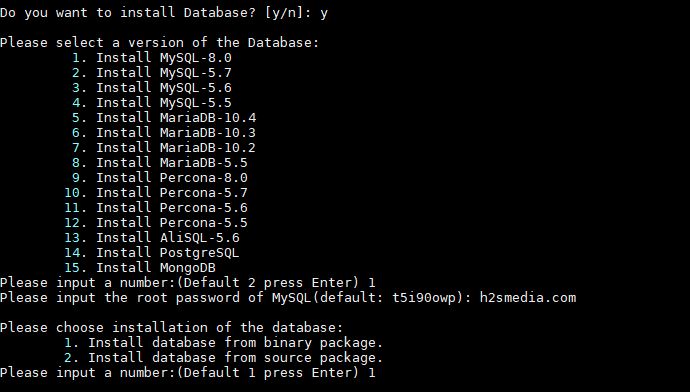
Database Server
You will then be asked to choose the MySQL database version on OneinStack. Currently while writing this article the 8.0 version was the latest one with improved performance. However, before choosing any of them make sure your program would have compatibility with the latest one, if not then opt the one which has or lower. After that enter the password for the database root user.
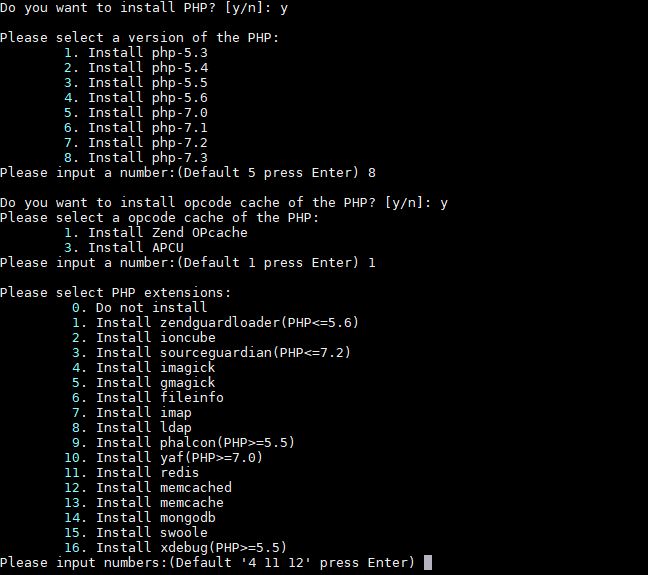
PHP version needs to be installed
Now, it will ask you which PHP version you would like to set on your server for testing web applications. Select one that your project supports becuase of optimized performance. Besides the PHP, the OneinStack will also give the option to configure the Opcode cache simultaneously. Select anyone between Zend OPcache and APCU.
Furthermore, if the web application you are about installing on your system using this script, requires some specific PHP extension then you select them from the given list. Simply enter the serial number of that. By Default, it will be 4, 11, 12.
If not sure about this, then simply press enter for Default options.
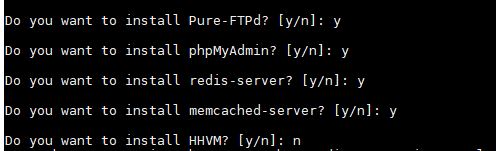
Other miscellaneous things
It depends on your own requirements like Pure-FTPd, PhpMyAdmin, redis-server, memcached-server and HHVM, if you want any of them, then select Y option accordingly.
While OneinStack installing all the tools which take some time depending upon your internet connection, so, you can grab a cup of coffee.
After installing, it will ask you to restart the system to check whether all services are working properly.
Step 7: Open OneinStack default page
Once the installation is done and the system restarted, open system browser and enter your system IP address. If you are using command-based server then you can use any other system (Windows/Linux/MacOS) on the same network and open OneinStack installed system’s IP address.
On the Control Center page, you will get all options to access installed applications directly.

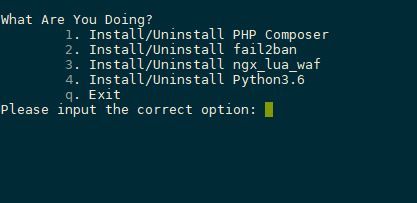
Step 8: Install OneinStack Add-ons
It also offers different add-ons. To install them, switch to OneinStack directory and run addon script
cd Oneinstack
sudo .addons.sh
You will get options to install are PHP composer, fail2ban, ngx_lua_waf and Python3.6
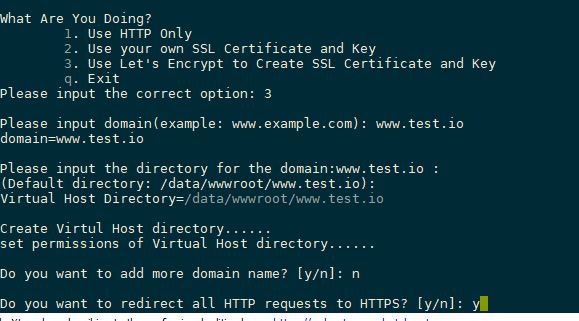
Step 9: Let’s Encrypt to Create an SSL certificate and key
If you have some domain then you can install your own free SSL certificate and for that first simply add your system IP address for A record in your Domain DNS. After that simply run the following, you should be in the directory of OneinStack.
sudo ./vhost.sh
Follow the guided steps appears on your screen. While setting up the SSL, it will also ask you to choose program rewrite rules, for that it offers popular programs such as WordPress, Opencart, larvelDZ, nextcloud, typecho and more.
To delete created virtual host in the future, use the below command:
vhost.sh --del
How to manage OneinStack services
- Nginx/Tengine/OpenResty:
-
sudo service nginx start
-
sudo service nginx stop
-
sudo service nginx status
-
sudo service nginx restart
-
sudo service nginx reload
-
sudo service nginx configtest
-
- MySQL/MariaDB/Percona:
-
sudo service mysqld start
-
sudo service mysqld stop
-
sudo service mysqld restart
-
sudo service mysqld reload
-
sudo service mysqld status
-
-
PostgreSQL:
-
sudo service postgresql start
-
sudo service postgresql stop
-
sudo service postgresql restart
-
sudo service postgresql status
-
- MongoDB:
-
sudo service mongod start
-
sudo service mongod stop
-
sudo service mongod status
-
sudo service mongod restart
-
sudo service mongod reload
-
- PHP:
-
sudo service php-fpm start
-
sudo service php-fpm stop
-
sudo service php-fpm restart
-
sudo service php-fpm reload
-
sudo service php-fpm status
-
- HHVM:
- #centos7
sudo systemctl {start|stop|status|restart} hhvm#centos6
sudo service supervisord {start|stop|status|restart|reload}
- #centos7
- Apache:
-
sudo sudo service httpd start
-
sudo sudo service httpd restart
-
sudo sudo service httpd stop
-
- Tomcat:
-
sudo service tomcat start
-
sudo service tomcat stop
-
sudo service tomcat restart
-
- Pure-FTPd:
-
sudo service pureftpd start
-
sudo service pureftpd stop
-
sudo service pureftpd restart
-
-
Redis:
-
sudo service redis-server start
-
sudo service redis-server stop
-
sudo service redis-server status
-
sudo service redis-server restart
-
sudo service redis-server reload
-
- Memcached:
-
sudo service memcached start
-
sudo service memcached stop
-
sudo service memcached status
-
sudo service memcached restart
-
sudo service memcached reload
-
How to upgrade Oneinstack
Inside the directory of this tool upgrade script is present run that when an update is available for this tool.
sudo ./upgrade.sh
How to uninstall Oneinstack
sudo ./uninstall.sh
Related Posts
How to create email groups in Gmail? Send one email to multiple recipients in a matter of seconds.
Getting the right dashcam for your needs. All that you need to know
How to Install 7-Zip on Windows 11 or 10 with Single Command
How to Install ASK CLI on Windows 11 or 10
How do you install FlutterFire CLI on Windows 11 or 10?
How to create QR codes on Google Sheets for URLs or any other text elements