Windows To Go (WTG) is the feature released by Microsoft in 2011 that allows the user to install and use Windows 8 or Windows 10 directly from a USB drive or external HDD.
Yes, if you are a macOS or Linux user and don’t want to install Windows 10 on your main PC then it is possible to enjoy it directly from a USD hard disk or the flash drive. Although we can create virtual machines, due to limited resource laptops or PC, it could not give the best performance at all. In that situation, using Windows To Go, is really a good idea.
With the help of this Windows feature, we can easily carry it on a USB storage device without worrying or filling up the limited storage space of your computer’s internal storage space.
Windows To Go supported operating systems:
- Windows 8/8.1/10 Enterprise Edition
- Windows 10 Education Edition
- Windows 10 Professional Edition
Note: Feature that allows creating Windows To Go, without using any third-party tool is not available anymore in Windows 10 2004 or later versions. The main reason for removing this inbuilt feature, that lets users set up Windows To Go Pen Drives is that it can’t support updates, thus after sometimes our portable Windows 10 installation could become vulnerable. However, you can still use third-party software such as Rufus to create WTG USB drives.
Let’s see how to install Windows 10 or 8 on USB Flash Drive for portable use
Things you need to perform the following steps.
- 32 GB or above USB. You can also use an external USB HDD as well.
- Rufus software
- Supported Windows operating system ISO image.
Step 1: Download the Windows 10 preview ISO to experience this, if you don’t have a compatible bootable image. Here is the link for that. Remember, to download the ISO you should have a Microsoft account, if you don’t have then simply register one, it is free.
Step 2: To create Windows To Go USB drive get the executable file of Rufus from Rufus.ie. This is a free tool that we can use to create a Linux bootable USB drive as well.
Step 3: Plug-in the USB Flash Drive or Hard Disk to system and run the Rufus software.
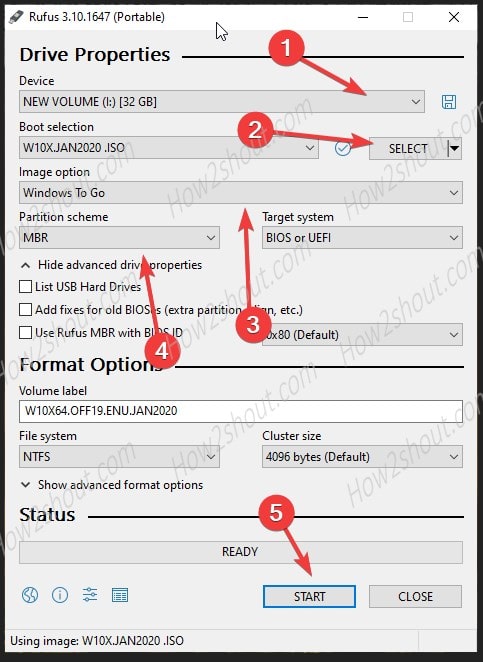
Step 4: Under Device, click on the Drop-Down box and select the connected USB drive that you want to use for Windows To Go.
Step 5: Next is Boot Select, click on the “SELECT” button and choose the Windows 8 or 10 ISO image you have.
Step 6: In the “Image Option” drop-down instead of Standard Installation select the “Windows To Go“.
Step 7: For Partition Scheme, select MBR, this supports both BIOS or UEFI.
Step 8: If you want, you can change the name of the Volume as per your choice.
Step 9: Finally click on the “Start” button to initiate the process of creating a Windows To USB.
Step 10: The software will push a message that all data resides on the USB drive will destroy. Just hit the OK button to accept it. Wait for a few minutes.

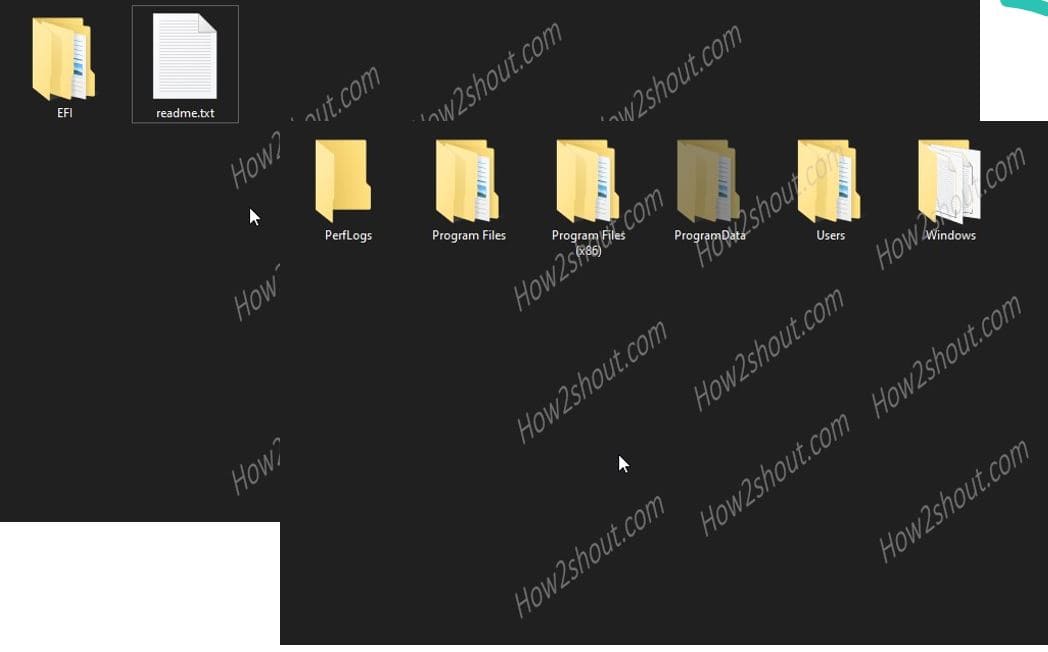
Step 11: Once the Windows 10 installation on a USB drive is completed, you will have two partitions on your Drive, one is for the system that holds the boot information, and the second one Windows core and other files such as Program Files and more…

Step 12: Now, boot your system and from the boot menu which generally appears via F9, F7, F8, F12, Esc, or Del key, however, it solely depends on the manufacturer of your motherboard BIOS. Moreover, when we boot our system, it shows the “key” for the very short time that we can use to get the BIOS menu. So, when you have that, set it to boot from Windows To Go USB drive.
Note: You just have created a Media that uses the UEFI: Bootloader. Please remember that. to boot this media, You must disable secure boot, in case it is active.
Step 13: Now you will have your portable Windows 10 OS that has been installed on a USB drive. Also, keep one thing in mind if you are using a USB drive then don’t install too many software because that ultimately going to consume your Pen drive or external Hard disk you have used to set it up. Instead choose any other internal drive for installing tools, games, or software. In this way, the portable Flash drive will have free space for OS operations.
In case, you face any let us know, the comment section is all yours!!
Related Posts
How to Change WIFI or Ethernet MAC address on Windows 11 or 10?
How to create email groups in Gmail? Send one email to multiple recipients in a matter of seconds.
Getting the right dashcam for your needs. All that you need to know
How to Install 7-Zip on Windows 11 or 10 with Single Command
Install Google Earth on Windows 11 or 10 Using a Single Command
How to install Gaming Services on Windows 11