XPG offers a variety of PC peripherals from budget to premium range, today we have XPG Starker AIR Compact Mid-Tower Chassis to review.
The full name of XPG is “XTREME PERFORMANCE GEAR”, a high-performance brand under ADATA Group. It has a good reputation among the gaming community and after years of hard work, its products range not only includes memory and SSD but also power, CPU coolers, chassis, keyboard, headsets, and mouse around the theme of e-sports and games in recent years.
Out of its Chassis product range, one is XPG Starker, a budget-friendly CPU cabinet for building mid-range gaming personal desktops. It sports a magnetic front panel with a quick-release feature, vertical installation of graphics cards, and 1 high-performance ARGB fan and ARGB light strips for those who love RGB lighting effects.
XPG Starker Chassis Review
Key specifications
| Chassis model | XPG Starker AIR |
|---|---|
| Exterior dimensions | Width: 215mm, height: 465mm, length: 400mm |
| Material | Galvanic steel plate & tempered glass side plate |
| Motherboard compatible | Mini-ITX, M-ATX, ATX |
| Front I/O interface | 2x USB 3.0, 1x composite audio interface |
| LED module | 2x front panel addressable RGB light emitting module |
| Vertical graphics card support | Yes, the PCI-E adapter cable needs to purchase separately |
| Hard disk support | Supports up to 4x 2.5″ hard disks, up to 2×3.5″ hard disks |
| Water-cooled radiator support | Front: 360mm radiator top: 240/280mm radiator Rear: 120mm radiator |
| Graphics card support | The regular installation supports a length of 350mm, vertical mounting graphics card supports a length of 350mm |
| Air-cooled radiator support | Up to 165mm |
| Number of expansion slots | 7x Slot |
| selling price | The black color is 4,999 INR and the Pink color at 5,327 INR |
XPG Starker chassis has two – black and white versions, apart from them Pink version is also available that we have here for review. To see through the internal components Starker uses a 4mm tempered glass see-through design, supporting a vertical graphics card and 220mm length power supply, graphics card mounting position has 350mm space.
Easy-to-understand design
XPG Starker mid-tower chassis with an overall size of 465(H)*400(L)*215(W)mm, based on iron metal, and one of the side panels is made of tempered glass, its overall appearance gives the impression of simplicity.
The design of the front panel of the chassis is also simple style, with a grille design and an XPG logo. Its outermost layer is a metal panel that is removable. It uses a magnetic quick-release design. Behind that, a high-strength engineering plastic frame holding plastic mesh, removable by sliding upper side, which can ensure ventilation while also playing a role in dust prevention.

Dust net combined with the metal mesh design of the front magnetic panel, can prevent dust from being sucked into the inside of the chassis to the greatest extent, so as to avoid dust adhering to the internal components, and improve the service life and heat dissipation effect of the whole machine. However, from time to time cleaning the Dust net is necessary, to avoid airflow blocking.


The front of the chassis also hides 2 ARGB light strips on the right and left side of the front end, which can cooperate with other hardware for ARGB lighting effects to provide users with a feast of lights.

The top of the chassis is also made of metal, the overhead I/O interface is a more common configuration, providing 2 USB 3.0 interfaces and 1 headset 2-in-1 interface, the power switch is a triangular design, and the circular button next to it is the lighting effect switch button of the RGB lighting controller included with the chassis. Well, the placement of buttons and USB interface on top is on the right side rather traditional front.

One thing I forget to tell, the Top side of the Starker cabinet is also protected with a dust screen protector with a magnetic base. You can see that the fan space is very large, and it can be installed with two 120mm fans or two 140mm fans.

The bottom of the chassis is equipped with large air vents to meet the heat dissipation needs of the extended ATX power supply. However, unlike the top dust screen, the bottom one is attached to metal grooves, so removal and installation are very old-fashioned. It should be attached to a plastic tray as we see in XPG’s other gaming chassis such as XPG Invader.

Just aside from PSU unit space, XPG starker offers a hard disk rack in a detachable design, and there are two positions adjustable, the one is closest to the power supply so that users can install the front fan or front radiator. Of course, users can also mount the drive cage close to the front of the chassis to free up more space for the extended ATX power supply.

From the rear of the chassis, it can be seen that its PCI slot adopts a 7+4 design, of which 7 are horizontal PCI designs and 4 are vertical PCI designs (with the help of vertical VGA Bracket), mainly used to install graphics cards vertically.
The rear fan position is a single 120mm, which can be arranged according to the installation of other hardware.

XPG Starker Case Interior design
Now let’s take a look at the internal design of the XPG starker, as a regular PC cabinet design, it also uses the upper-left middle portion to hold Mini-ITX and Micro ATX, and ATX form factor motherboards. As we already have seen for hard disk and PSU there is a separate compartment at the bottom side. If the CPU uses a tower air-cooled radiator, it can install products up to 165mm, and the graphics card installation space is 350mm long.


Well, the internal design is not much different from our already reviewed Corsair iCUE 220T RGB Airflow Mid Tower Case, you can check it out.
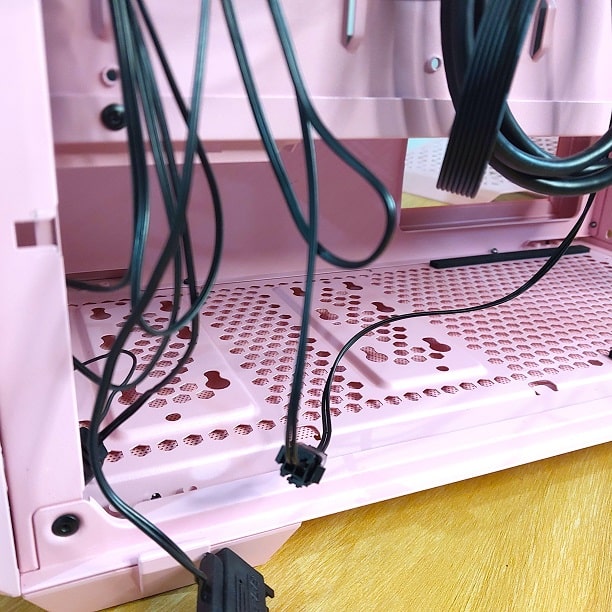
For the proper arrangement of cables, 5 relatively large openings are also installed with rubber gaskets, which have both a protective and beautifying effect. There are also large openings on the motherboard bracket so that users do not need to remove the motherboard when installing or replacing the CPU cooler.


As this XPG PC case comes with 4mm Glass, hence, you definitely don’t want to clutter your cables. Therefore, the left side has a design for cable routing and the depth of the cable management space is about 25mm, which is basically enough.

Further, the same side also has space for two 2,5″ SSD or Hard disks. This is apart from the area dedicated neat the PSU for installing two 3.5″ hard disks or 1 x 3.5 and 1x 2.5 drives. Therefore in total, a PC user can install 4 hard drives on XPG Starker. Near PSU – two 3.5-inch or two 2.5-inch hard disks, and the others are on the back of the motherboard bracket, with two 2.5-inch hard disk slots.


For cooling, the XPG starker offers ample space and options. Three sets of fan mounting positions are given in front, if they are 120mm whereas if you are using 140mm then only two.
In the same way, the Top of the Chassis can hold two fans of 120mm or two fans of 140mm. The rear one already has one 120mm fan and it can only support and hold one of that size.
All three positions can hold one radiator, here are the sizes:
- Front- 360 or 280 or 240 mm
- Top: 280 or 240 or 120 mm
- Rear: 120mm
There are 2 pre-installed fans, 1 at the rear, and 1 at the front, all of which are XPG’s own fan products, using the 3-pin power supply and supporting the ARGB lighting effect. Only the rear one supports (RGB).

The interior of the XPG starker is well-designed, which can be identified by the holes given to easily route the PCI-E external power supply line if graphic cards are placed vertically. This also helps when we use PCI-E x16 extension cable for vertical alignment of GPUs.
Efficient air duct design
The overall air duct design of a chassis directly affects the efficiency of heat dissipation. In XPG starker, it can be seen that its front is the main air inlet, the rear part is mainly used for air outlets, and the top position can be used for air intake or outlet according to the needs of gamers.
As we know the hot air rise up, hence we have used the top side of the chassis as an air outlet. To test it we placed an air-cooled radiator, the radiator’s fan was running at full speed during the test. The chassis fan is configured as a full front inlet fan, with 1 rear outlet, the speed of the chassis fan is controlled at 1000RPM
During the test, we adjusted the speed of all chassis fans to 1000 RPM. After our test, the temperature of the two temperature measurement points in the XPG starker chassis is 25.3 °C and 23.8 °C, and the ambient temperature is 22.6 °C, which belongs to the range of very excellent heat dissipation performance.
Instead of using benchmarks, we used real high-end games such as Call Of Duty: Modern Warfare 2 and Horizon Zero Dawn. The CPU was only on average around 65 degrees most of the time while the GPU was between 70 to 80 degrees. The overall performance after 3 to 4 hours of playing was very stable. If you go for some water cooling system, overall cooling performance may be even better.
It is worth mentioning that we recommend players choose 3 front fans to bring better results than “2 in and 1 out”. Of course, if you plan to use the front 360mm radiator, you don’t need to think too much.
The standard dust net, fan, and lighting system fully reflect the practical value of the XPG Starker, and the measured heat dissipation efficiency has reached A-level for a mid-range gaming PC, with rich extended installation and overall performance. XPG Starker comes with a tempered glass side through the panel,1 ARGB fan (rear), and 2 ARGB light strips, if you like ARGB lighting effects, then we believe that the XPG Starker chassis is also a good choice, and will not make you regret it at 4,999 INR price. However, if it feels slightly overpriced or not under your budget then there are options online to go for.
Pros:
- Glass Panel
- Dust filters
- Multiple colors availability
- Supports all major motherboard form factors and standard radiator sizes
Cons:
- Tad high in price
- Only one ARGB fan
- No USB-C on Top-front panel
- Hard drive mounting is on a screws bracket rather than sliding
Related Posts
What is a juice-jacking attack? How can we be safe from such attacks?
Getting the right dashcam for your needs. All that you need to know
WhatsApp iPad App Gets Major Overhaul, Adds New Communities Feature
Moto G85 5G launched in India but is unlikely to beat VIVO or XIAOMI
Rise of deepfake technology. How is it impacting society?
Smartphone Apps Get Smarter- Meta AI’s Integration Across Popular Platforms