
Installing WordPress in a Subdirectory is very easy like setting up a new WordPress-based website on your Subdomain; What you need is just a bit of understanding of the technology. People who want to run multiple WordPress instances without changing the root domain can go either for the Subdomain or Subdirectory method. The core benefit in both cases is your root domain will be the same.
Installing the second WordPress in a subdirectory not only gives you a way to start a new niche website or blog under the same domain name but also helps boost your new WordPress website ranking. Here, today in this tutorial we will let you know, how to install a new WordPress instance in a Subdirectory without messing up with the parent or root domain.
Now the question is, what is the difference between Subdomain and Subdirectory WordPress installation?
The core difference between the installation of WordPress in the Subdirectory and Subdomain is the URL structure.
Generally, your main domain is in the form of www.example.com but to run multiple websites, let’s say WordPress based blog on your existing domain then you need to go for one of the options:
Subdomain:
If you want to start a blog on your existing parent domain website as a subdomain then the URL structure will be blog.example.com.
Subdirectory:
However, in the case of Subdirectory installation of a WordPress blog; the structure will be like www.example.com/blog
Now which is one better; Subdirectory or Subdomain from an SEO point of view…
The working, Look & feel, and management of the second WordPress instance installed in a subfolder or on a Subdomain are the same. The thing that can affect a bit your new website is SEO because the search engines will consider the Subdomain websites as totally different or new websites and rank them according to that. The website installed in the Subdirectory can get benefits of your root domain authority and would rank higher in most of the cases as compared to the Subdomain.
Also, the URL structure of the Subdirectory looks more familiar and if you create a link for it in your root domain website menu then the user can easily come and navigate to your new website from the main website.
How to install WordPress in a subdirectory to root
Step 1: Create a Subdirectory
To create a Subfolder or directory, either you can log in to your web hosting CPanel to access File Manager or just use an FTP client like FileZilla to connect the WordPress hosting. Here in the tutorial, we are using the CPanel because we also need to create a separate database.
Step 2: Log in to Cpanel and open File Manager
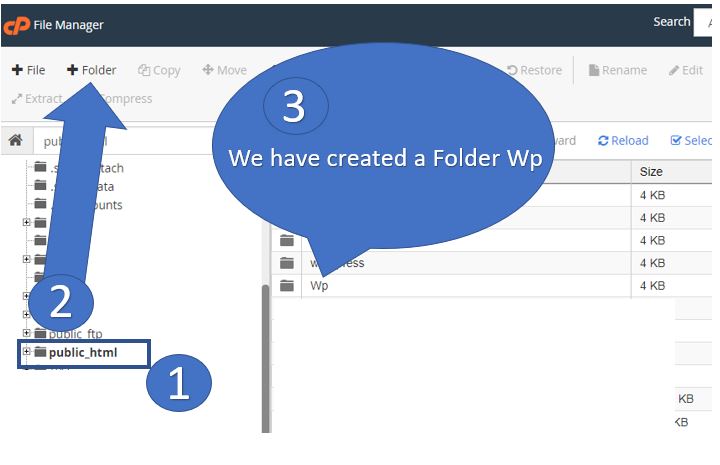
1. From the Cpanel select the File Manager option and you will see all your hosting files and folders. Now, you need to select the root folder of your main website, which usually resides under the/public_html/ folder. If your main or parent website is on WordPress then you will see all your WordPress files and folders there.
2. To create a new folder you will find an option called Folder. Click on that and create a folder or subdirectory with a name that you want to give to your new website. For example, if you want to create example.com/blog then the folder name will be a blog. Here in this tutorial, we have created a name of Wp; this means our new website subdirectory URL will be example.com/wp.
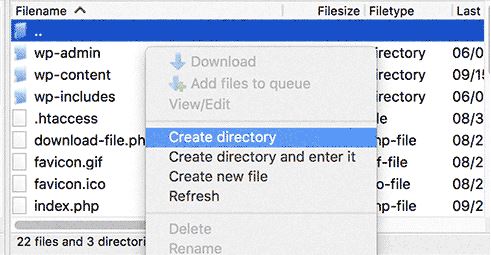
If you are using an FTP client then just need to right-click and select the option “Create directory“.
Step 3: Upload WordPress installation Files to Subdirectory
1. Inside your newly created directory or folder which is empty right now; need to upload the WordPress files to install it on your new website.
2. Go to WordPress.org and click on the download button.

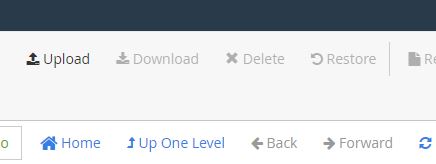
3. Open the newly created folder in Cpanel File Manager and find the option Upload. It will appear on the top of the menu bar. Click on it and upload the downloaded WordPress.zip folder.
4. When you click on upload a new window will open from where just click on the Choose File button and upload the WordPress zipped file.

After uploading, select the extract option either from the file manager menu bar or right-click on the WordPress.zip folder and Extract it.
Once it is extracted you will see a WordPress folder. Open it and you will see all installation files and folders.
Select them all… Now select the move option from the File menu or just right and select the Move.
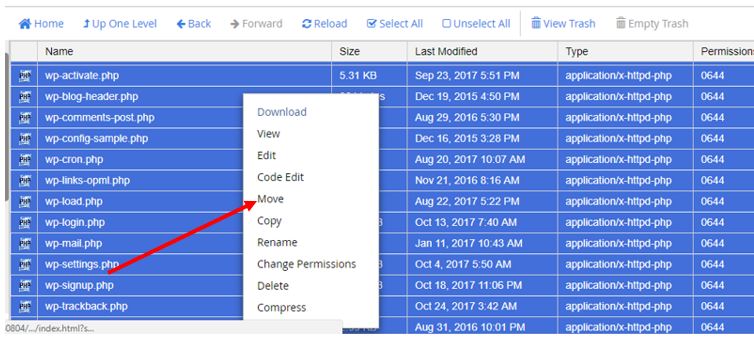
Once you click on the MOVE option; a Move window will open with a path /public_html/Wp/WordPress delete the WordPress text from the path so that we can move all files and folders to our created subdirectory. In our case it is Wp and in yours, it will show whatever name you have given to your Subdirectory.

Step 4. Create Fresh Database
1. From the CPanel of your hosting, click on the MySQL databases.

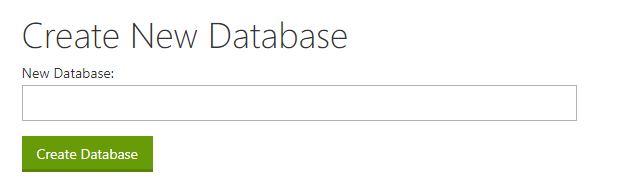
2. From the Database; under the Create New Database box type some name you want to give to your new database that going to be used for the newly created WordPress instance present in the subdirectory. After typing some names, click on the Create Database button.
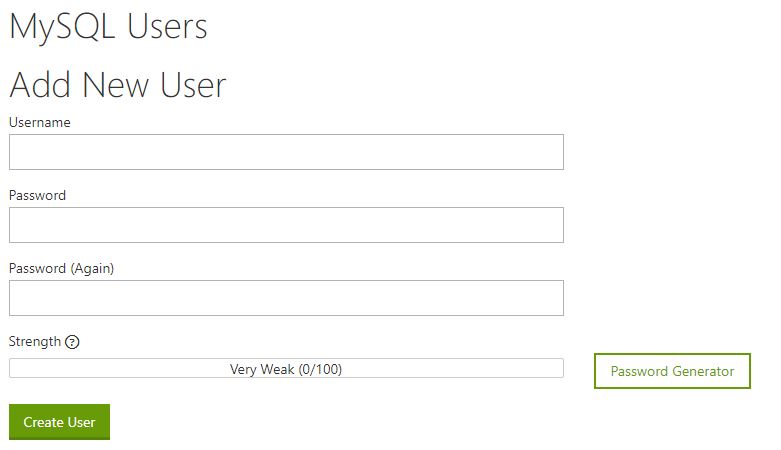
3. Now scroll down and from MySQL users create a new user by giving Username and password. To add new users click on the Create user button.
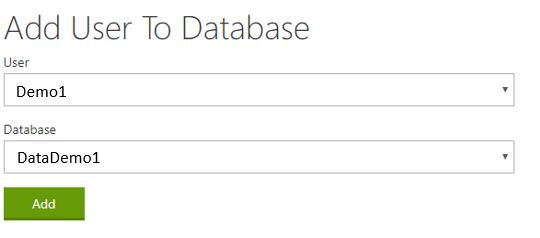
4. When you scroll down further you will see a section Add User to Database. Now click on the User drop-down box and select your newly created MySQL user and from Database select your created database and click on the Add button.
5. As soon as you click on the Add button you will get a privilege screen from where you select – The all privileges checkbox and then click on the Make Changes button.
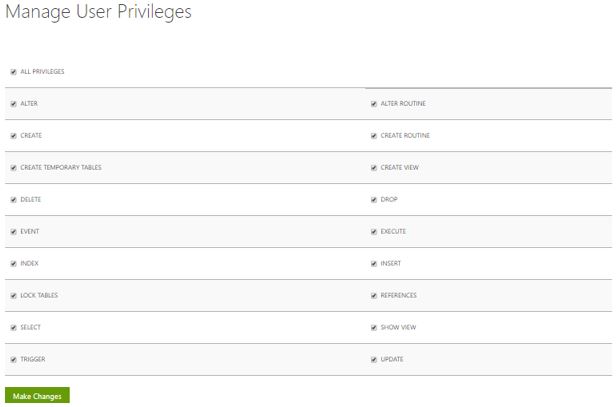
In this way, you will assign the user to your database with all permissions.
Step 5. Install WordPress in Subdirectory
If you have done everything as mentioned above then the task left is the installation of WordPress. Just open a new tab in the browser and type the URL of your new website, i.e http://example.com/your-subdirectory-name/
As you enter the URL of your new website it will bring a WordPress installation wizard screen.
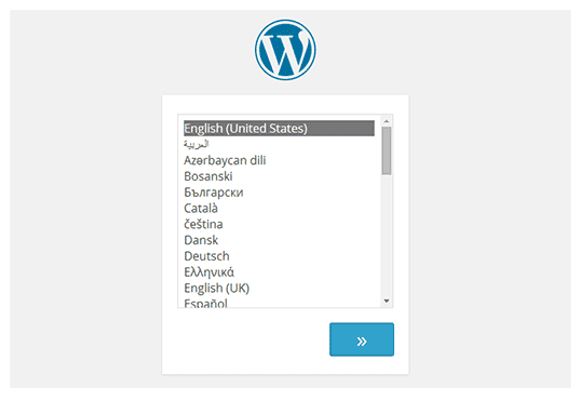
From the first screen of the WordPress installation select the language.
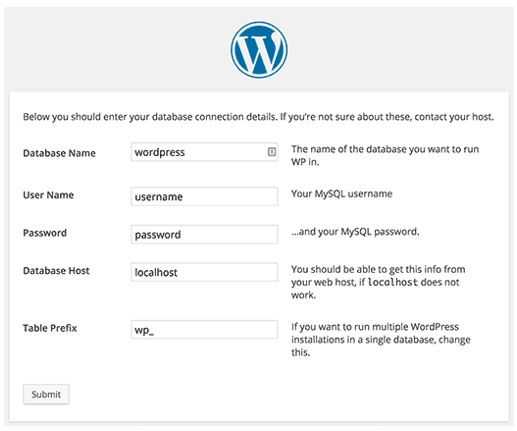
After selecting the language, on the second screen, you need to enter the database and MySQL user information you have created above in this article to connect the WordPress for storing your content. Just enter the Database Name, Username, and Password; leave the rest as it is…
Click on the Submit button.
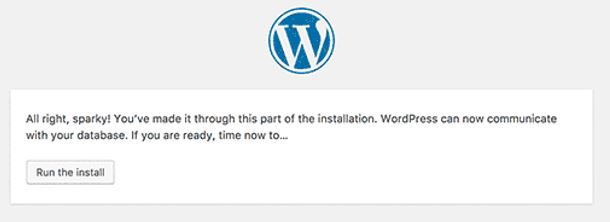
After communicating with the database successfully WordPress will give the message as mentioned in the below screenshot.
Click Run the Install…
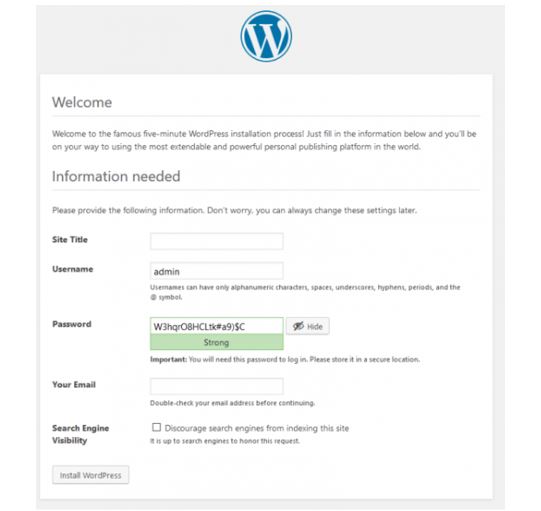
You will get the Welcome screen of WordPress. Enter the information needed for your websites such as login Site title, username, password, and email ID.
Finally, your new subdirectory-based WordPress website is ready to use, go and log in.
Fix Permalinks Problem from WordPress subdirectory .htaccess file.
In most cases, your subdirectory website and permalinks of WordPress work without any 404 error.
But in case, you are getting a WordPress subdirectory 404 error then you need to edit the .htaccess file present in your subdirectory.
Go to a subdirectory, select the .htaccess file, and edit it.
Copy the below-given code and replace the text ” your Subdirectory name” with your subdirectory… For example, if your website URL is example.com/blog then the blog is your subdirectory name.
# BEGIN WordPress
<IfModule mod_rewrite.c>
RewriteEngine On
RewriteBase /your-subdirecorty-name/ RewriteRule ^index\.php$ - [L]
RewriteCond %{REQUEST_FILENAME} !-f RewriteCond %{REQUEST_FILENAME} !-d RewriteRule . /your subdirecorty name/index.php [L]
</IfModule>
#END WordPress
After editing save the .htaccess file.
If you have any confusion or getting problems while performing this tutorial– how to install WordPress in a subdirectory please let us know… The comment box is all yours!!

after doing these changes it gets server error
Server error!
The server encountered an internal error and was unable to complete your request. Either the server is overloaded or there was an error in a CGI script.
If you think this is a server error, please contact the webmaster.
Error 500
localhost
Apache/2.4.29 (Win32) OpenSSL/1.0.2l PHP/5.6.32
Are you setting it up on the Windows local machine, if yes then please check the apache setup configuration? See whether it is working fine or not.
not working ERROR: “Table Prefix” must not be empty.
🙁
Thanks, I have installed WordPress in a subdirectory.
Thank you for the great step-by-step instruction. I have the same strategy, one in the root folder and the other one in a subdirectory. I get 404 errors for my subdirectory website pages and links. The problem is my server runs Nginx and does not have .htaccess files. I do not know how to set my Nginx website for this structure.
Are you using any Cpanel?
can we enable wp multisite for one that installed on subdolder of public_html ie: public_html/your_wp_folder
Yes, we can install WordPress in subdirecotry with multisite featur enabled.
Many thanks for such clear instruction! So far, so good!