If you are sharing some content online or with some other person, you cannot underestimate the possibility of it being misused or copied without your consent. People might start using your creation as their creation, and the most fundamental thing that you can do to prevent your creation from being copied is to use watermarks. If you are sharing some form of text, others can copy the text easily, however, if it is some official document prepared by you, or it is some photo, a watermark can prevent your creation from being copied in an unauthorized manner. If Microsoft Word is your daily driver when it comes to word processing and working with documents, the option to add watermark in also there on Microsoft Word, and anybody can use it.
You can either add a photo watermark or a text watermark depending upon your requirements. When it comes to adding watermarks, you can either add those watermarks that are already there, or you can also add your own custom watermarks, and it all depends upon your requirements. Besides talking about how you can add watermarks, I will also talk about how you can resize picture watermarks or edit picture watermarks after they added to your document for security purposes. If you know the way to add watermark to your document, it can come in handy in a number of everyday situations when you deal with different types of documents on Microsoft Word.
So, without any further delay, let’s get started with how you can add watermarks on your Microsoft Word documents.
Adding watermarks to Microsoft Word documents
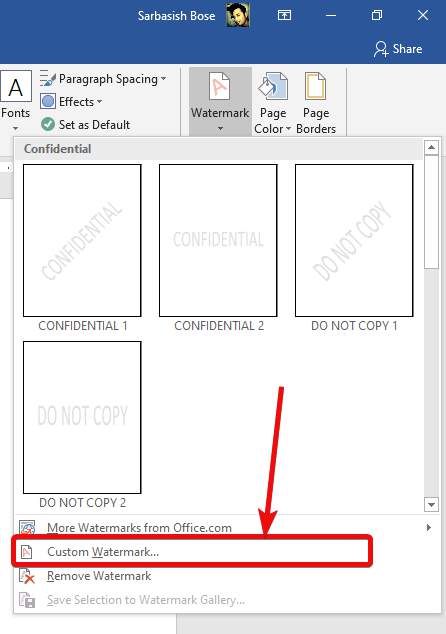
Open Microsoft Word and complete the document. You can also open an existing document where you want to add a watermark. After you have opened the document, click on the ‘Design’ tab on top, and then click on the ‘Watermark’ dropdown menu.

Now, you can add any of the existing pre-designed watermarks by simply clicking on one of them, or you can also so use one at Office.com. But as only 2 different watermarks are provided, I am here to show you how you can create your own watermark. To add a new customized watermark, click on ‘Custom Watermark…’.
Adding a picture watermark
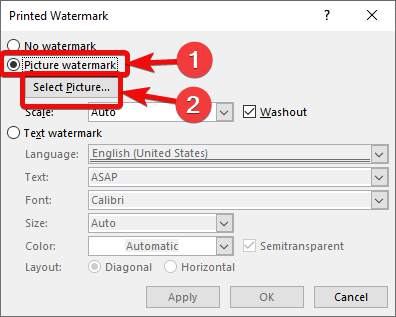
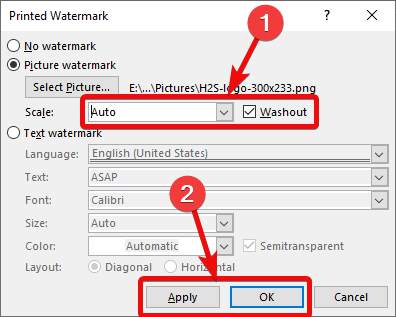
In the ‘Printed Watermark’ window that opens up, you can either select a picture watermark or you can add your own text and that will be used as a watermark. To use picture watermark, click on and select ‘Picture watermark’. Now click on the ‘Select Picture…’ button.
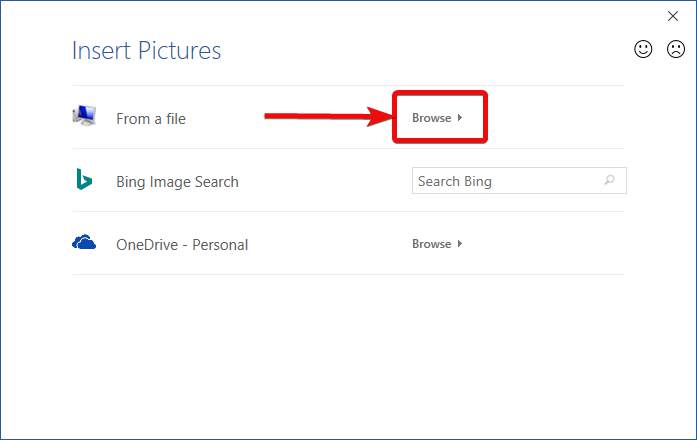
Now, the ‘Insert Picture’ window will appear. You can add an image for watermark purposes, either from the web, from OneDrive, or you can add one from your computer. Let me add a photo from the local drive. Just click on ‘Browse’ corresponding to ‘From a file’.
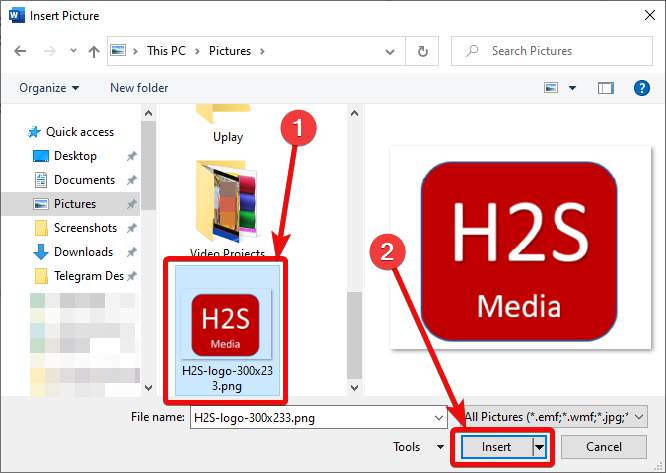
Now, select the image from the Windows Explorer window that opens up, and click on ‘Insert’.
Now, you can change the scaling from the drop-down menu, and enable or disable washout, to adjust the brightness, and finally, click on ‘Apply’, and then ‘OK’. If you enable ‘Washout’, the image will hardly be visible. So, enable or disable ‘Washout’ depending on your specific needs.
Editing the watermark
Enable the header & footer by double-clicking on the top or bottom of the document. Now, you can select the picture to edit it, and you can resize the picture, move it across the page, etc.

As the watermark will be visible in all the pages, changing the watermark on one page is going to apply the same settings across the document.
Adding a text watermark
Under several situations, you might need to add text watermarks, and you can do that, as well, using Microsoft Word.
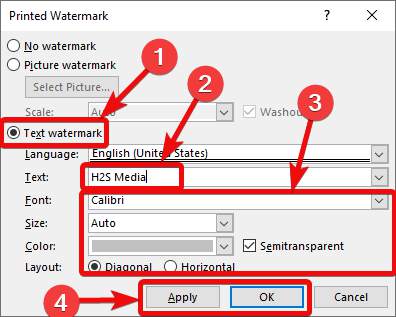
In the ‘Printed Watermark’ window, click to select ‘Text watermark’, and then enter the text, configure the font style, size, color, the layout, i.e. diagonal or horizontal, and click on ‘Apply’ followed by ‘OK’.
Now the text watermark will be immediately visible.
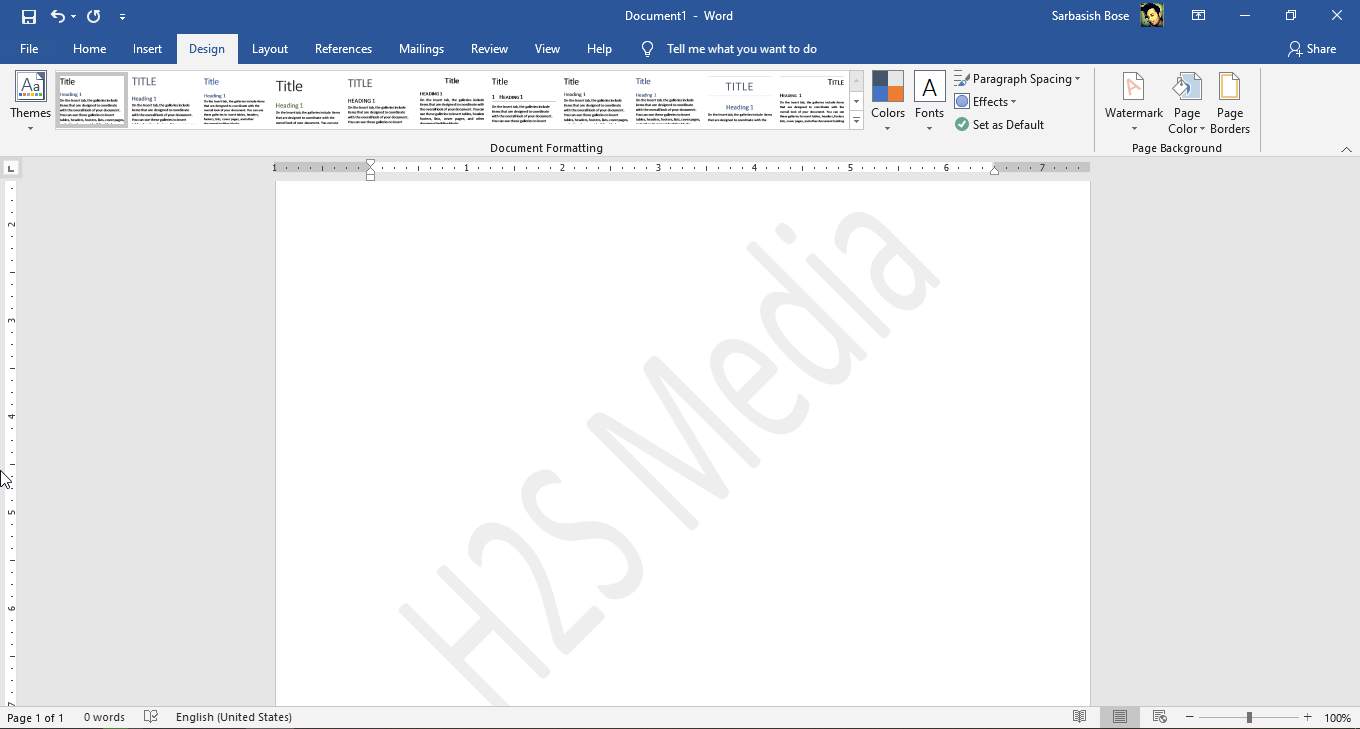
As it is a configurable text that is used as a watermark, you cannot change the watermark settings using the header & footer. What you can do is, use the ‘Custom Watermark…’ option to change the text, or configure some other settings associated with the watermark.
Removing watermark
To delete the watermark altogether, click on ‘Watermark’ under ‘Design’, and then click on ‘Remove Watermark’.

The watermark in the current document will be removed immediately, and you can proceed with the document normally.
Using watermarks is the simplest way of adding a rudimentary level of security to your document to prevent it from getting copied. But that doesn’t mean your creation can’t be copied at all. With the help of watermarks, it will be tougher for others to copy your creation, compared to if no watermarks were there.
So, that was all about how you can deal with watermarks on Microsoft Word. Do you have any questions? Feel free to comment on the same below.
Related Posts
How to create email groups in Gmail? Send one email to multiple recipients in a matter of seconds.
Getting the right dashcam for your needs. All that you need to know
How to Install 7-Zip on Windows 11 or 10 with Single Command
How to Install ASK CLI on Windows 11 or 10
How do you install FlutterFire CLI on Windows 11 or 10?
How to create QR codes on Google Sheets for URLs or any other text elements