
Sudeors is the superuser group on Debian or Linux operating system that has all administrative privileges. Whenever we install Debian or any other Linux Distro one user in Sudoers group automatically gets created by the installer i.e root. By default all the power to execute high-level commands is with root user, however, we can promote or add a standard user to Sudoers group for having the same kind of rights.
Thus, you will not be needed to log in again and again to the root user to run some security privileges command. Here in this tutorial to reduce the security risk, we will add a new regular user and assign root privileges to the same. Hence, whenever we want to use root privileges simply use sudo with that, which will temporarily increase the user’s privileges.
Steps to add a User to Sudoers group on Debian
To make the tutorial more informative for beginners first we will create a new user on Debian, however, if you already have one then simply move to the step four, where we are adding an existing user to Sudo group.
1. Create a New user on Debian
Login to your Debian server or desktop. If you are on Desktop then search and open Command Terminal application. And on the terminal screen type the following command to add a new user. Note: You must need the root user access to add or delete user on Debian.
sudo adduser h2smedia
h2smedia is a username we used in the above command. You can use whatever you want to add.
2. Assign Password to user
After running the above command, it will ask you to create a password for your newly created Debian user. After typing the password one time press the Enter button and then again type and press the Enter button, second time.
3. Enter the User information
Now, if you want to provide some information to the system about created user, here you can do it. However, just provide use Full name and press the Enter button to skip the rest of the things. When it says, are you sure the information is correct? Simply press Y and then the Enter and move to the next step.
Output
h2s@DESKTOP-9OOKS69:~$ sudo adduser h2smedia
[sudo] password for h2s:
Adding user `h2smedia' ...
Adding new group `h2smedia' (1001) ...
Adding new user `h2smedia' (1001) with group `h2smedia' ...
Creating home directory `/home/h2smedia' ...
Copying files from `/etc/skel' ...
New password:
Retype new password:
passwd: password updated successfully
Changing the user information for h2smedia
Enter the new value, or press ENTER for the default
Full Name []: How2shout
Room Number []:
Work Phone []: 971684565
Home Phone []:
Other []: demo user
Is the information correct? [Y/n] Y
h2s@DESKTOP-9OOKS69:~$

4. Add a user to Sudoers group of Debian
So, this is the step which will be the same for both new and existing user of Debian, if you want them to root user group category. Thus, follow the below command followed by Sudo and username.
sudo usermod -aG sudo h2media
Replace h2smedia with your username that’s it. You will get nothing in return on-screen after running the above command but it successfully adds the user to the sudoers group.
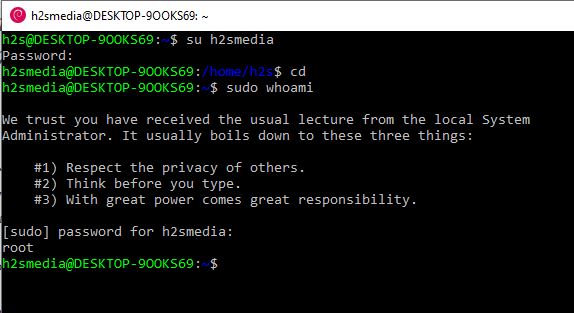
5. Switch to User to see Sudo access
In the above step, we have given a standard user the root privileges, now its time to check that. Simple run:
su username
Replace the above username with your user. For example, our username here is h2smedia, thus the command will be:
su h2smedia
It will then ask for the password for the same, enter that and then use the below command:
sudo whoami
This command output at the end shows a text: root; which means you are now a part of Sudoers group of Debian.
OutPut
h2s@DESKTOP-9OOKS69:~$ su h2smedia
Password:
h2smedia@DESKTOP-9OOKS69:/home/h2s$ cd
h2smedia@DESKTOP-9OOKS69:~$ sudo whoami

We trust you have received the usual lecture from the local System
Administrator. It usually boils down to these three things:

#1) Respect the privacy of others.
#2) Think before you type.
#3) With great power comes great responsibility.

[sudo] password for h2smedia:
root
h2smedia@DESKTOP-9OOKS69:~$
Verdict of Sudo Debian tutorial
In this way, we can create or add any user to Sudo group of Debian Linux. Now you can use your standard user to run root commands. The above steps are valid for Linux Mint and Ubuntu too.
Related Posts
How to create email groups in Gmail? Send one email to multiple recipients in a matter of seconds.
Getting the right dashcam for your needs. All that you need to know
How to Install 7-Zip on Windows 11 or 10 with Single Command
How to Install ASK CLI on Windows 11 or 10
How do you install FlutterFire CLI on Windows 11 or 10?
How to create QR codes on Google Sheets for URLs or any other text elements