Science is yet to make time travel a reality but if you are sitting in front of your computer, you can at least travel back in time if not forward. No, I am not talking about time travelling a few minutes back with the help of a computer to place your cat in the litter box so that he doesn’t do his business elsewhere. I am talking about System Restore, which is a nifty feature available on Microsoft Windows computers so that you can revert your system back to a condition when it was working just fine. We keep installing new programs, change the settings on our Windows computer, and sometimes things might go wrong and in that case, we cannot boot into or Windows computers and that is frustrating, to say the least.
System Restore is a tool that can help you exactly in this situation. Even though Microsoft automatically creates restore points each time it installs some major update or at the time of making some major changes to the system, you can also create your own restore point manually on your Windows computer. After the restore point is created you can revert your system back to the restore point quite easily. It is just a matter of a few steps and you will get back your computer working just normally. I’ll talk about how you can create a restore point and revert back to a previous restore point here in this tutorial.
So, without any further delay, let’s get started with how you can create a restore point first.
How to create a restore point on Windows 10
Step 1: Right-click on ‘This PC’ and click on ‘Properties’.

Step 2: In the ‘System’, click on ‘Change settings’ on the right side, as shown in the screenshot below.

Step 3: In the ‘System Properties’ window that opens up, click on the ‘System Protection’ tab, and click on ‘Create…’ corresponding to the restore point area as shown in the screenshot below.

Step 4: If, for any reason, the ‘Create…’, or ‘System Restore…’ options are disabled, just click on the ‘Configure…’ button.

Step 5: Now, select ‘Turn on system protection’, and click on ‘OK’.

Step 6: You can now create a restore point.
Now, assign a name to the restore point. Choose the name in a way, so that you can easily recognize it, once things go wrong, and click on ‘OK’. I am naming it ‘Test Restore Point’. The time and date will automatically be added so that it becomes easier for you at the time of choosing a restore point.

Now the process of creating restore point will begin and it might take some time before it is complete.

Step 7: After the process is completed successfully, you will get a message that will basically say, the restore point has been created successfully. Just click on ‘Close’ to exit.

Now you can exit a start working on your computer. Next time, if you want to revert your system back to a restore point, you can do that from within Windows, or you can even do the same from the system recovery if you can’t even boot into your system.
How to Restore the Windows computer back to a point
Step 1: Let’s now talk about, how you can restore your computer back to a restore point from within Windows. To do that, just go to the ‘System Properties’, where you have created the restore point, and click on ‘System Restore…’.

Now, some basic details about the system restore process will be displayed to you. One thing that you should know is that if you restore your system back to a restore point, the documents, pictures, and other personal files, which has been deleted meanwhile will not be recovered. This isn’t a file recovery operation. You can clearly see the message that says, system restore will not affect documents, pictures or other personal data.
Step 2: Just click on ‘Next’ to begin.

Step 3: Your system will start searching for the restore points and you can find the restore point created by me, which comes with the name ‘Test Restore Point‘. You can additionally find other restore points created automatically by your system and they will come with the type ‘Automatic’ instead of ‘Manual’ in this case. Just select the restore point and click on ‘Next’.

Step 4: Click on ‘Finish’ to start the operation.

Step 5: You will get a final warning that basically says, you cannot stop the operation when it is being carried out. Just click on ‘Yes’.

Step 6: You will get the following screen, as long as the system restore operation is going on.

Next time, when you boot into Windows, you will find the following message that will say, the process has been successfully completed without affecting any of the existing document. Just click on ‘Close’ and start using your computer normally.

If you can’t boot into Windows for any reason, and you automatically boot into recovery, click on ‘Troubleshoot’ in the following screen that appears. To get the following screen, you can also use the ‘Shift + Restart’ key combination.

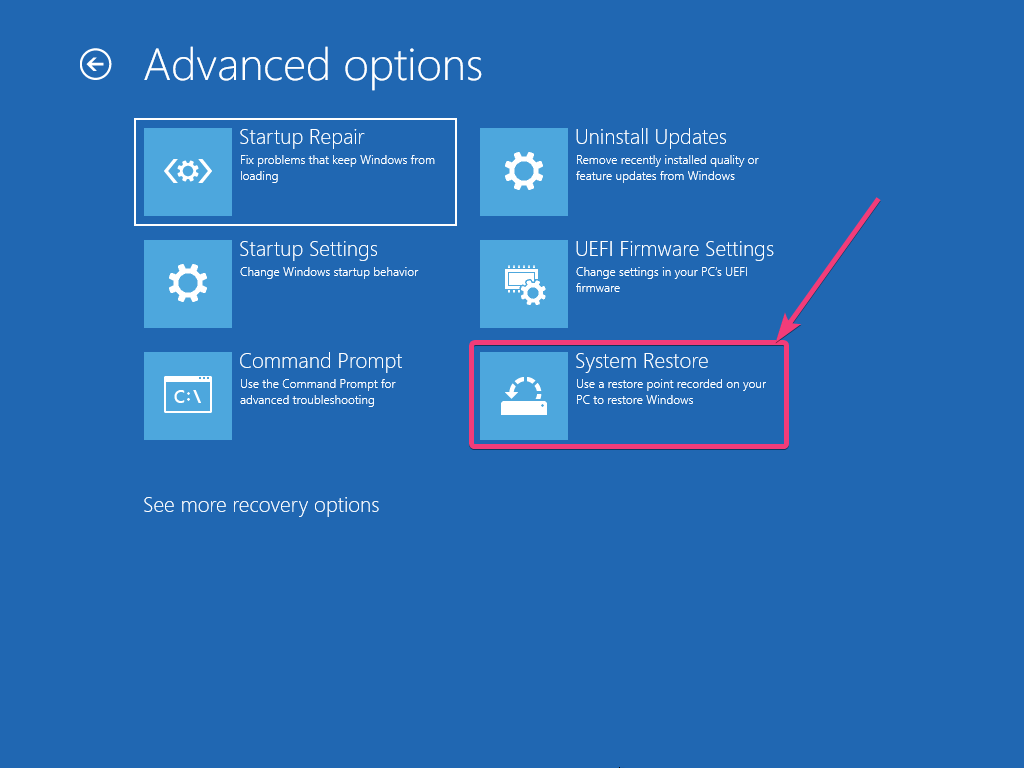
Now, click on ‘Advanced options’.

Next click on ‘System Restore’.
After this, the process is going to be similar to creating a restore point, when you are doing that from within Windows. After the operation is completed, you can keep using your Windows computer normally.
If the problem isn’t fixed even after restoring your system back to a restore point, there might be serious problems with the computer and the best thing that you can do right now is used a system rescue disk if it has been created earlier.
If you still can’t do that, I recommend you to backup all your important files, if possible and then reinstall Windows. If your Windows installation is corrupted and you cannot boot into Windows or do anything at all, the best thing that you can do to recover all your files by booting into your computer using some live operating systems like Ubuntu or any other system rescue programs.
Alternatively, you can also connect your hard drive or SSD to a different computer, and hence copy all your files on that computer. This is also an option for most users.
So that was all about how you can create a restore point on your Windows computer and restore your computer back to a restore point at any point in time. Do you still have any questions in mind? Feel free to comment on the same below.
Related Posts
How to create email groups in Gmail? Send one email to multiple recipients in a matter of seconds.
Getting the right dashcam for your needs. All that you need to know
How to Install 7-Zip on Windows 11 or 10 with Single Command
Install Google Earth on Windows 11 or 10 Using a Single Command
How to install Gaming Services on Windows 11
How to Install Telnet Client on Windows 11 Using PowerShell