You might have invested a lot in purchasing your new computer with the latest processor and graphics card, along with a keyboard and mouse, with fancy RGB lighting and high fidelity stereo sound, but there is something that you are forgotten for your computer. I am talking about the microphone. A microphone is a useful gadget nowadays in the world of technology and if you are into gaming, obviously in playing multiplayer games, you will have to communicate with your team, and communicating with them through voice is the best thing that you can do, as your teammates can take actions pretty quickly by listening to you, and it is much better than sending text messages within games.
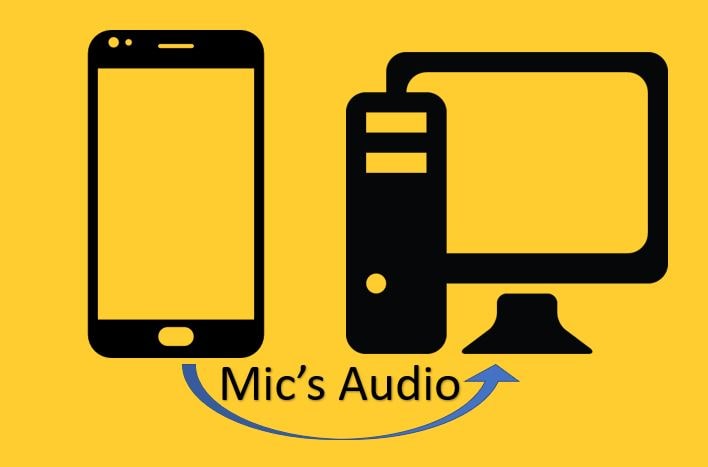
But, if you are not getting the best budget microphone, and you can’t invest a lot for a new microphone, right now, you can use your smartphone’s microphone as a microphone for your PC. Yes, this is possible as long as you are having a smartphone and you can maintain communication between your smartphone and your computer through Wi-Fi, Wi-Fi hotspot Bluetooth or USB using a data cable. You can choose any of the connectivity options that are suitable for you, and, once you are connected, you can use your smartphone’s microphone as an audio source for your computer or laptop. As most laptops come with internal microphones, this tutorial is mostly going to cater to the needs of most PC users and some laptop users, just in case.
So, without any further delay, let’s get started with how you can use your smartphone’s microphone as an audio source for your PC.
Using the smartphone’s microphone as an audio source for computer
Step 1: Open the Google Play Store and download the WO Mic app on your smartphone.

Step 2: Next, download WO Mic Client and the Virtual Device Driver for your PC Running Windows from the given links.

Step 3: Open the WO Mic app on your Android device, and tap on the ‘Settings’ cog icon to make some necessary changes, only for the first time.

Step 4: Now, tap on ‘Transport’, and hence tap on ‘Wi-Fi’.
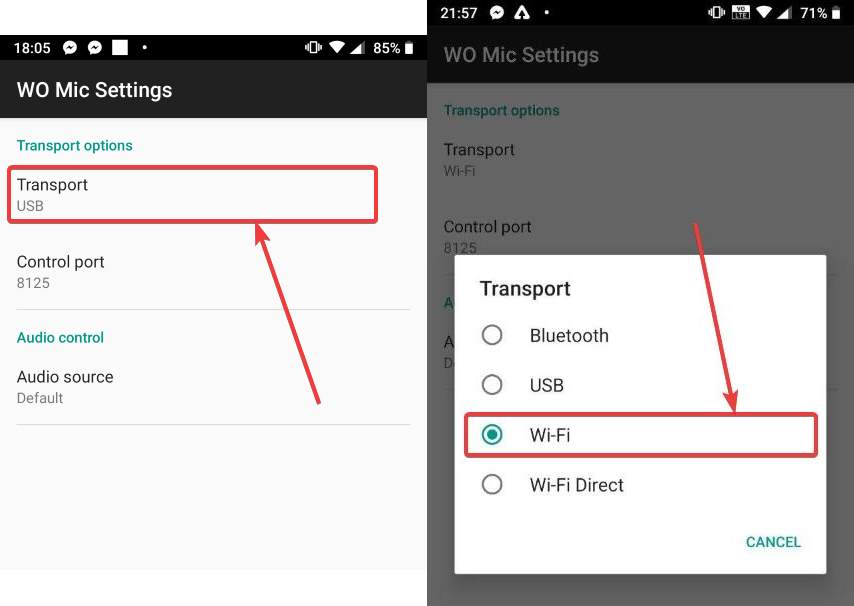
Step 5: You can change the ‘Control port’ as well if the default port is in use. You can keep the ‘Audio source’ to ‘Default’.

Step 6: Next, tap on the play button, and after that, the app will ask for permission to record audio. Just allow the connection. The local IP address of your phone on your home network will now be displayed to you. Just note it down.

Step 7: Now, install the WO Mic client and the WO Mic Virtual Device Driver, which you have downloaded on your PC. The installation steps are simple. Just proceed with the default settings for the installation.
After the installation of both the programs is complete, you should find the shortcut to WO Mic Client on your desktop. Just double-click on the icon to open it.

Step 8: You will get the following interface, where you will have to click on ‘Connect…’, under ‘Connection’.

Step 9: Choose the type of connection you have chosen, which is Wi-Fi for me, and is the going to be the most convenient option for most users, enter the IP address that you have noted down, in the text box corresponding to ‘Server IP address:’, and click on ‘OK’.
*One thing that you should note while connecting using Wi-Fi is that it is not necessary that your computer should have a Wi-Fi radio. Even if your computer is connected to your home network through an Ethernet cable, and your smartphone is connected to the same network using Wi-Fi, the Wi-Fi connection mode should work like a charm. By Wi-Fi, the developers mean both your computer as well as the smartphone should be on the same network for the connection to take place. However, if you are using the ‘Wi-Fi Direct’ connection mode, your computer will actually require a Wi-Fi radio to use WO Mic.

Step 10: Now the connection is established, and everything that you say in front of your smartphone will be sent to your PC. Depending upon which program you are using to record the speech, you can either record the audio coming from your smartphone all you can even play the same on your speakers.
You can click on ‘Play in speaker’ under ‘Options’, and that will play Everything speaks in front of your smartphone on the default audio output connected to your PC.

Step 11: To stop the connection, open the WO Mic app again on your Android device, and tap on the ‘Stop’ button to disconnect your PC from the Android device, and stop sending audio from your smartphone to the PC altogether.

Step 12: When you are setting up WO Mic on your computer, WO Mic Microphone Will be assigned as a new audio input source on your computer, and you can find that in your sound settings come as shown in the screenshot below.

It means, if you purchase a new microphone, later on, or is using multiple microphones, you can easily switch between the microphones, whenever you need to do that.
So, that was all about how you can use your smartphone’s microphone as an audio input source for your computer. This works like a charm and even if you come across other ways to do the same thing, the following tutorial will work the best for you come as it is hassle-free, and you can get a number of different connection modes as per your requirements. Do you have any questions? Feel free to comment on the same below.
Related Posts
How to create email groups in Gmail? Send one email to multiple recipients in a matter of seconds.
Getting the right dashcam for your needs. All that you need to know
How to Install 7-Zip on Windows 11 or 10 with Single Command
Install Google Earth on Windows 11 or 10 Using a Single Command
How to install Gaming Services on Windows 11
How to Install Telnet Client on Windows 11 Using PowerShell