Are you facing a problem in updating Windows 10 via a graphical user interface? Yes, then try the command line force update method to download and install them.
As we know on Windows 10, we can opt for slow and fast rings build that let the Windows insiders get the latest updates even before they went to public. However, because of a few betas and frequently issuing of updates by Microsoft, sometimes users may face some problems in updating Windows 10 using the traditions method from the Check for Update Settings.
I am saying this because recently my Windows 10 PC got some updates and every time it asked me to restart the laptop to install updates but it couldn’t. Thus, in such case, we can use the Command line to force the Windows 10 system to download and install the latest updates manually using Powershell or Command Prompt. I recommend the Powershell.
Force Windows 10 to Update using PSwindowsupdate Command-line
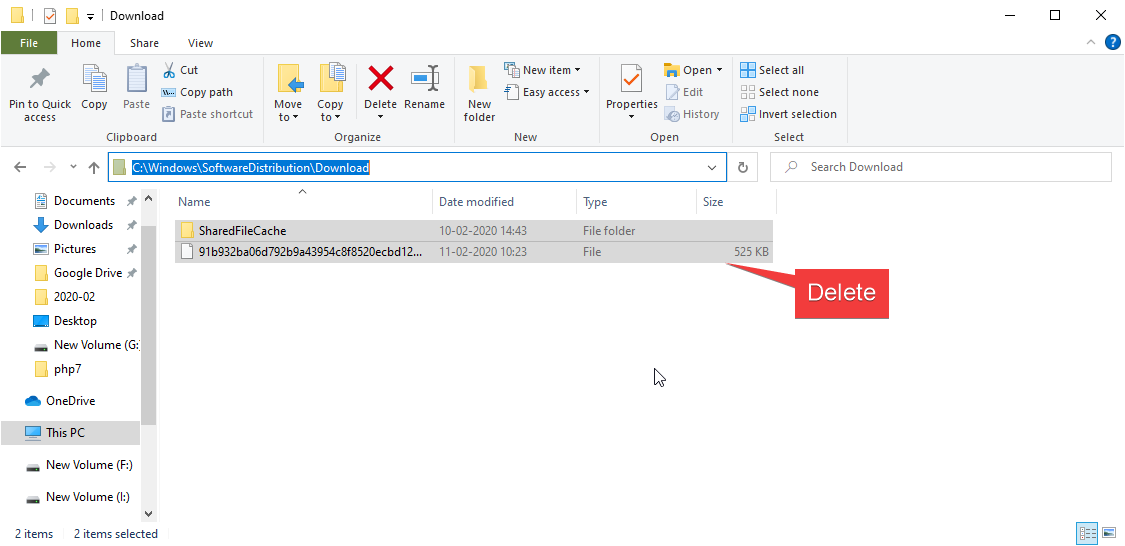
Tip: Before going further to follow the given steps I would like to recommend you: Go to your Windows 10 installation drive which is generally the C: drive, there click on the Windows folder and open the SoftwareDistribution inside that open Download and delete all files resides in it.
Windows 10 force update using PowerShell
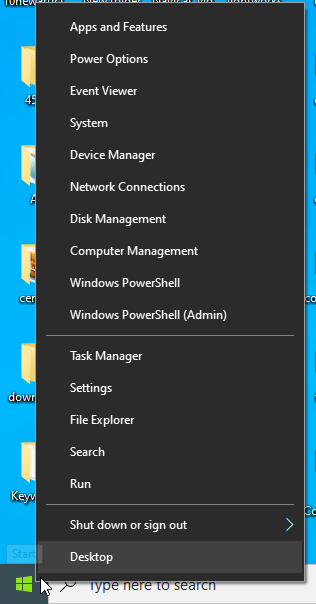
- Power shell is the native and advanced command-line tool of Windows platform. Just right click on the Windows 10 start button and select Windows Powershell (Admin).
- In the Powershell first, to install the Windows Update Module, for that use the command:
Install-Module PSWindowsUpdate
The output for the above command:
NuGet provider is required to continue

PowerShellGet requires NuGet provider version 'x.x.x" or newe to interact with NuGet-based repositories. The NuGet provider must be available in "C:\Program files\PackageManagement\ProviderAssemblies' or C:'Users\Trm\AppData\localPackahemanagement\ProviderAssemblies'. You can also install the NuGet provider by running install-PackageProvider - Name BuGet -MinimumVersion x.x.x -force'. DO you want PowershellGet to install and import the NuGet provider now?

[Y] Yes [N} No [S] Suspend [?] Help (default is "Y"): Y

Trusted repository

You install the modules from an untrusted repository. If you trust this repository, change its installation policy value by running the Set PSRespository cmdlet. Are you sure you want to install the modules from PSGalery'?

[Y] Yes [A] Yess to All [N] No [L] No to All [S] Suspend [?] Help (default is "N"): Y
- Check the latest available updates for Windows 10 using the command:
Get-Windowsupdate
If you receive an error:
PS C:\WINDOWS\system32> Get-WindowsUpdate

Get-WindowsUpdate : The 'Get-WindowsUpdate' command was found in the module 'PSWindowsUpdate', but the module could

not be loaded. For more information, run 'Import-Module PSWindowsUpdate'.

At line:1 char:2

+ Get-WindowsUpdate

+ ~~~~~~~~~~~~~~~~~

+ CategoryInfo : ObjectNotFound: (Get-WindowsUpdate:String) [], CommandNotFoundException

+ FullyQualifiedErrorId : CouldNotAutoloadMatchingModule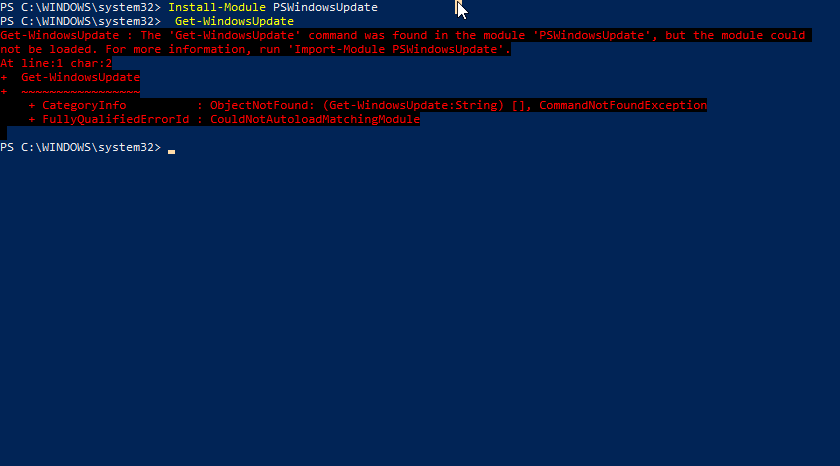
Powershell Script running error
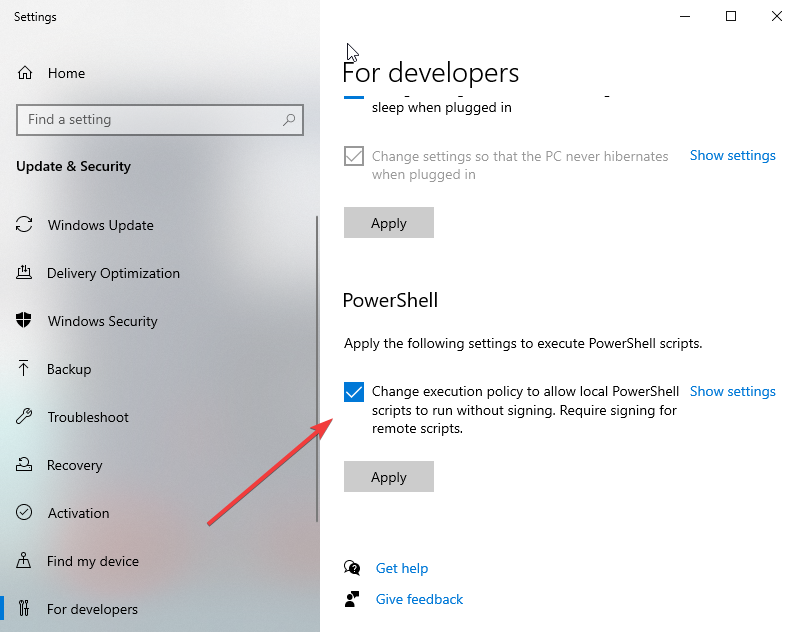
- To solve it, on Windows 10 search bar simply type Script and an option “Allow local PowerShell scripts to run without signing” will appear, click on the open.
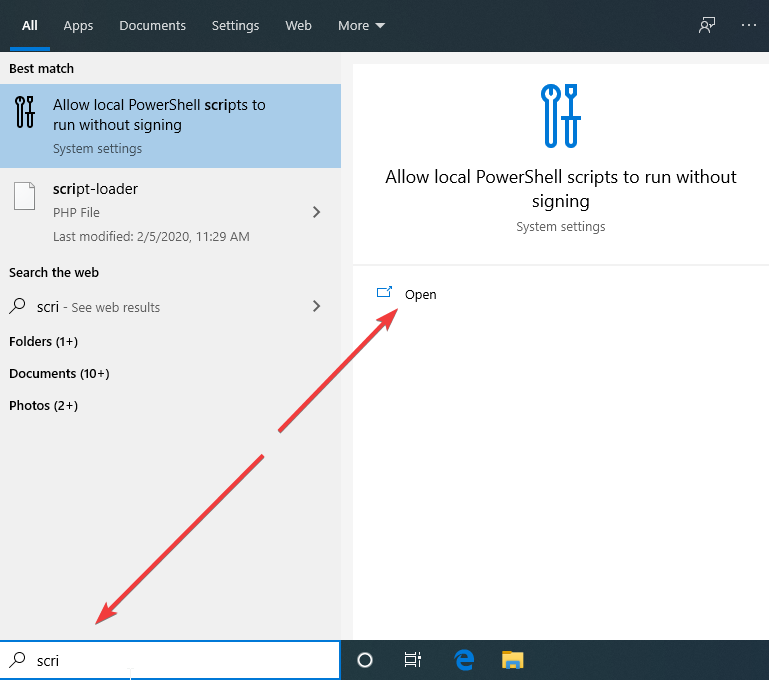
Allow Powershell local script running without signing This will drop you in the For Developers section of Windows 10. Select the PowerShell option Apply the following settings to execute PowerShell Scripts. “Change execution policy to allow local PowerShell scripts to run without signing. Require signing for remote scripts.“And click on the Apply button.
allow local scripts on Powershell windows 10 Now close the PowerShell and run again as admin. After that use the command:
Get-Windowsupdate
- Finally, type the Powershell script command to install windows updates and then reboot. It will allow the Windows to connect, downloading and installing of the updates-
Install-WindowsUpdate
The command will first ask your permission and perform the force update. Once it finishes, the PowerShell will prompt to reboot the Windows 10 system for proper installation of updates.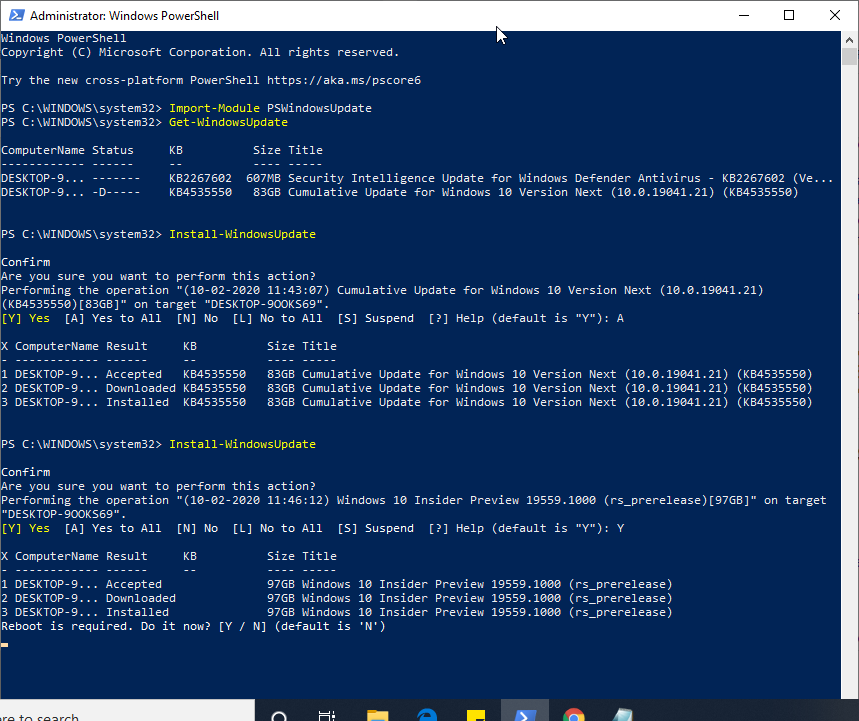
Force Update Windows 10 using the command line
Apart from the PowerShell method, one can also go for the Command Prompt, for that simply run it as Administrator on Windows 10.
To check and get the updates – UsoClient StartDownload and to install the same the command will be UsoClient StartInstall.
A single command for all three tasks is UsoClient ScanInstallWait
Once done restart the device for implementing the updates – UsoClient RestartDevice
Other Articles:
Related Posts
How to create email groups in Gmail? Send one email to multiple recipients in a matter of seconds.
Getting the right dashcam for your needs. All that you need to know
How to Install 7-Zip on Windows 11 or 10 with Single Command
Install Google Earth on Windows 11 or 10 Using a Single Command
How to install Gaming Services on Windows 11
How to Install Telnet Client on Windows 11 Using PowerShell