
What is WinAuth?
WinAuth is an open-source Windows Authenticator supporting Google Authenticator and portable in nature. Basically, it is a verification tool that supports account services such as Google, Microsoft, Battle.Net, and Steam to improve the efficiency of secondary verification. WinAuth can be used with Bitcoin trading websites.
Two-factor authentication is the best thing that you can do in order to safeguard your account if security and privacy really matter to you. But, in most cases, two-factor authentication requires depending on a 3rd party system, typically SMS, to get the one-time password or key, necessary for the purpose of authentication. So, you might face problems logging into your account, if you are at a place with no mobile network, or in the better case, your login process might get delayed, if there are some problems with your mobile network. Using an offline token generator can however be the best alternative.
If you are tech-savvy, you might already know about offline token generators like Google authenticator, Microsoft Authenticator or any other app, but the only catch is, you have to use the offline token generator apps on your mobile devices. But there is a way out if you want to use a token generator for all your login purposes right on your PC with WinAuth. So you will no longer need your smartphone next time you try logging into your account. But I will recommend you to set up the token generator both on your mobile device and computer so that at least one can come in handy at the time of logging in, the next time.
The accounts supported by WinAuth include:
- Google Authenticator
- Microsoft account
- Battle.Net
- Guild Wars 2
- Glyph / Trion
- Steam
- Okta Verify
Advantages of WinAuth
- A validator that supports multiple apps and games
- A validator that can manage multiple accounts of the same game at the same time
- Support for verification and recovery of the validator
- Support for verifier information encryption
- Support boot automatically start
- Copy the verification code manually or using a shortcut
So without any further delay let’s get started with, how you can set up a token generator on your windows computer.
Step 1: Download WinAuth- Microsoft Windows Authenticator
Download WinAuth Stable version on your Windows computer from Github. You can even use the beta version, but I will not recommend that.
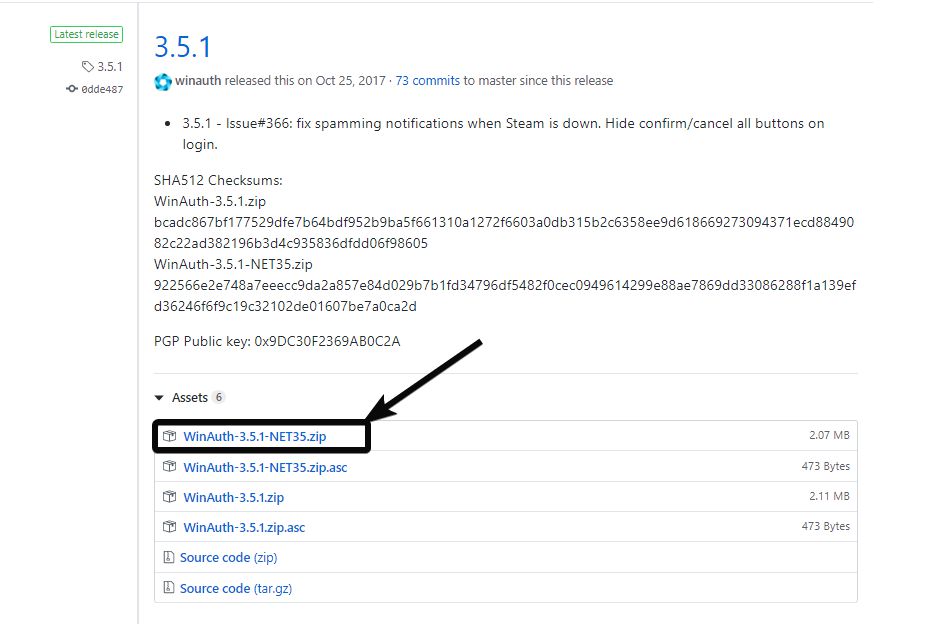
Step 2: Extract WinAuth Zip file
Once the download is complete, open the downloaded archive file. There will be a single file with the name ‘WinAuth.exe’. Just extract it to the desired location, before opening.
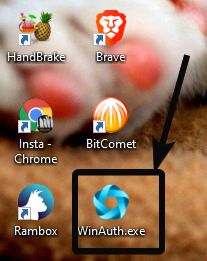
Step 3: Run WindAuth.exe
Now open WinAuth from the location where you have extracted it, simply by double-clicking on it, just like opening any other Windows program.
Step 4: Use WinAuth to link with Google Authenticator
Keep it open, and go to the link to set up two-factor authentication for your favourite online service. As the link to set up two-factor authentication is different for all the services, I am setting up two-factor authentication for Google in this tutorial. Just follow this link to directly visit the page to set up two-factor authentication. Alternatively, you can even reach there manually.
Scroll down unless you find ‘Authenticator app’, and click on ‘Set up’ corresponding to that.
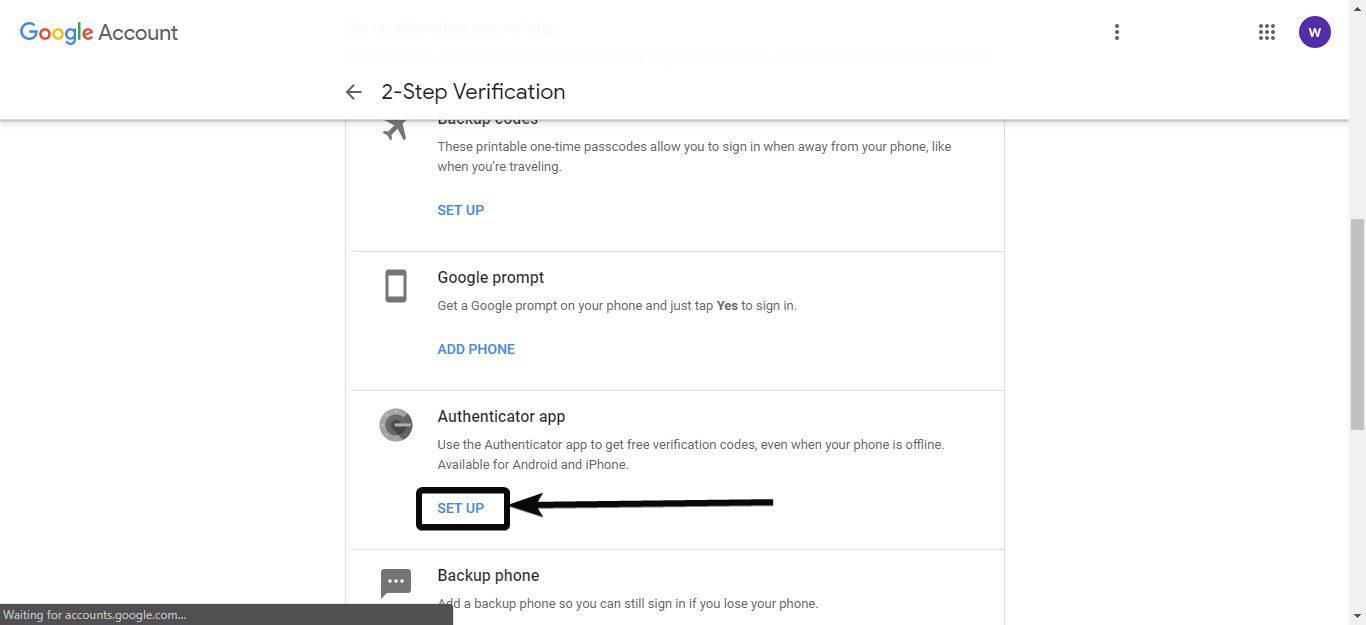
Now click on ‘Android’, and click on ‘Next’.

Step 5: Google Authenticator code
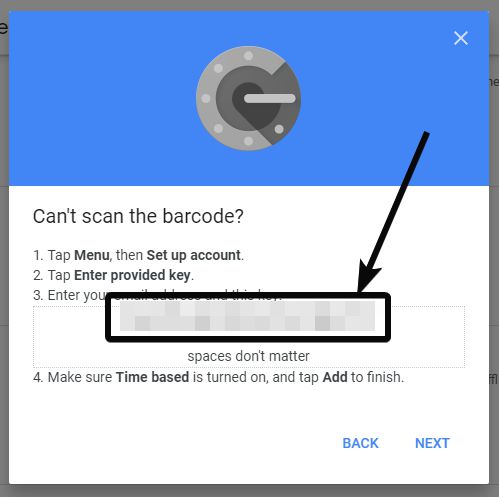
A QR code will be shown to you, and if you aren’t having a special app to scan or process QR codes, like ShareX, you cannot do that on your Windows computer. So now, just scan it with your Android authenticator app like Google Authenticator, Microsoft Authenticator or 2FAS, which you can learn more about here (how to use Google Authenticator app), and then click on the option that says ‘Can’t scan it?’
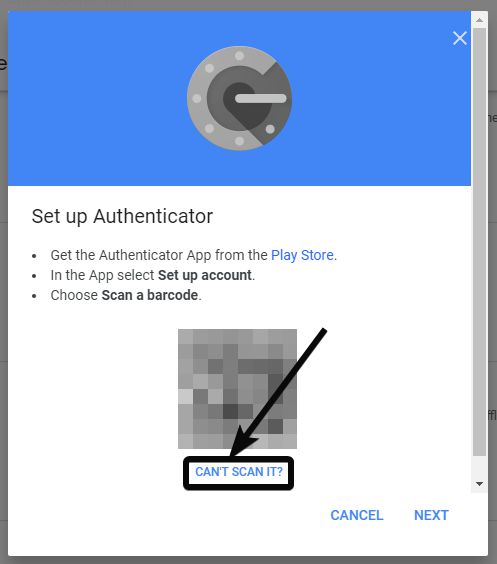
Now the code will be displayed to you. Just copy it and get back to the WinAuth program on your Windows computer.
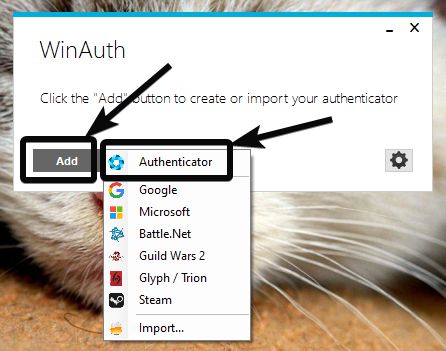
Click on ‘Add’ in the WinAuth program, and then click on ‘Authenticator’ or ‘Google’. I am choosing ‘Authenticator’ here.
*Authenticator is the general option, which can help you with setting up two-step authentication for all online services that support it, while Google and the others in the list are optimized only for the specific services.
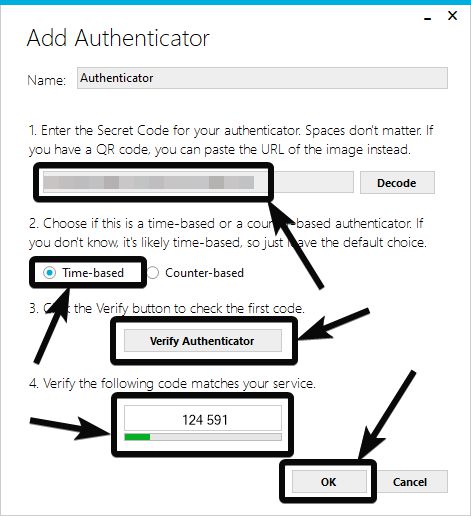
Step 6: Assign a name for the authenticator
Now assign a name for the authenticator, and enter the code or alternatively the link of the QR code, in the box shown below. Select ‘Time-based’, which should, however, be selected by default. Finally, click on ‘Verify Authenticator’.
Now the time-based code will be shown to you. Click on ‘OK’ now.
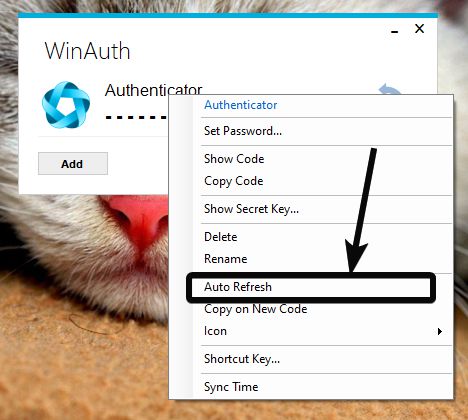
Now the Authenticator code will be shown to you, and it will refresh every 30 seconds, as usual.

To make things more convenient, just right click on the code in WinAuth, and turn on ‘Auto Refresh’.
Now you can simply exit the program, and carry on with the process of setting Authenticator up, by entering the code on your browser. You can again open WinAuth next time you want to login.
With WinAuth you can export the keys to later import them if the program or your computer crashes for any reason. You can even protect WithAuth with a password or configure it to open with Windows startup. Thus, there are a number of additional options, which you can choose.
Having an authenticator app on your Windows computer will surely be helpful in some way or the other. Do you have any questions in mind about the complete process? Feel free to comment on the same down below.


How do i make this a physical authenticator by installing it onto a flash drive after ive set everything up and its working properly?
Instead of extracting WinAuth.ZIP on PC, do that on the USB or Pen Drive which you want to carry with you. Thus, all the files that WinAuth needed will created on that particular USB Drive you want to use as Physical Authenticator.
hI!
Amazing article, thanks.
I have an issue.
i followed this article and installed WinAuth so I can use it “Two-factor authentication” in my KRAKEN account. I think I did every thing right, since it worked.
Some hours later I have tried to login in again in my kraken account and the code wouldn’t work. Please tell me if am doing something wrong. There were my steps:
Step 1- log in in kraken account
Step 2- I am being asked “Two-factor authentication – Enter the one-time code found in your authenticator app to sign in to Kraken.”. SO NOW, I open my WinAuth and see the code.
Step 3 – I enter the code in kraken.
The result is always the same: “Invalid sign-in” !
What am I doing wrong? Can you please help me?
same as above
Hello, my winauth crashes and I have no backup. How do I go about it?