Nginx is an Apache alternative web server in the open source category to support several internet protocols such as HTTP (S), IMAP, and POP3. It can also be used as a reverse proxy with WebSocket support. The server offers a gunzip module, whereby compressed web pages can be unpacked before being sent to the browser.
Here we will learn the process of installing Linux+Nginx+PHP+MySQL stack on Windows 10 Subsystem for Linux using Ubuntu 20.04 LTS WSL distro…
Steps to install LEMP server on Ubuntu 20.04 LTS WSL
Enable WSL on your Windows 10
I am assuming that you already have enabled WSL 1 or WSl 2 on your Windows 10 system, If not then go to the search box and type “Turn Windows feature on or off” after that select Windows Subsystem for Linux to enable it. For more information related to it, you can see our tutorial: how to install WSL on Windows.
Install Ubuntu 20.04 LTS WSL distro
Previously, the long term versions of the Ubuntu available as WSL app on Microsoft store were 18.04 and 16.04 but now the Ubuntu 20.04 LTS focal fossa is the latest one, thus the same can be downloaded from the MS- App store. Here is the link.
Run Update and Upgrade commands
After the installation of the Ubuntu 20.04 and setting up the user name and password run the below-given system update and upgrade commands. This will make sure all the system available packages on this Linux are up to date and in their latest state.
sudo apt update
sudo apt upgrade
Install PHP on WSL
First let’s check which version of PHP is currently available on the Ubuntu 20.04 LTS to install, for that use the below command:
sudo apt-cache show php
Now according to your PHP version, use the below command. Note: replace the 7.4 with the version number available for your system.
sudo apt-get install php7.4-cli php7.4-fpm php7.4-curl php7.4-gd php7.4-mysql php7.4-mbstring zip unzip
Install Nginx web server on Ubuntu 20.04 Windows 10
Just like Apache, the Nginx is also available to install in the default repository of Ubuntu, therefore no need to add any third-party repo. Just use the APT package manager to download and install it on your system.
sudo apt install nginx
Start Nginx services
By default, the Nginx web server service will not be activated and we have to do that manually using the command. Thus run
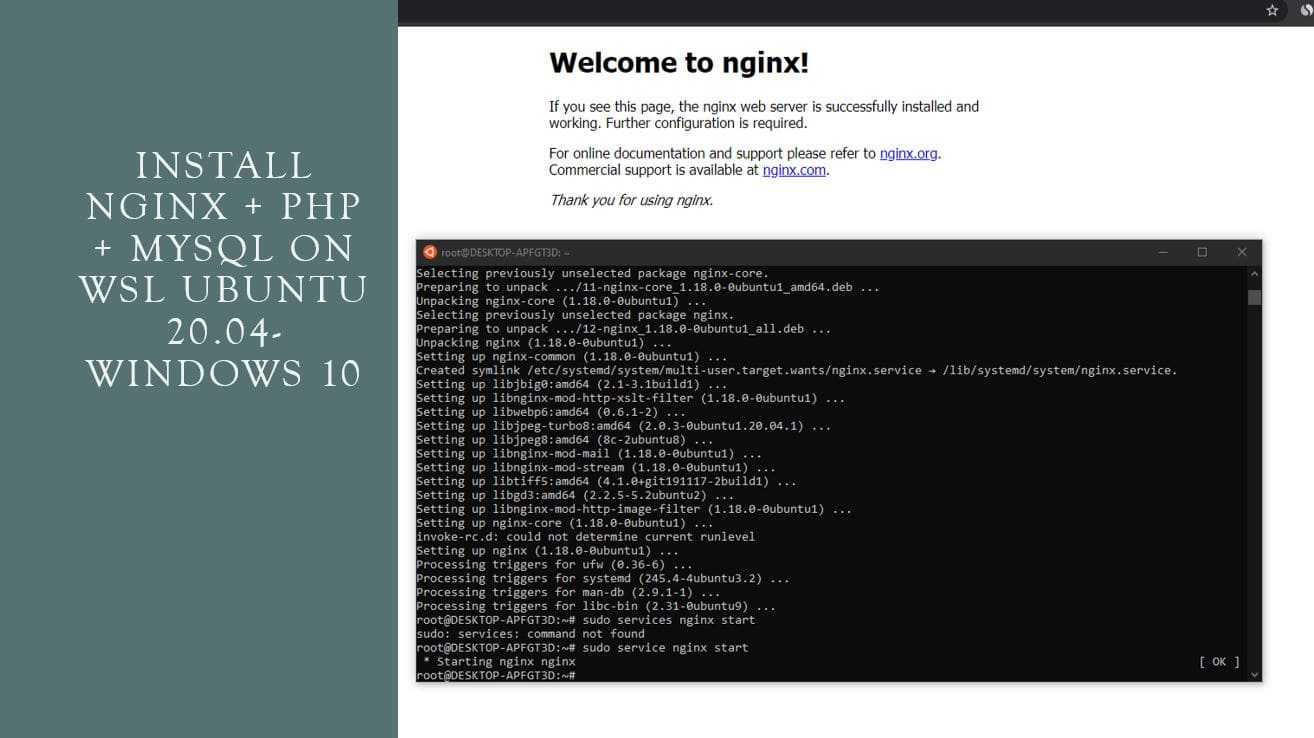
sudo service nginx start
When Windows Firewall asks you to allow the webserver services to access through the public network, allow it.
Check the status
sudo service nginx status
Optional: Commands to stop and restart the Nginx web server services
sudo service nginx restart
sudo service nginx stop
Access Nginx through the browser
Open your system browser and type http://127.0.0.1 or http://localhost or http://your-system-ipaddress
Start PHP-fpm service
Start PHP-fpm to start with Nginx:
sudo service php7.4-fpm start
Configure PHP-fpm for Nginx on Windows 10 WSL
Open the php-fpm configuration file
sudo nano /etc/php/7.4/fpm/pool.d/www.conf
In the file find the PHP-fpm listening socket path:
listen = 127.0.0.1:9000
Change that to
listen= /var/run/php/php7.4-fpm.sock
If you are using some other version of PHP then replace the php7.4 with that version or manually navigate to the path to check the FPM socket file.
Now, open Nginx Default site configuration
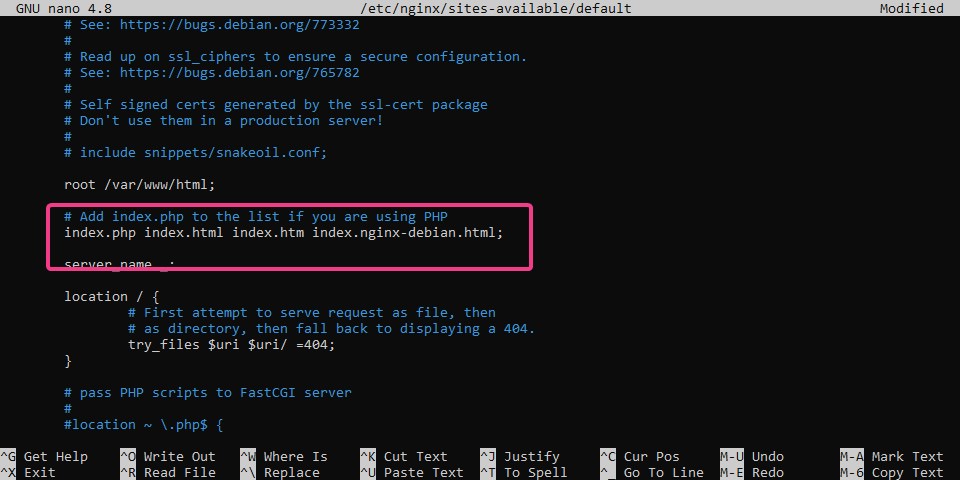
sudo nano /etc/nginx/sites-available/default
In the default site configuration, to use PHP with Nginx, first, we have to add index.php in that…
Find the below line and add index.php to the list.
index index.html index.htm index.nginx-debian.html;
# For example:
index.php index.html index.htm index.nginx-debian.html;
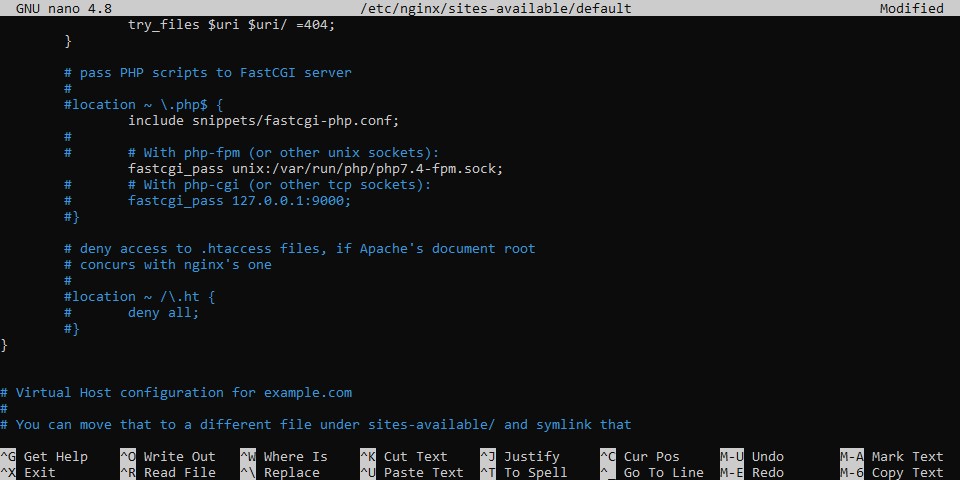
Now find the below lines and do editing as mentioned below:
#location ~ \.php$ {
# include snippets/fastcgi-php.conf;
#
# # With php-fpm (or other unix sockets):
# fastcgi_pass unix:/var/run/php/php7.4-fpm.sock;
# # With php-cgi (or other tcp sockets):
# fastcgi_pass 127.0.0.1:9000;
#}
Remove the # or uncomment the following lines which we have done here…
location ~ \.php$
{
include snippets/fastcgi-php.conf;
#
# # With php-fpm (or other unix sockets):
fastcgi_pass unix: /var/run/php/php7.4-fpm.sock;
# # With php-cgi (or other tcp sockets):
# fastcgi_pass 127.0.0.1:9000;
}
After all the changes press CTRL+X and type Y and then press the Enter button to save the changes.
Restart Nginx and PHP-FPM services
sudo service nginx reload
sudo service php7.4-fpm restart
Step 9: Create a test PHP file
Create an index.php file
sudo touch /var/www/html/index.php
Open it:
sudo nano /var/www/html/index.php
And add the following lines in that ]
<?php
phpinfo();
Again press CTRL+X and type Y then press the enter button to save it.
Now, open the browser and type http://localhost
Note: The root directory to save your project, so that you can call it using Nginx in the browser is just like Apache, i.e /var/www/
Finally, Install MySQL Server
The officially available version of MySQL version to install on Ubuntu 20.04 WSL is MySQL 8.0.
sudo apt install mysql-server
sudo service mysql start


Related Posts
How to create email groups in Gmail? Send one email to multiple recipients in a matter of seconds.
Getting the right dashcam for your needs. All that you need to know
How to Install 7-Zip on Windows 11 or 10 with Single Command
How to Install ASK CLI on Windows 11 or 10
How do you install FlutterFire CLI on Windows 11 or 10?
How to create QR codes on Google Sheets for URLs or any other text elements